This app is available on the
App Store for iPhone and iPad

Download EventCode+ from the App Store

This app is available on the
Mac App Store for macOS

Download EventCode+ from the Mac App Store

BareCode X Pro QR Code Scanner – Try the free version of this app for iPhone and iPad!

BareCode X Pro QR Code Scanner – Try the free version of this app for <strong>iPhone and iPad</strong>! Download BareCode X Pro from the App Store

BareCode X Pro M Code Scanner – Barcode Scanner for macOS

BareCode X Pro M Code Scanner – Barcode Scanner for <strong>macOS</strong> Download BareCode X Pro from the Mac App Store

Feature Overview

The best ticketing app for easy creation of your own tickets as well as electronic check-in, attendance check and validation at the entrance on the day of the event – directly with your smartphone & tablet device (Apple iPhone, iPad, iPod) and on your Mac.

Design, print and validate your own digital tickets with the mobile EventCode+ XQ Ticket System!

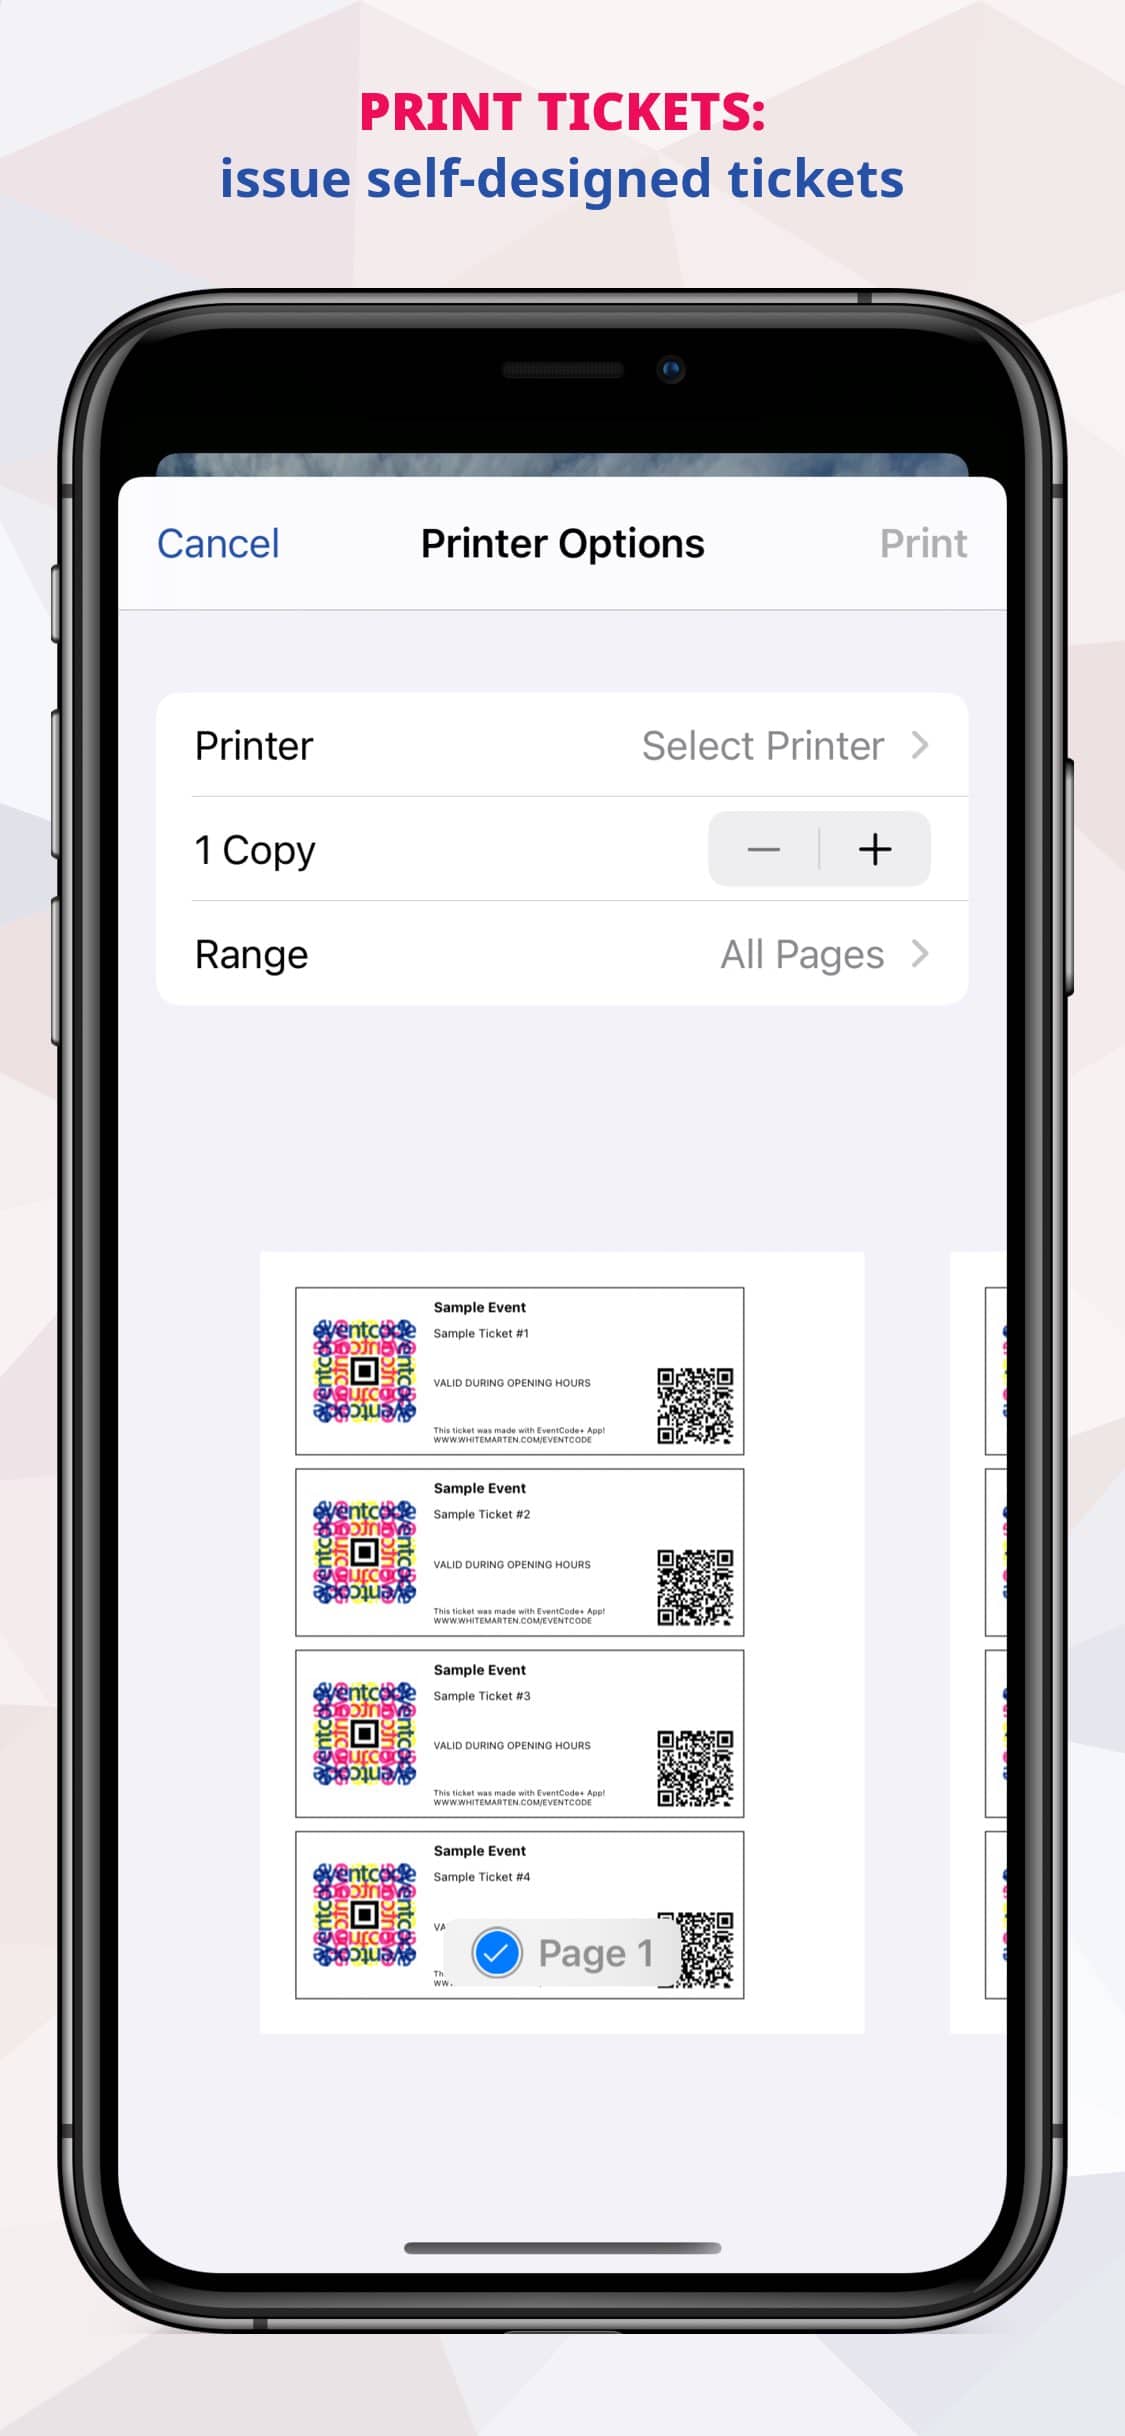
Create new events adding tickets and attendees. Print or email the completed tickets. On the day of the event, scan the tickets with one or more iOS devices and check them for validity.

Possible applications are (for example) design and management of tickets for soccer matches, clubs, private parties, cabaret, theater, exhibitions, performances and much more.

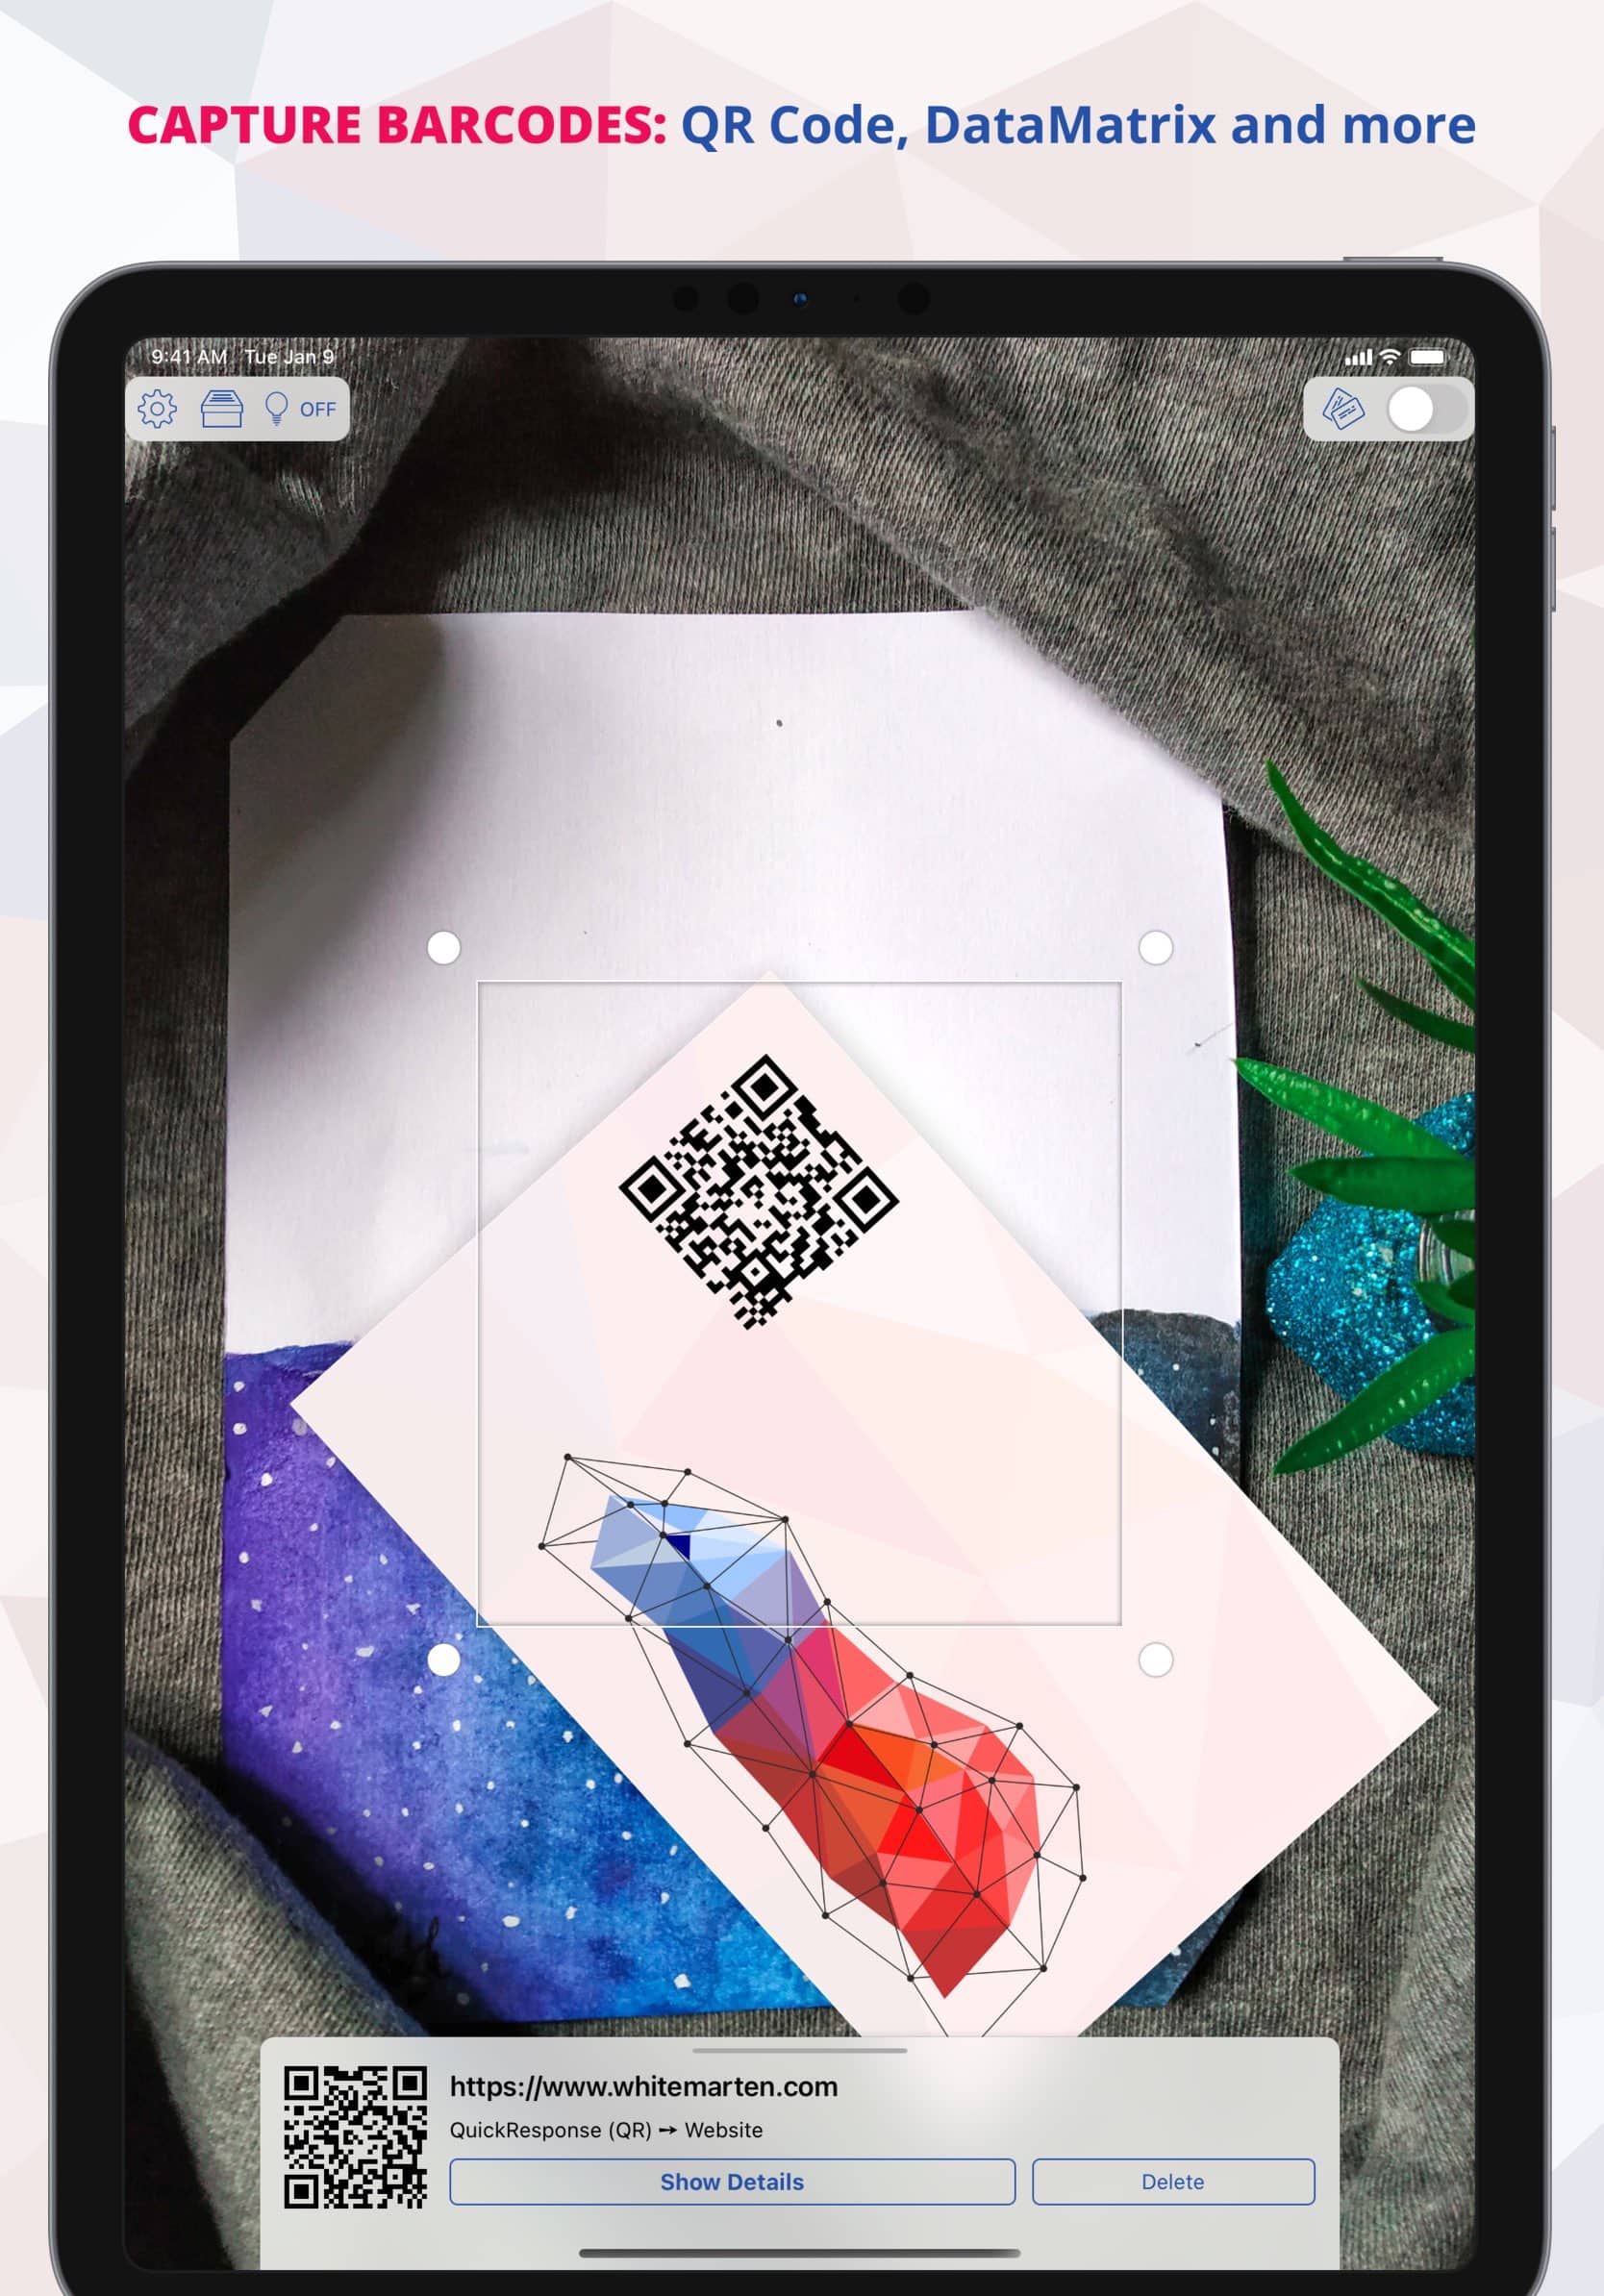
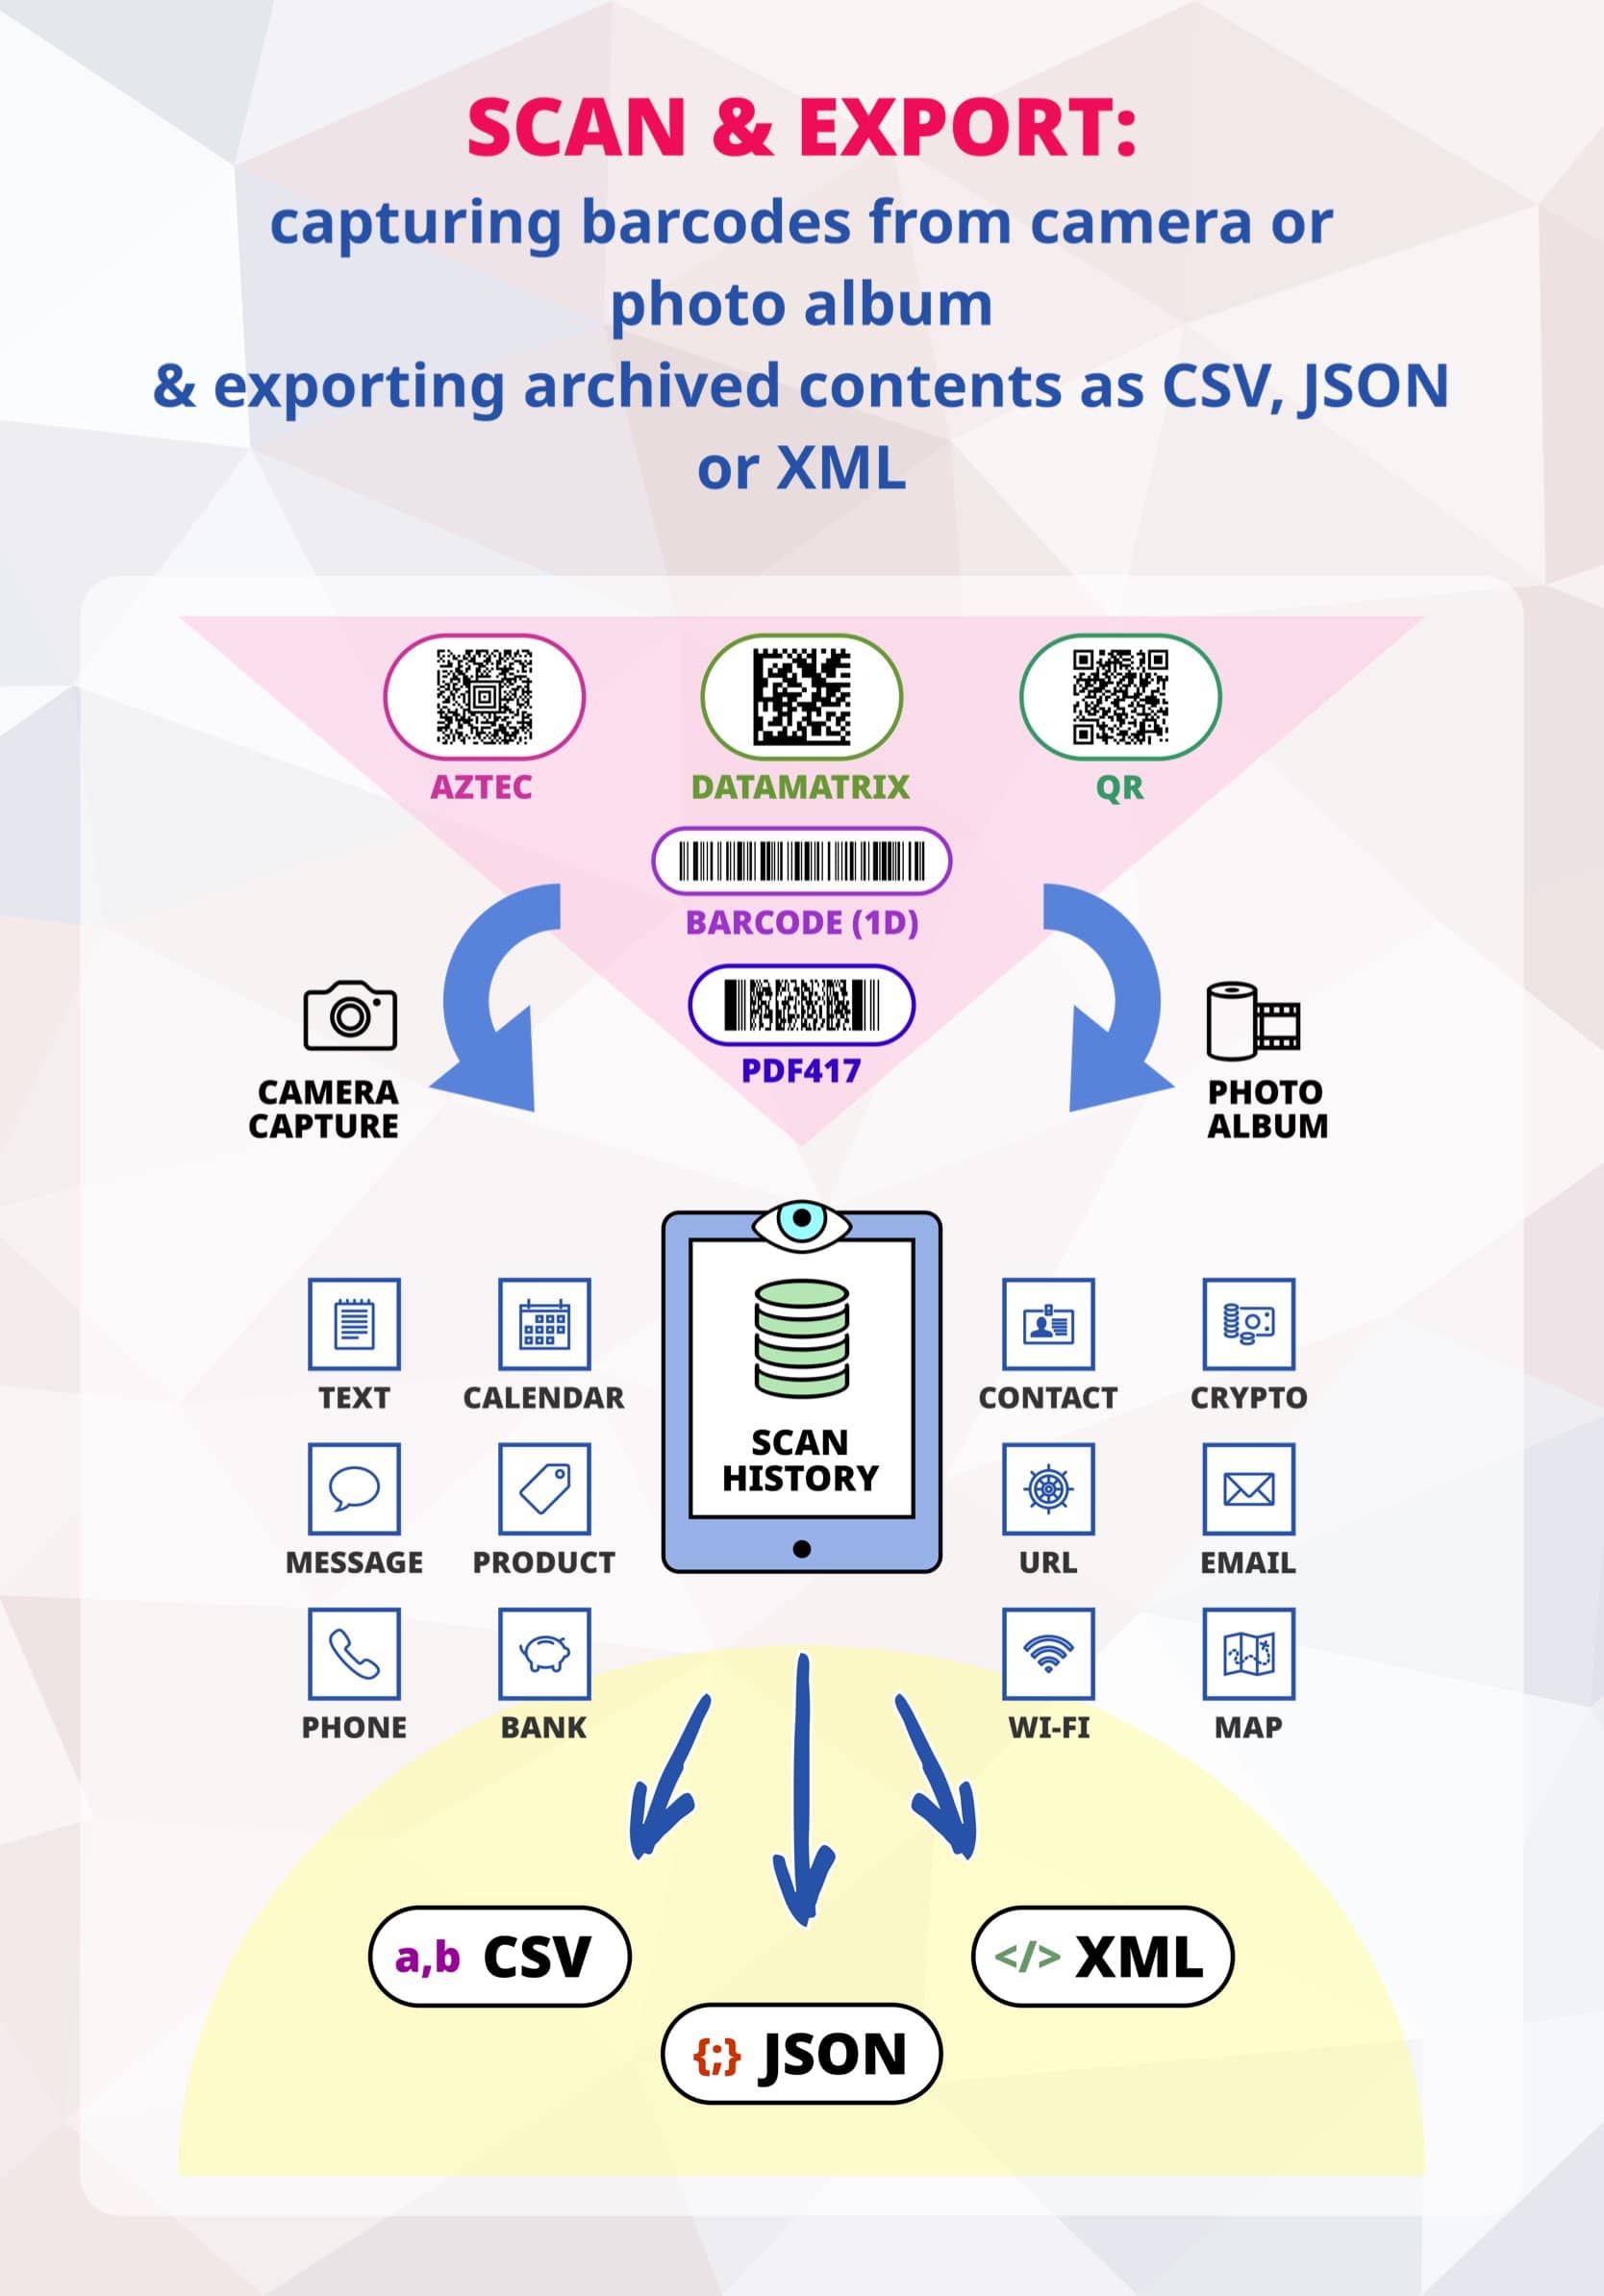
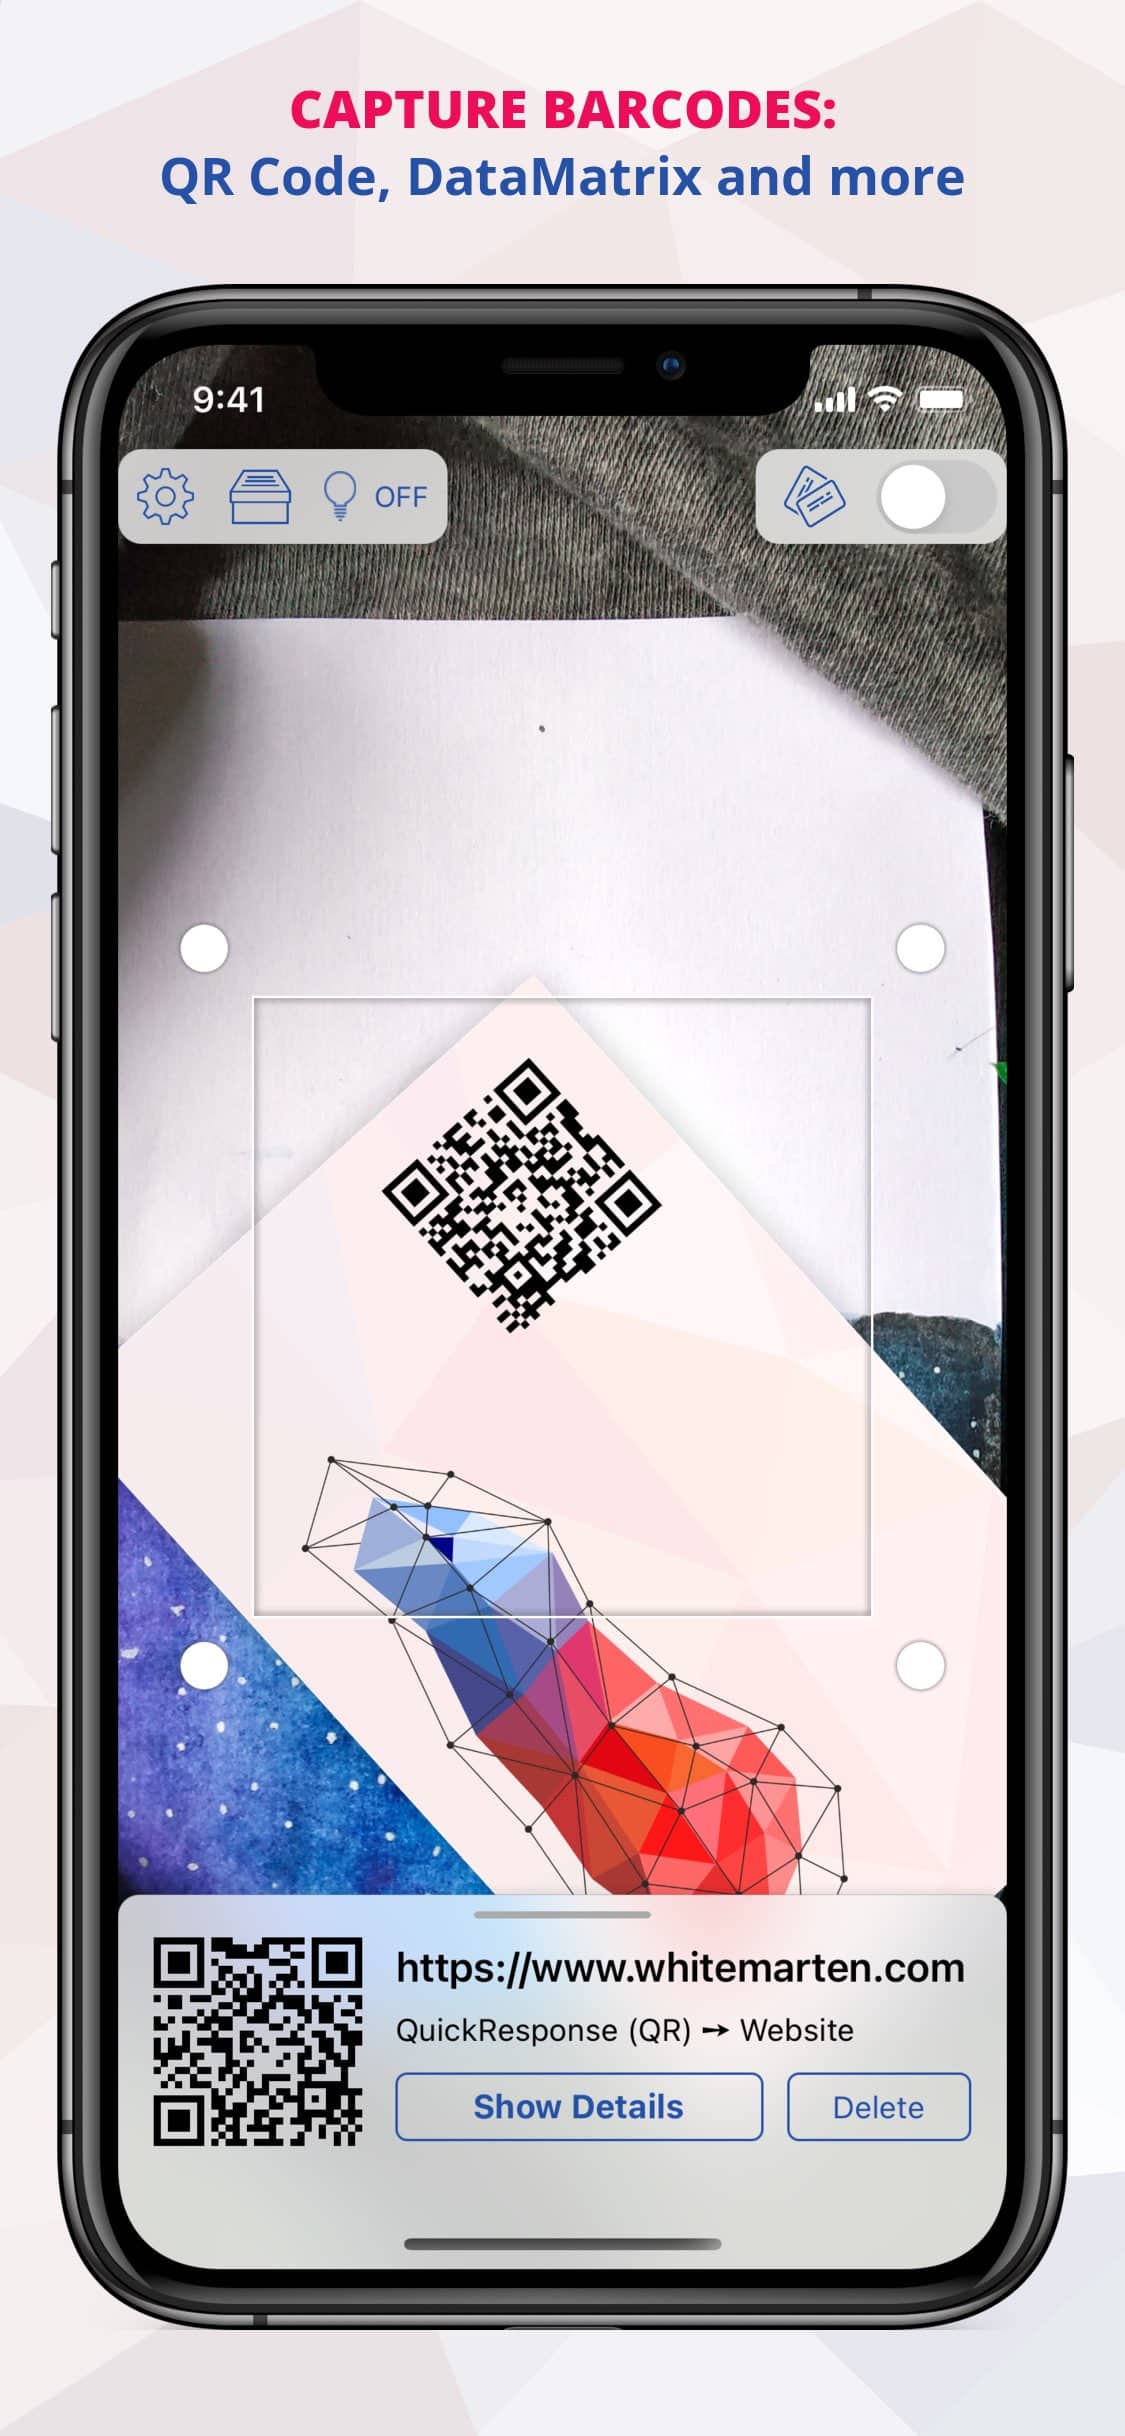
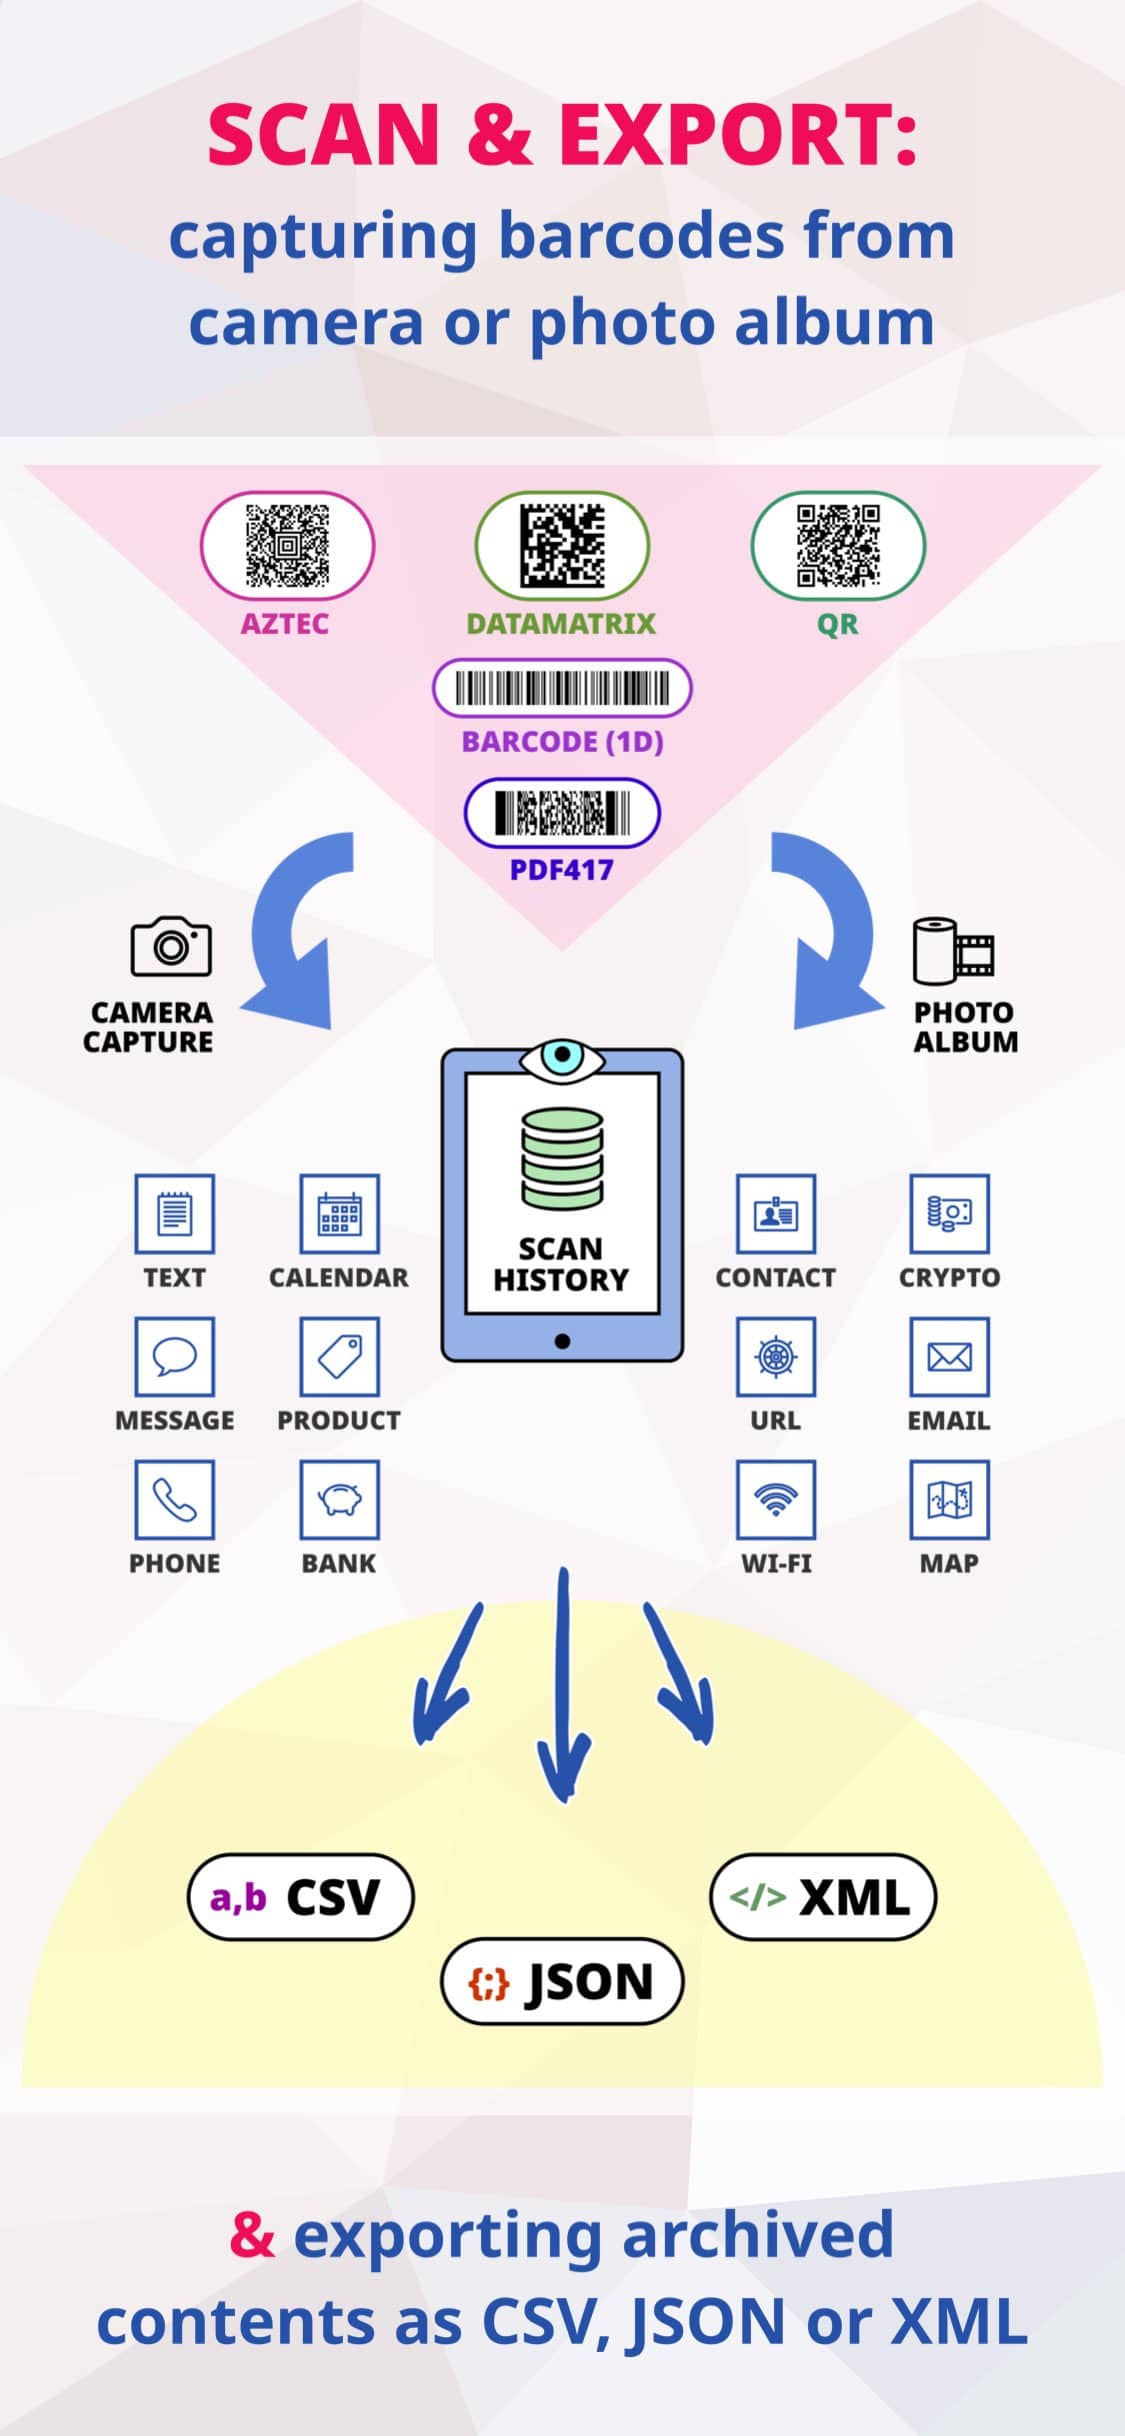
Furthermore you can capture, utilize and archive all popular barcodes! Capture directly from your device's camera or from images in your photo album (on macOS directly from your device's screen, a camera or from image files on your disk).

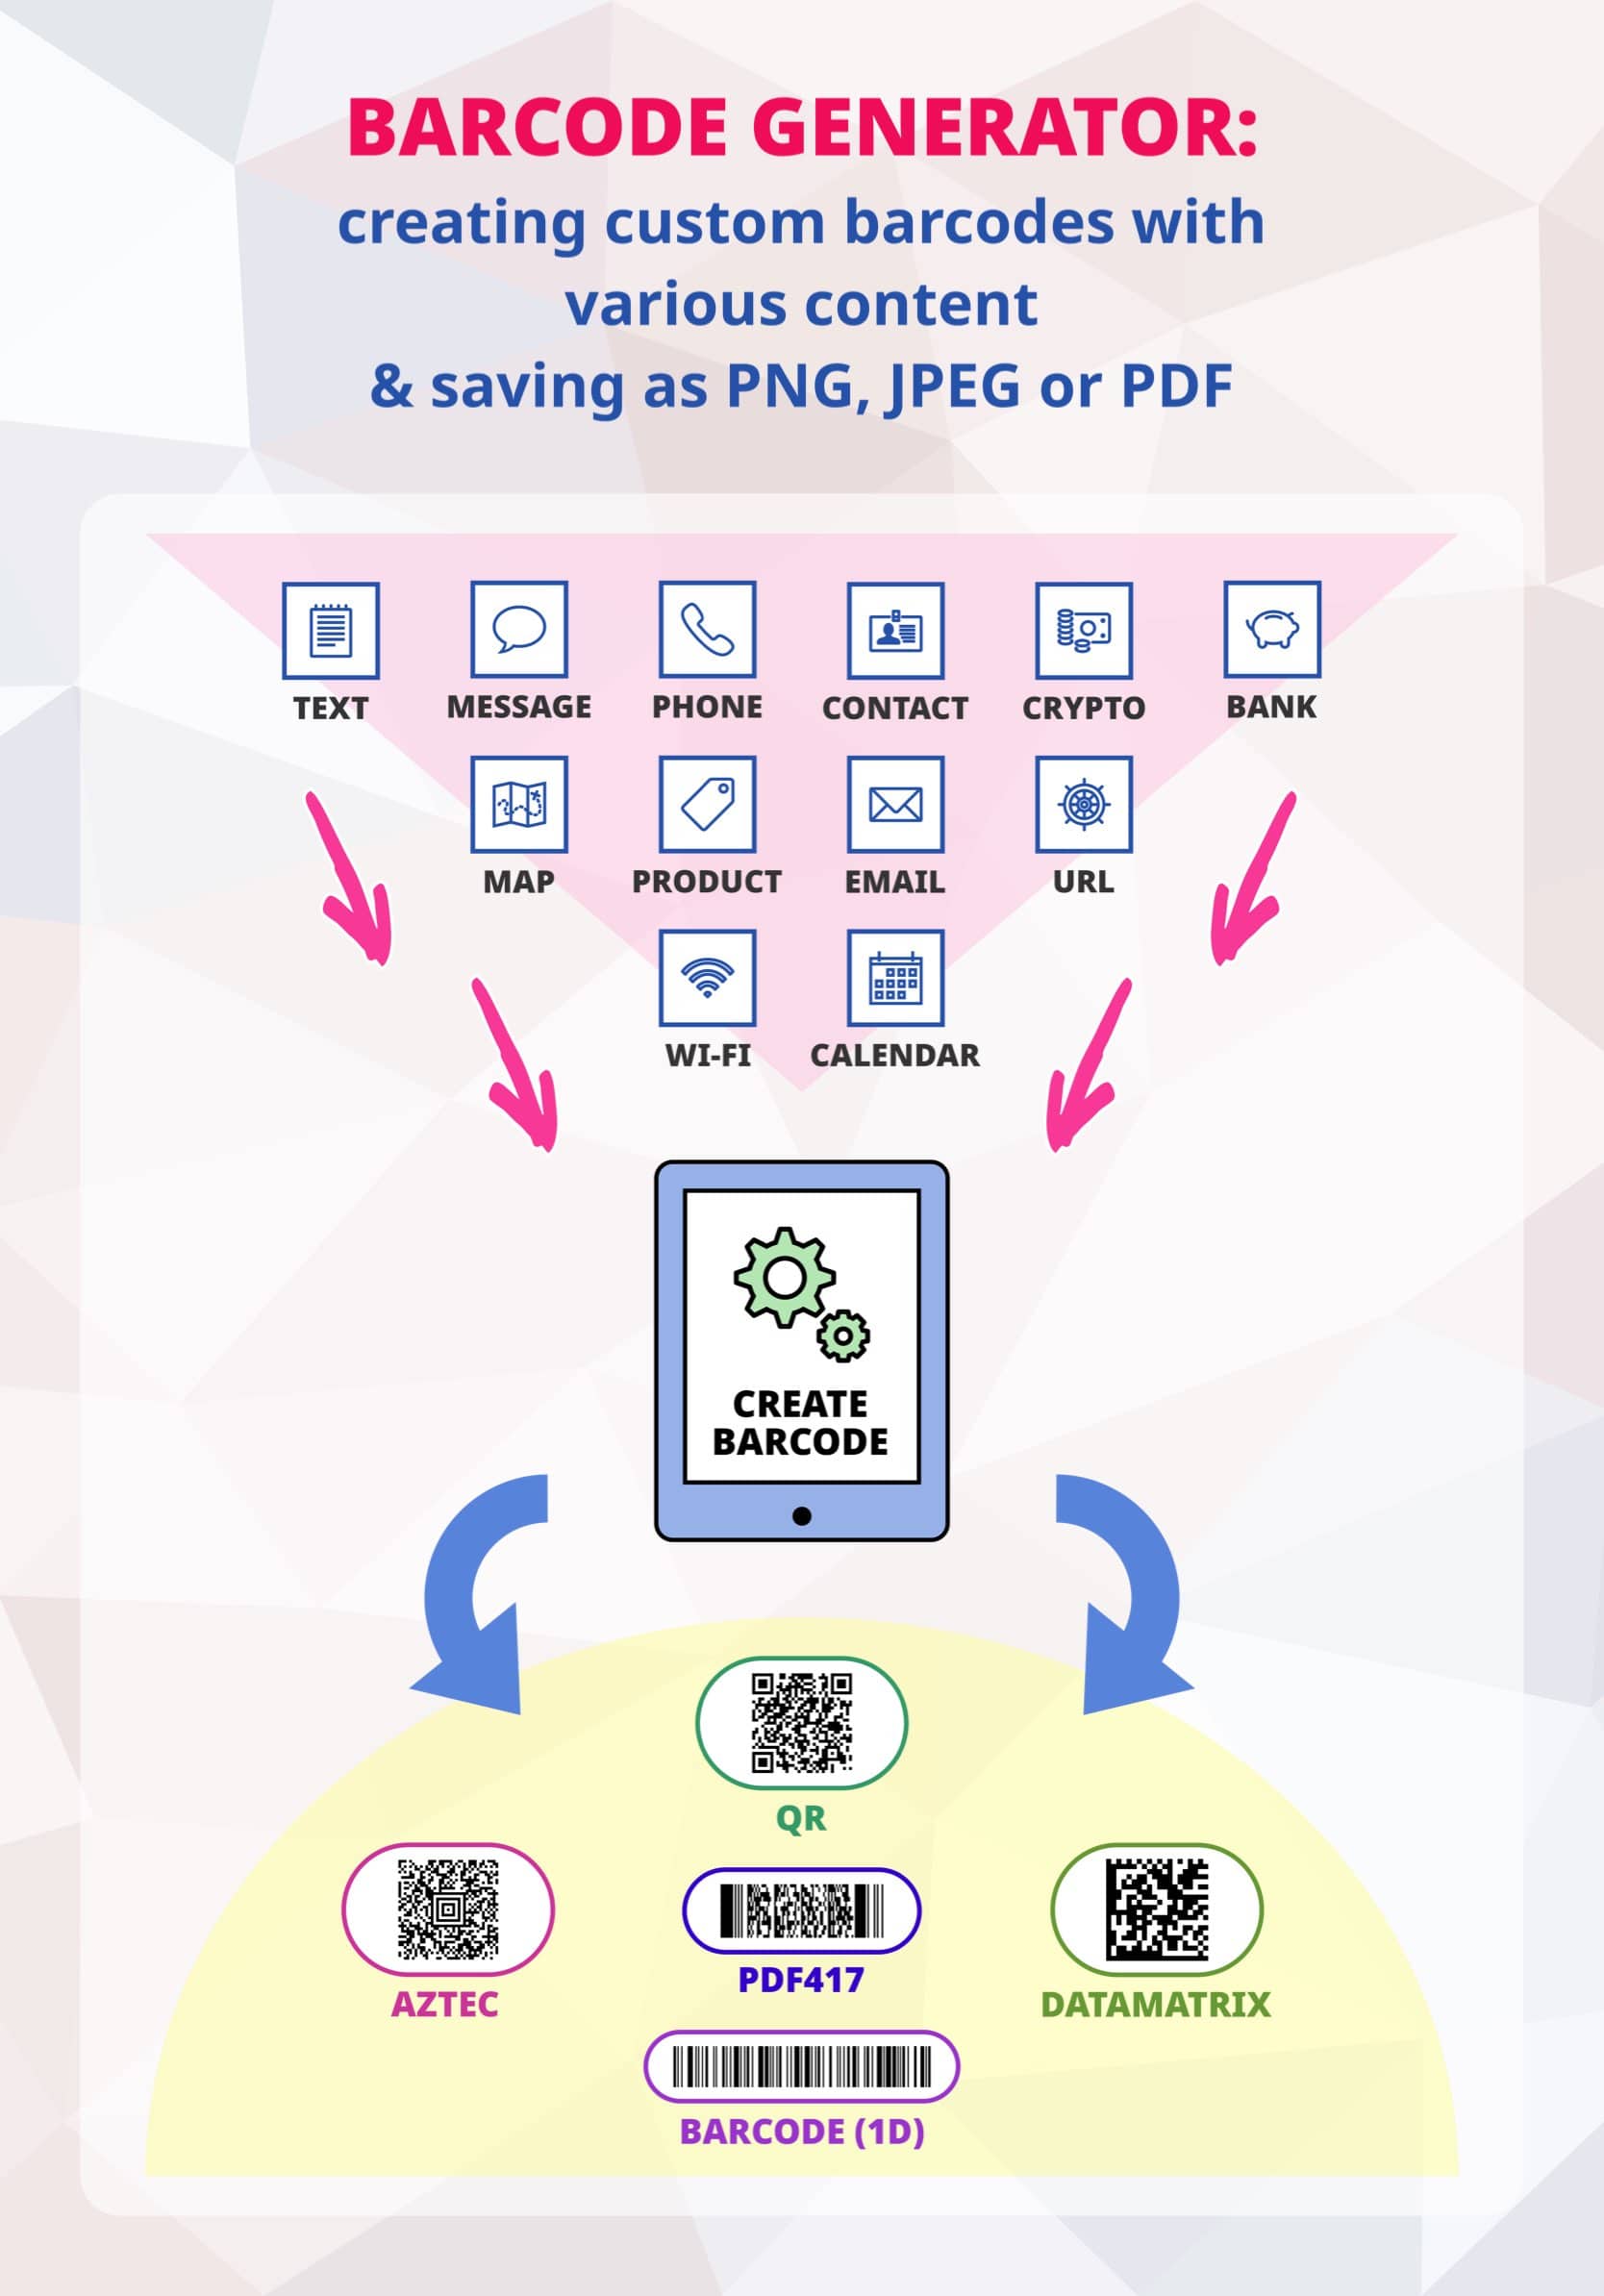
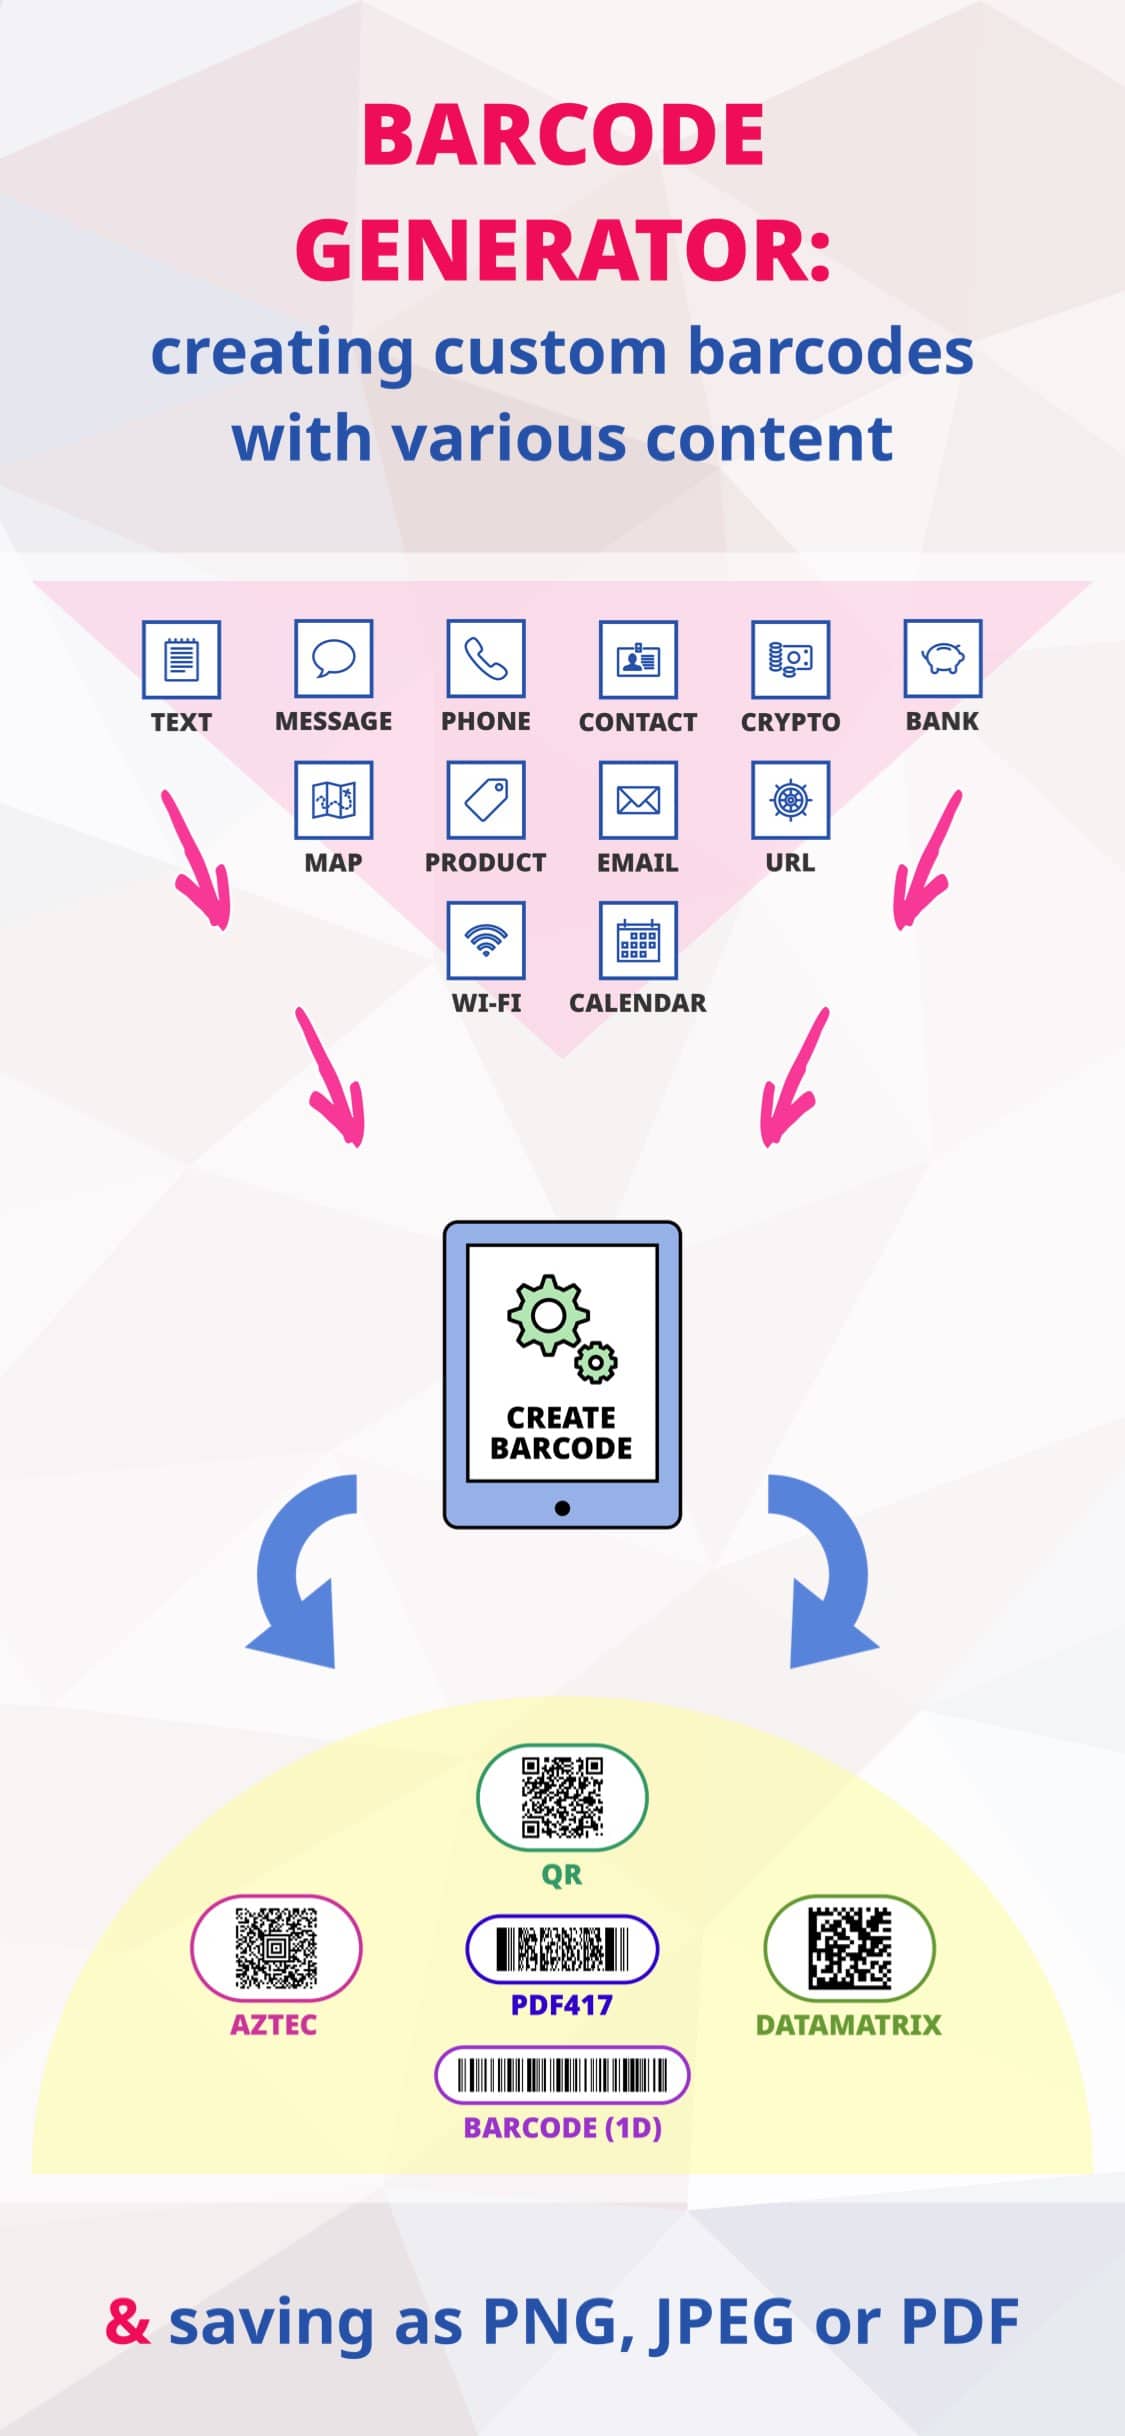
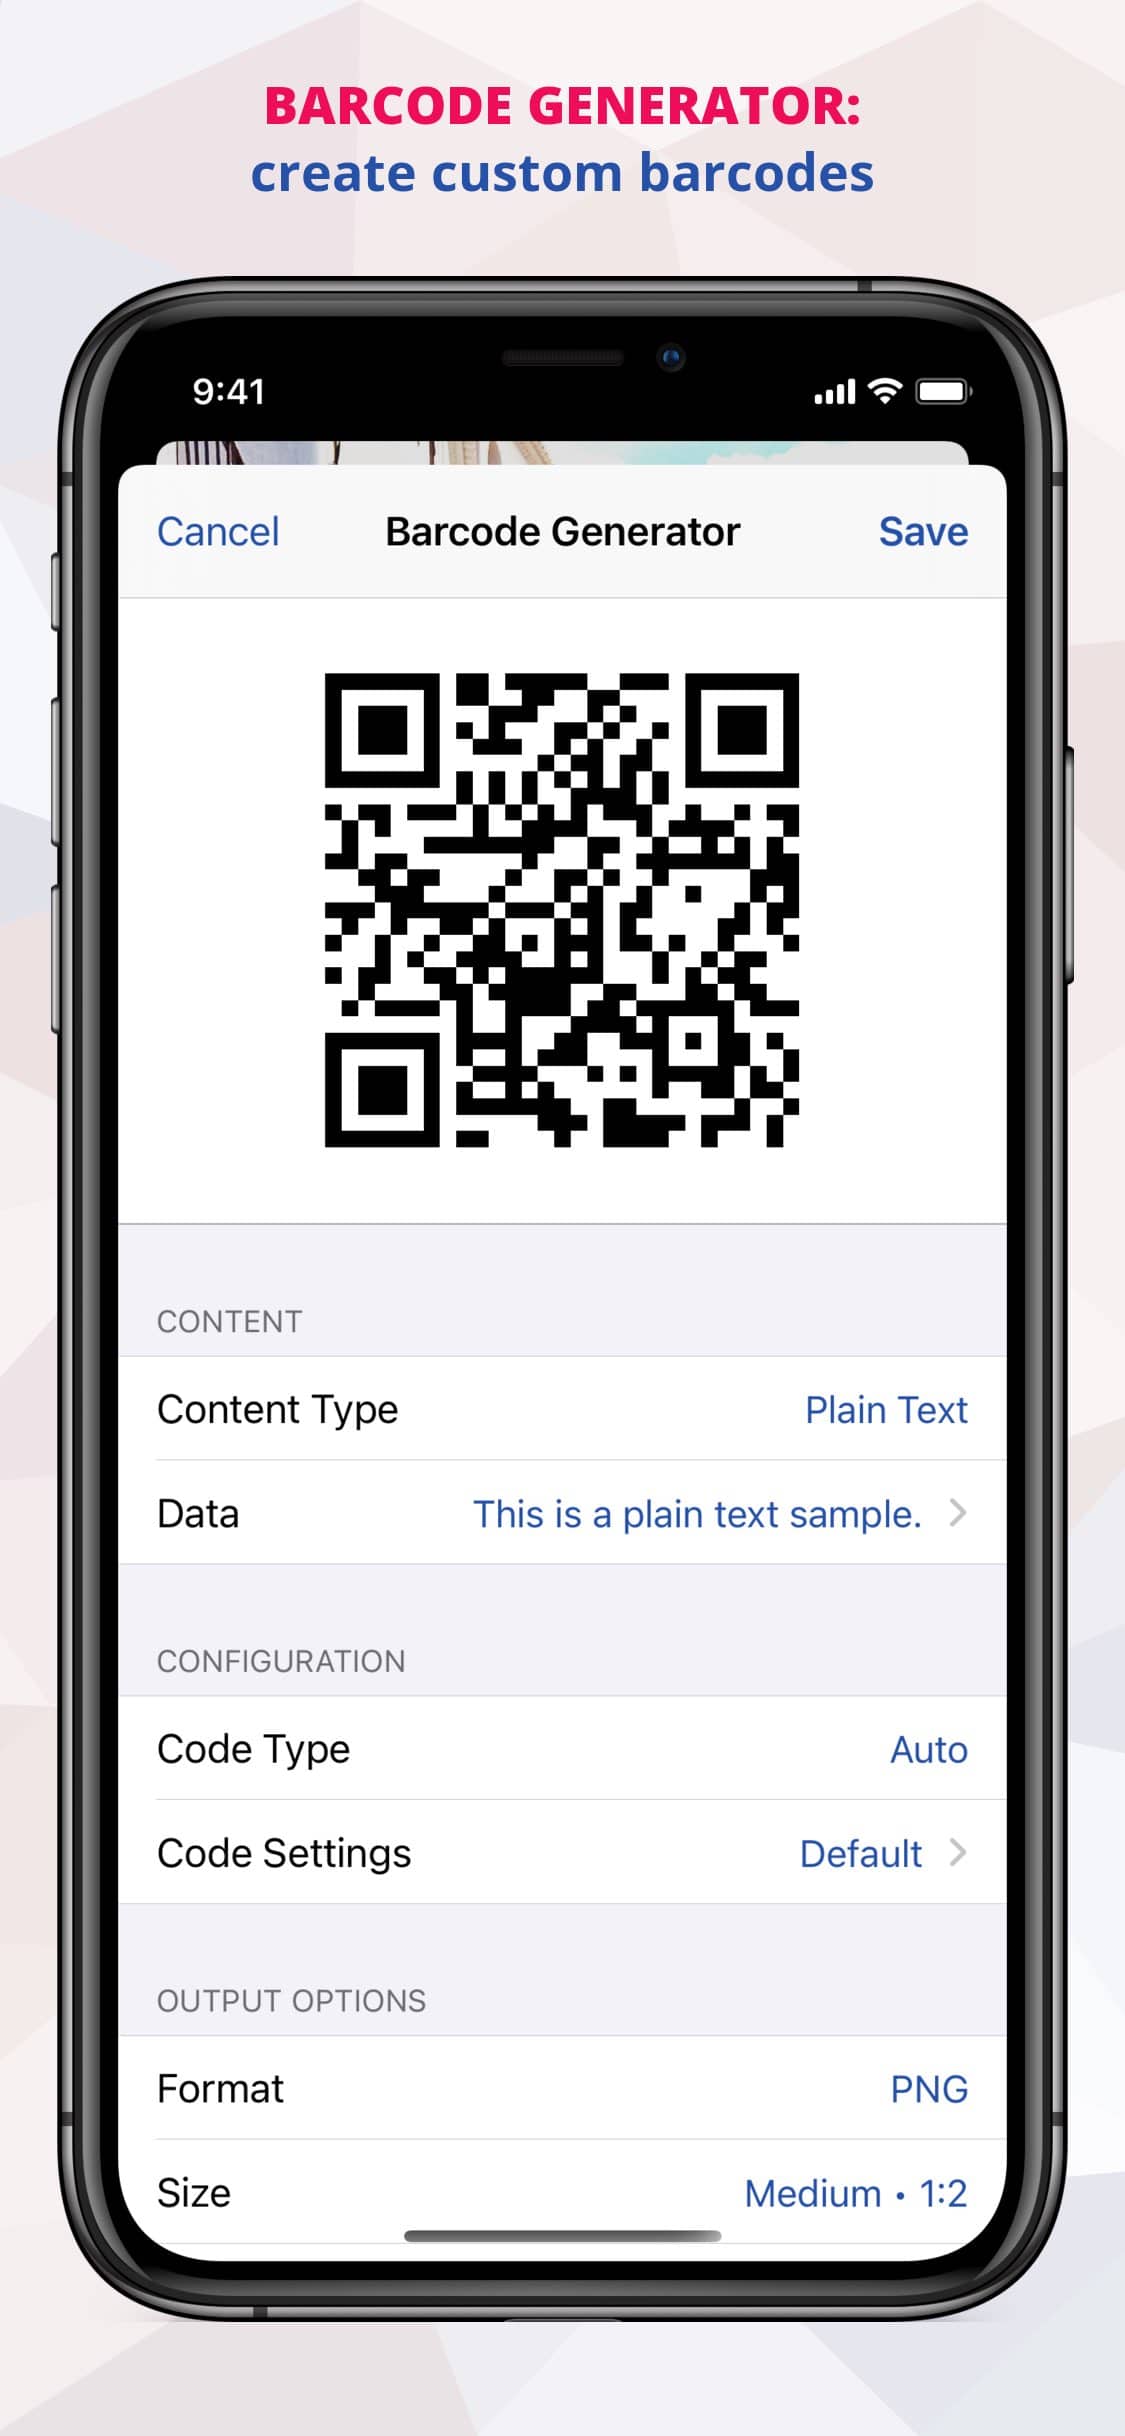
In addition, the integrated barcode generator creates 2D barcodes (such as QR codes) and linear (1D) barcodes with any content.


Ticket Generator, Designer & Editor

  • creating events with optional start and end dates and adding tickets for attendees
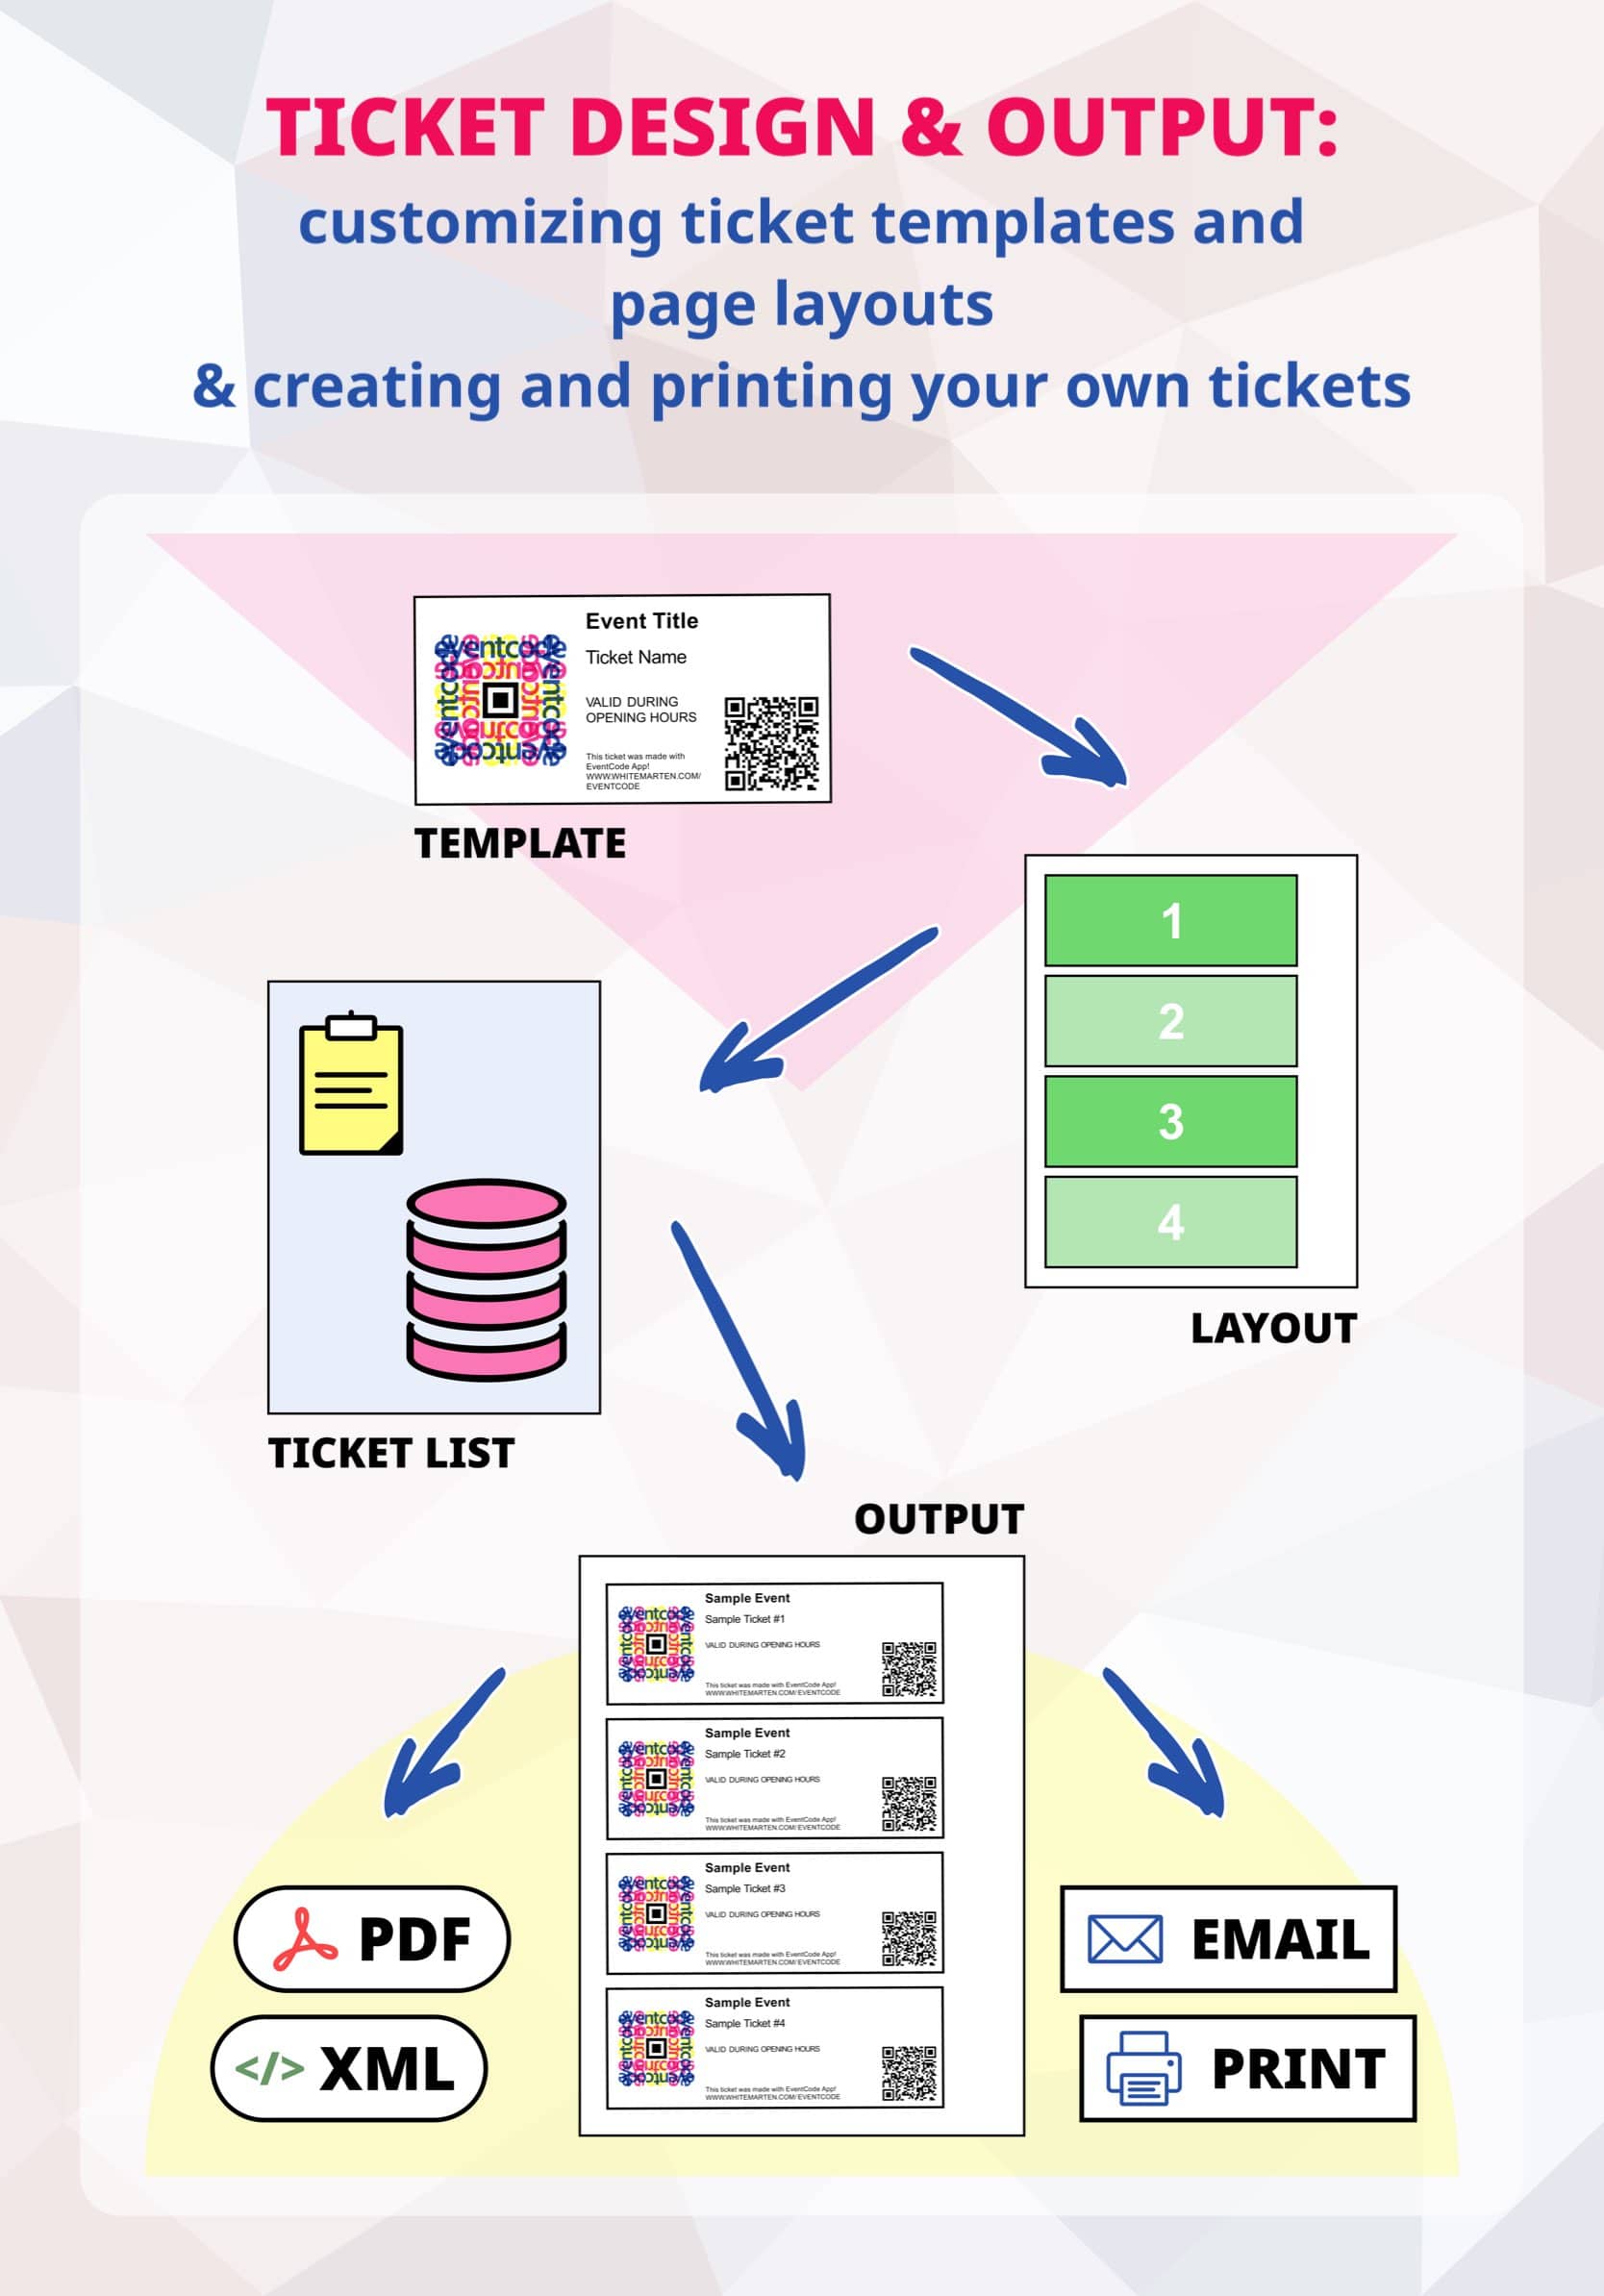
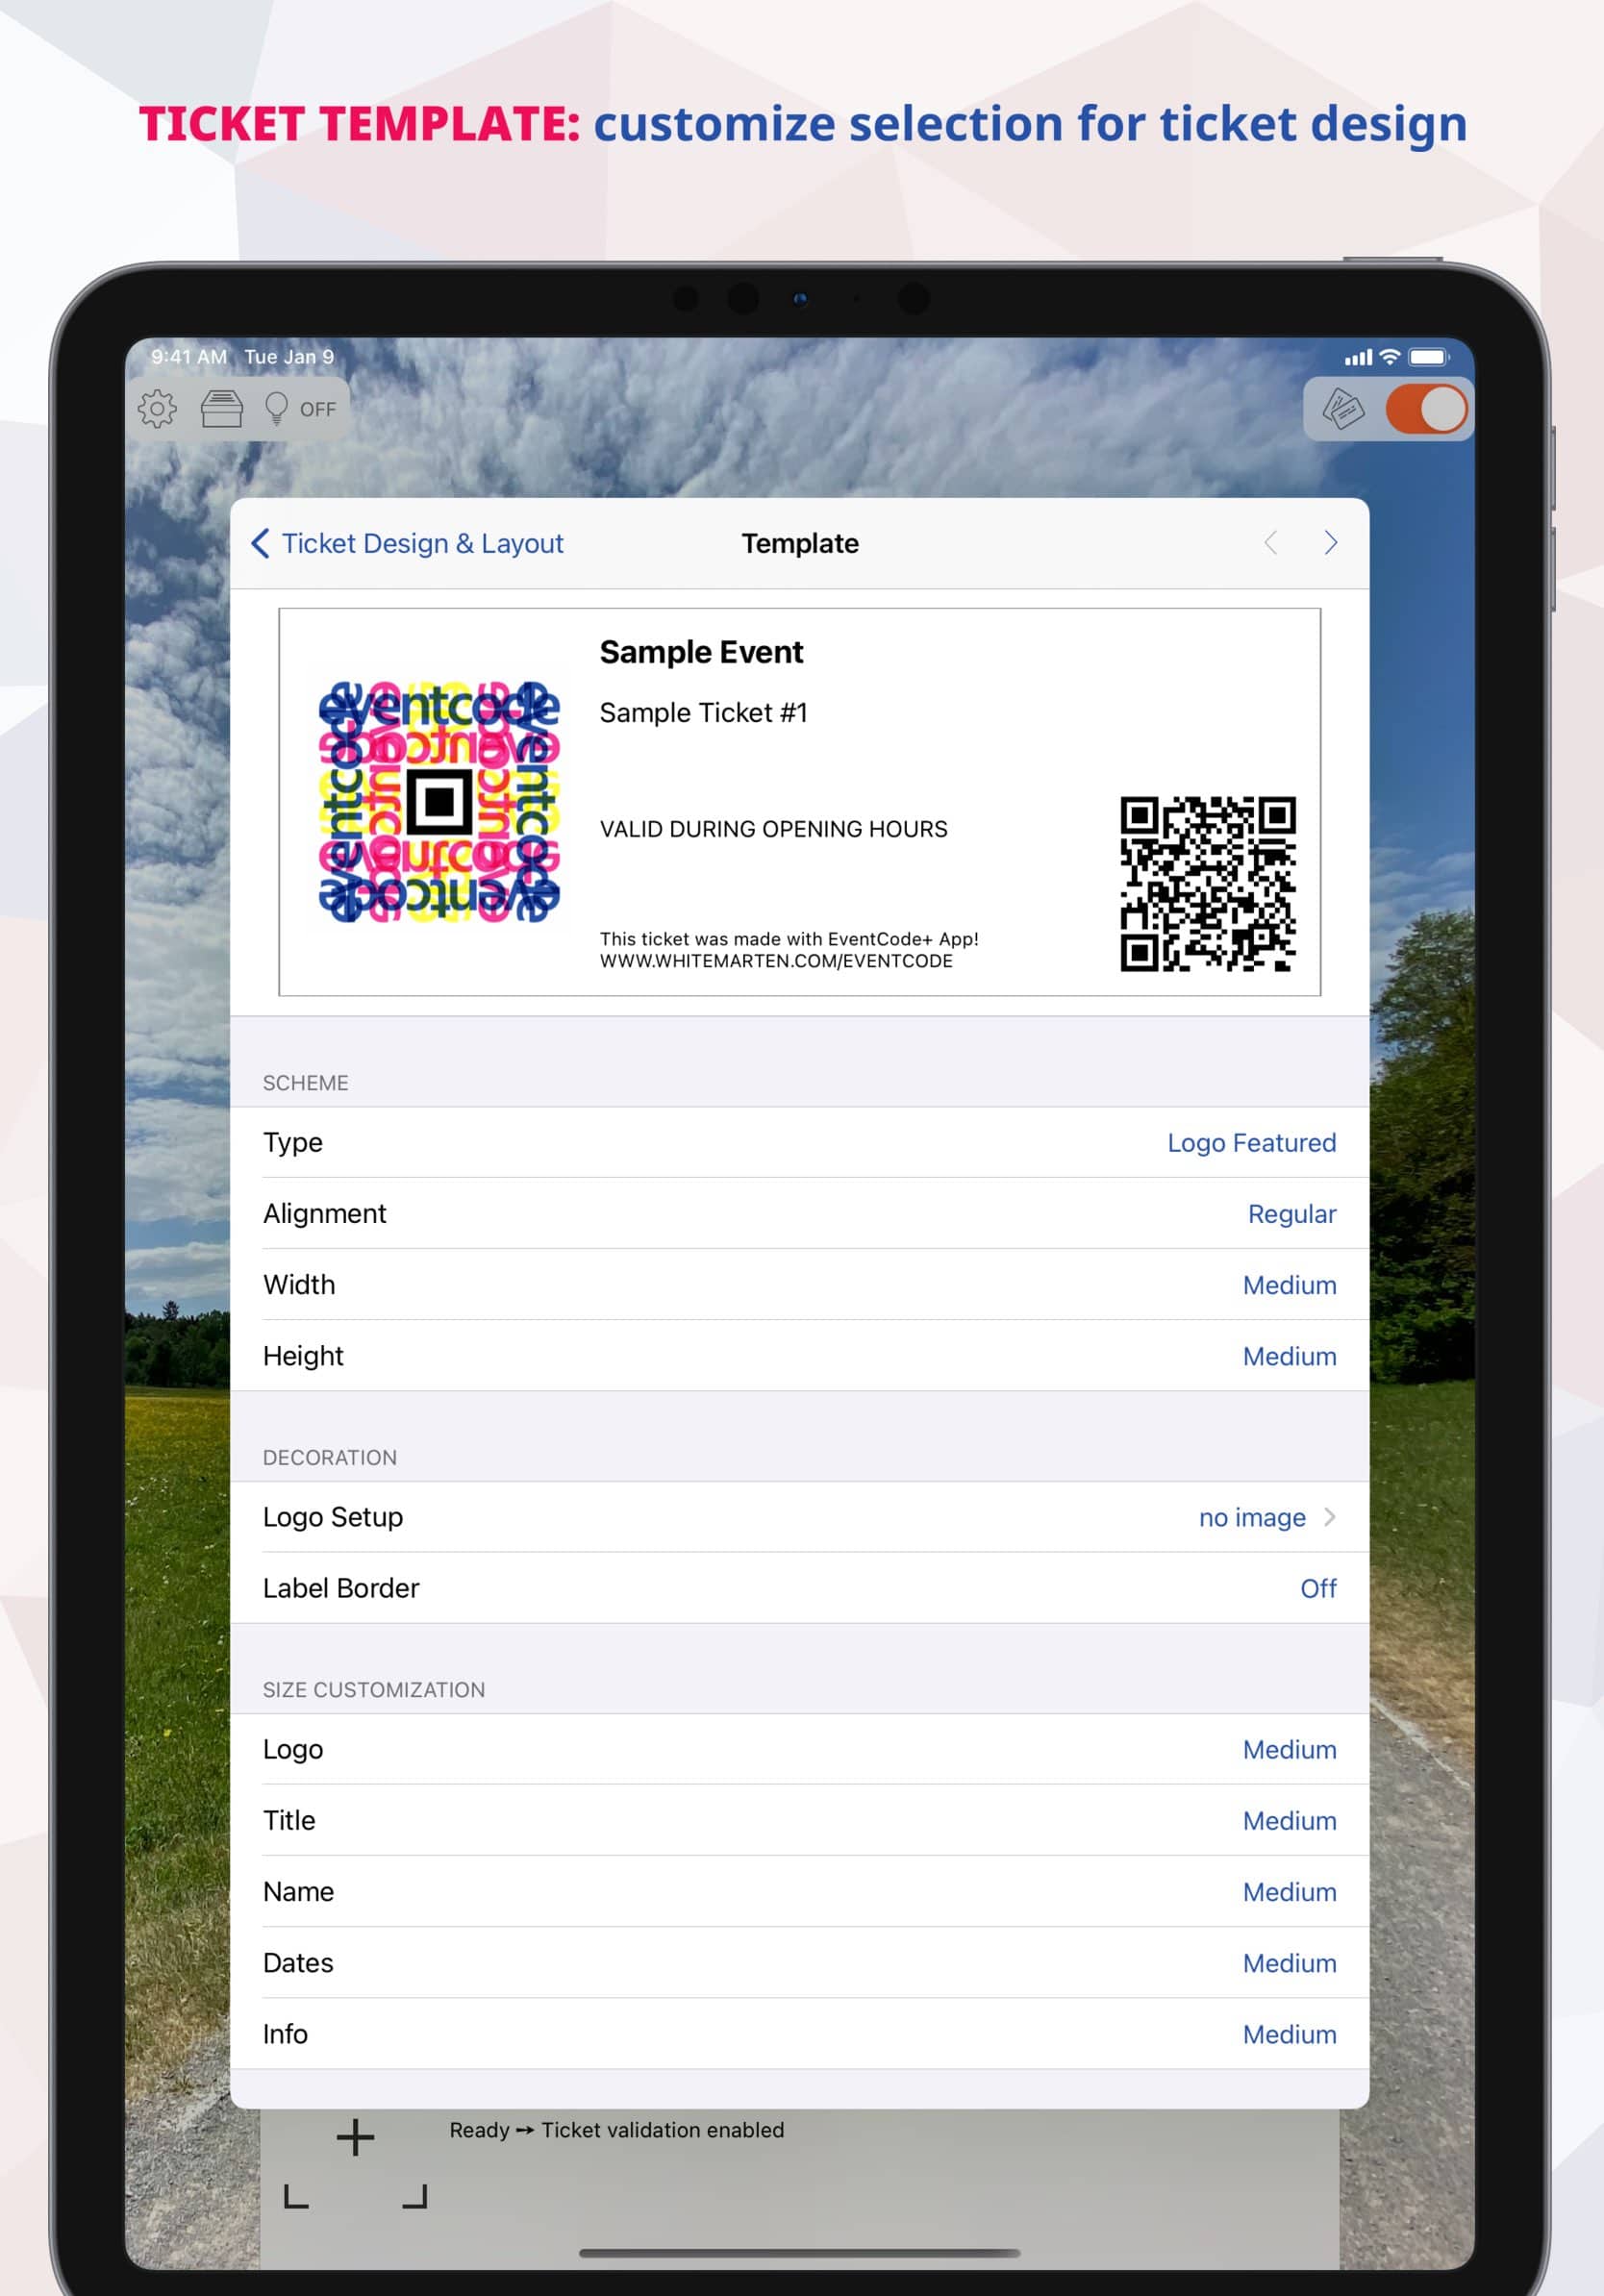
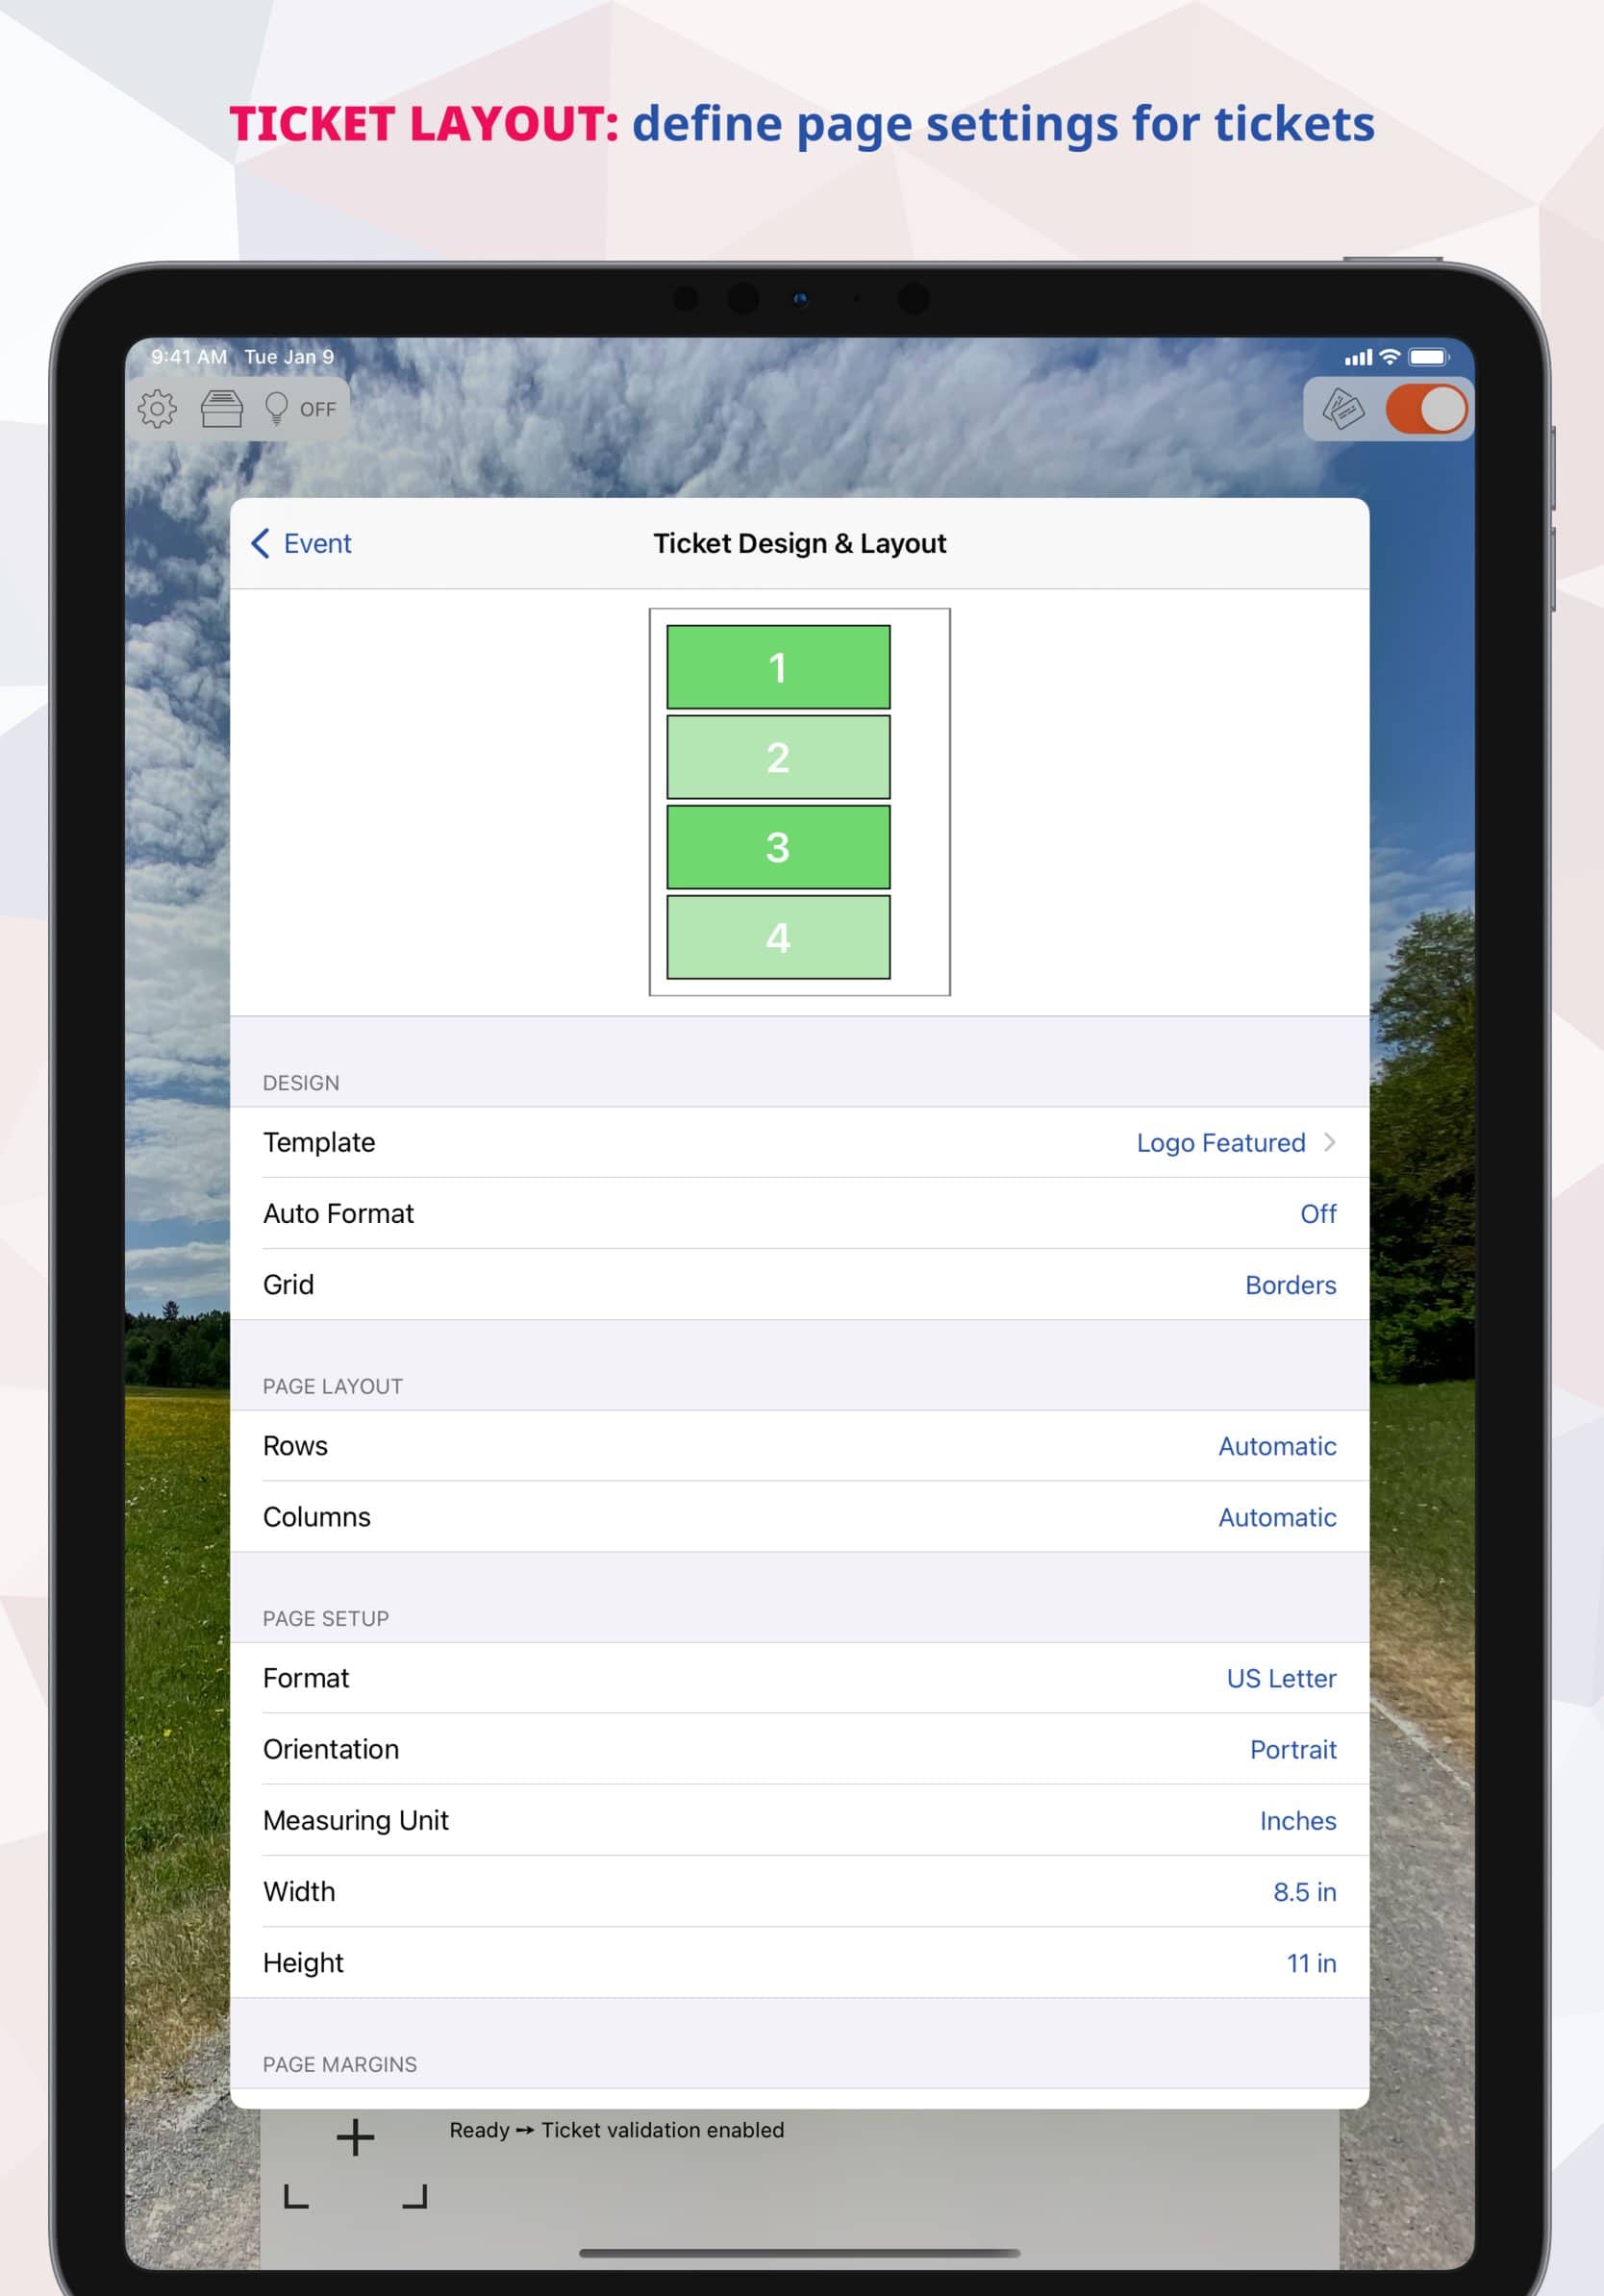
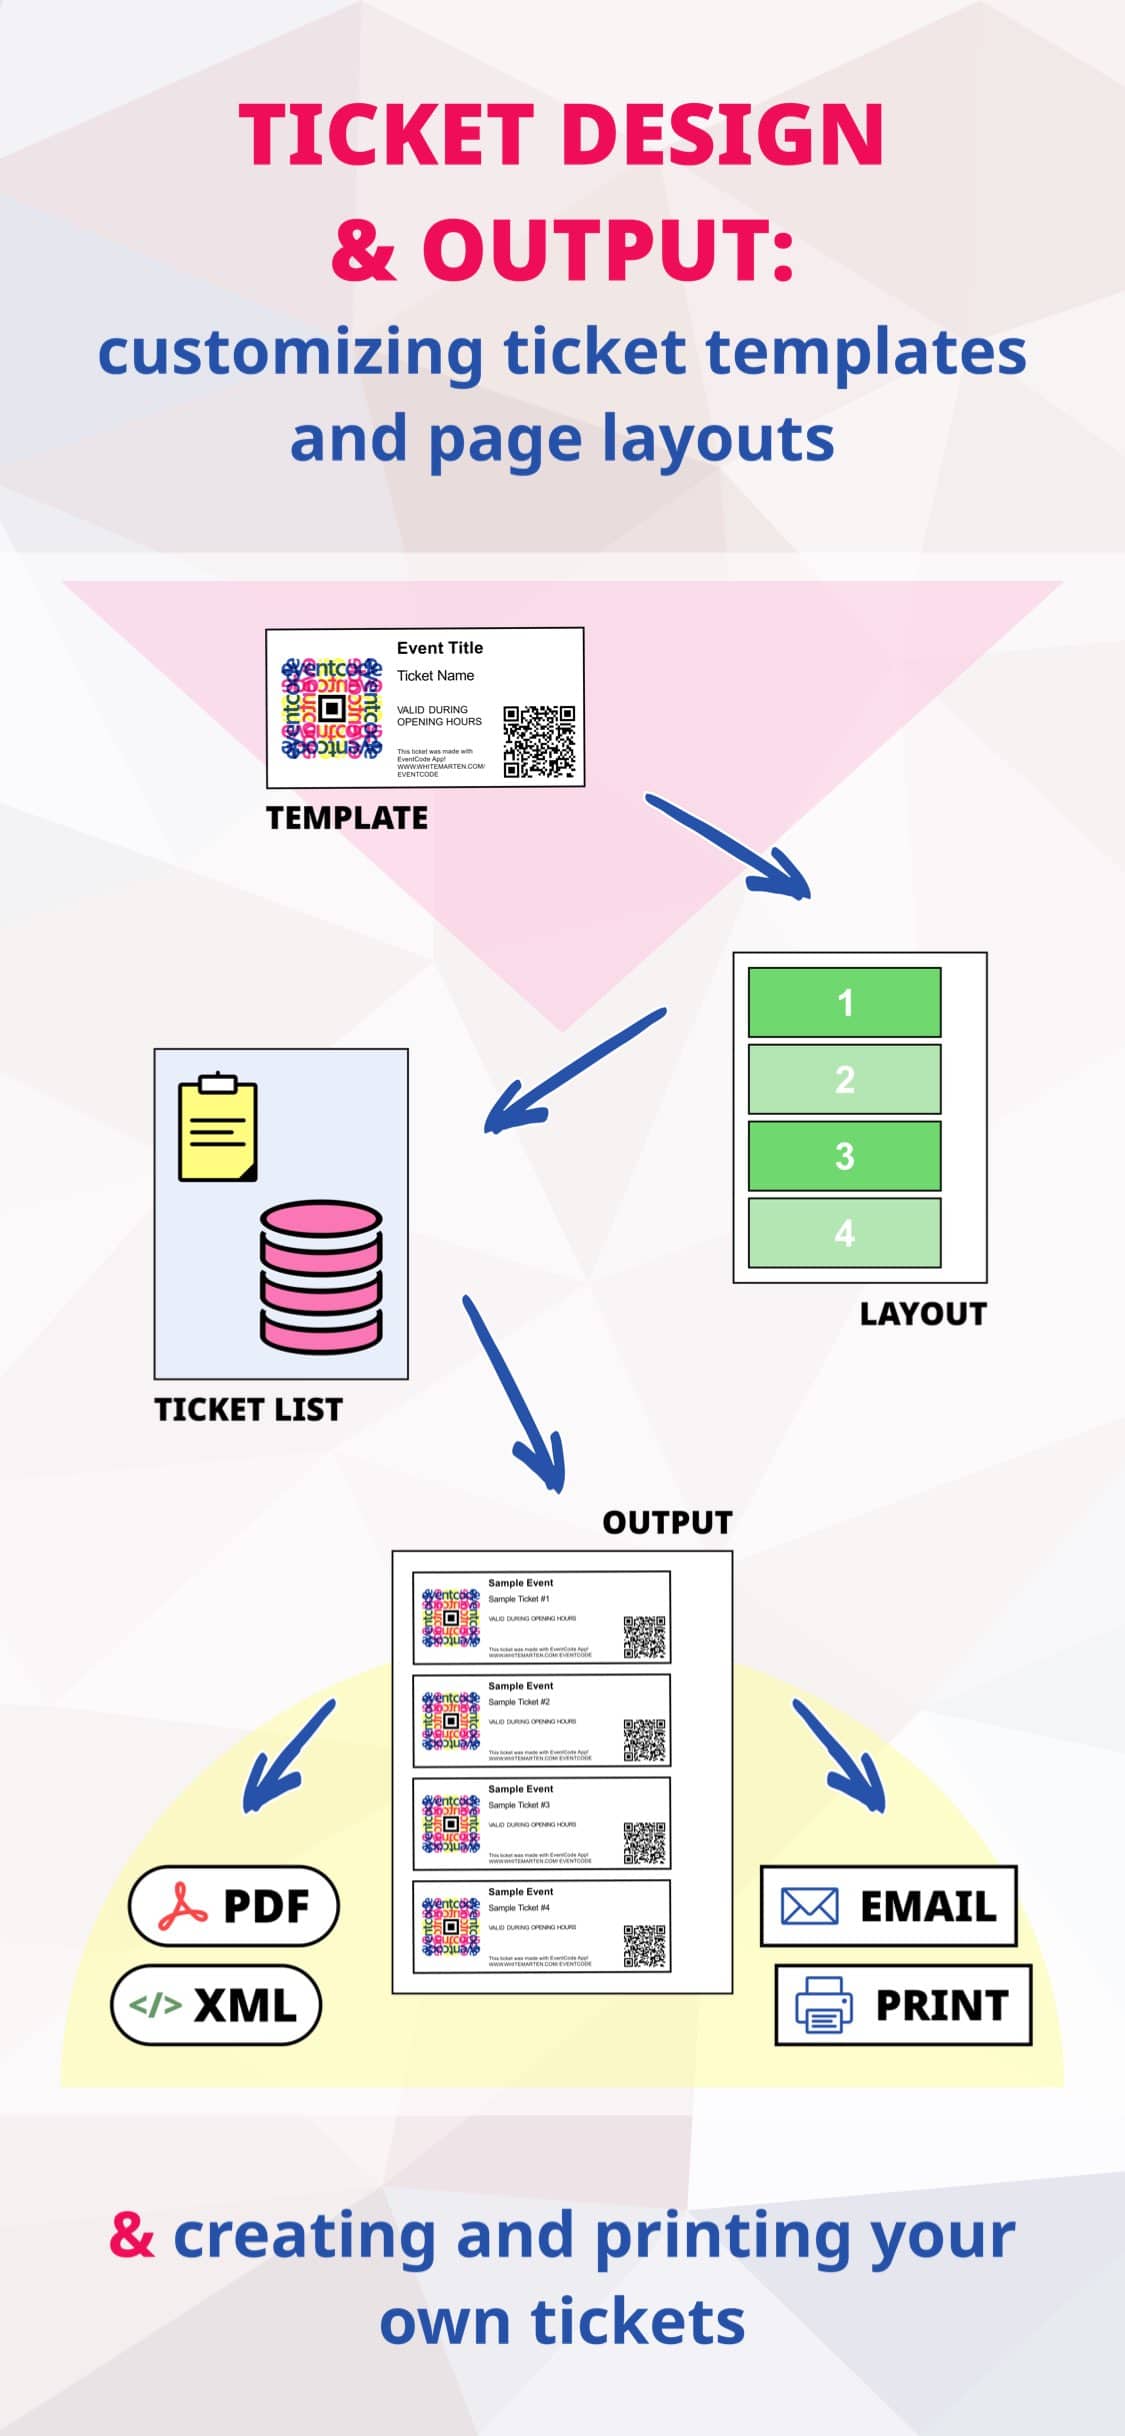
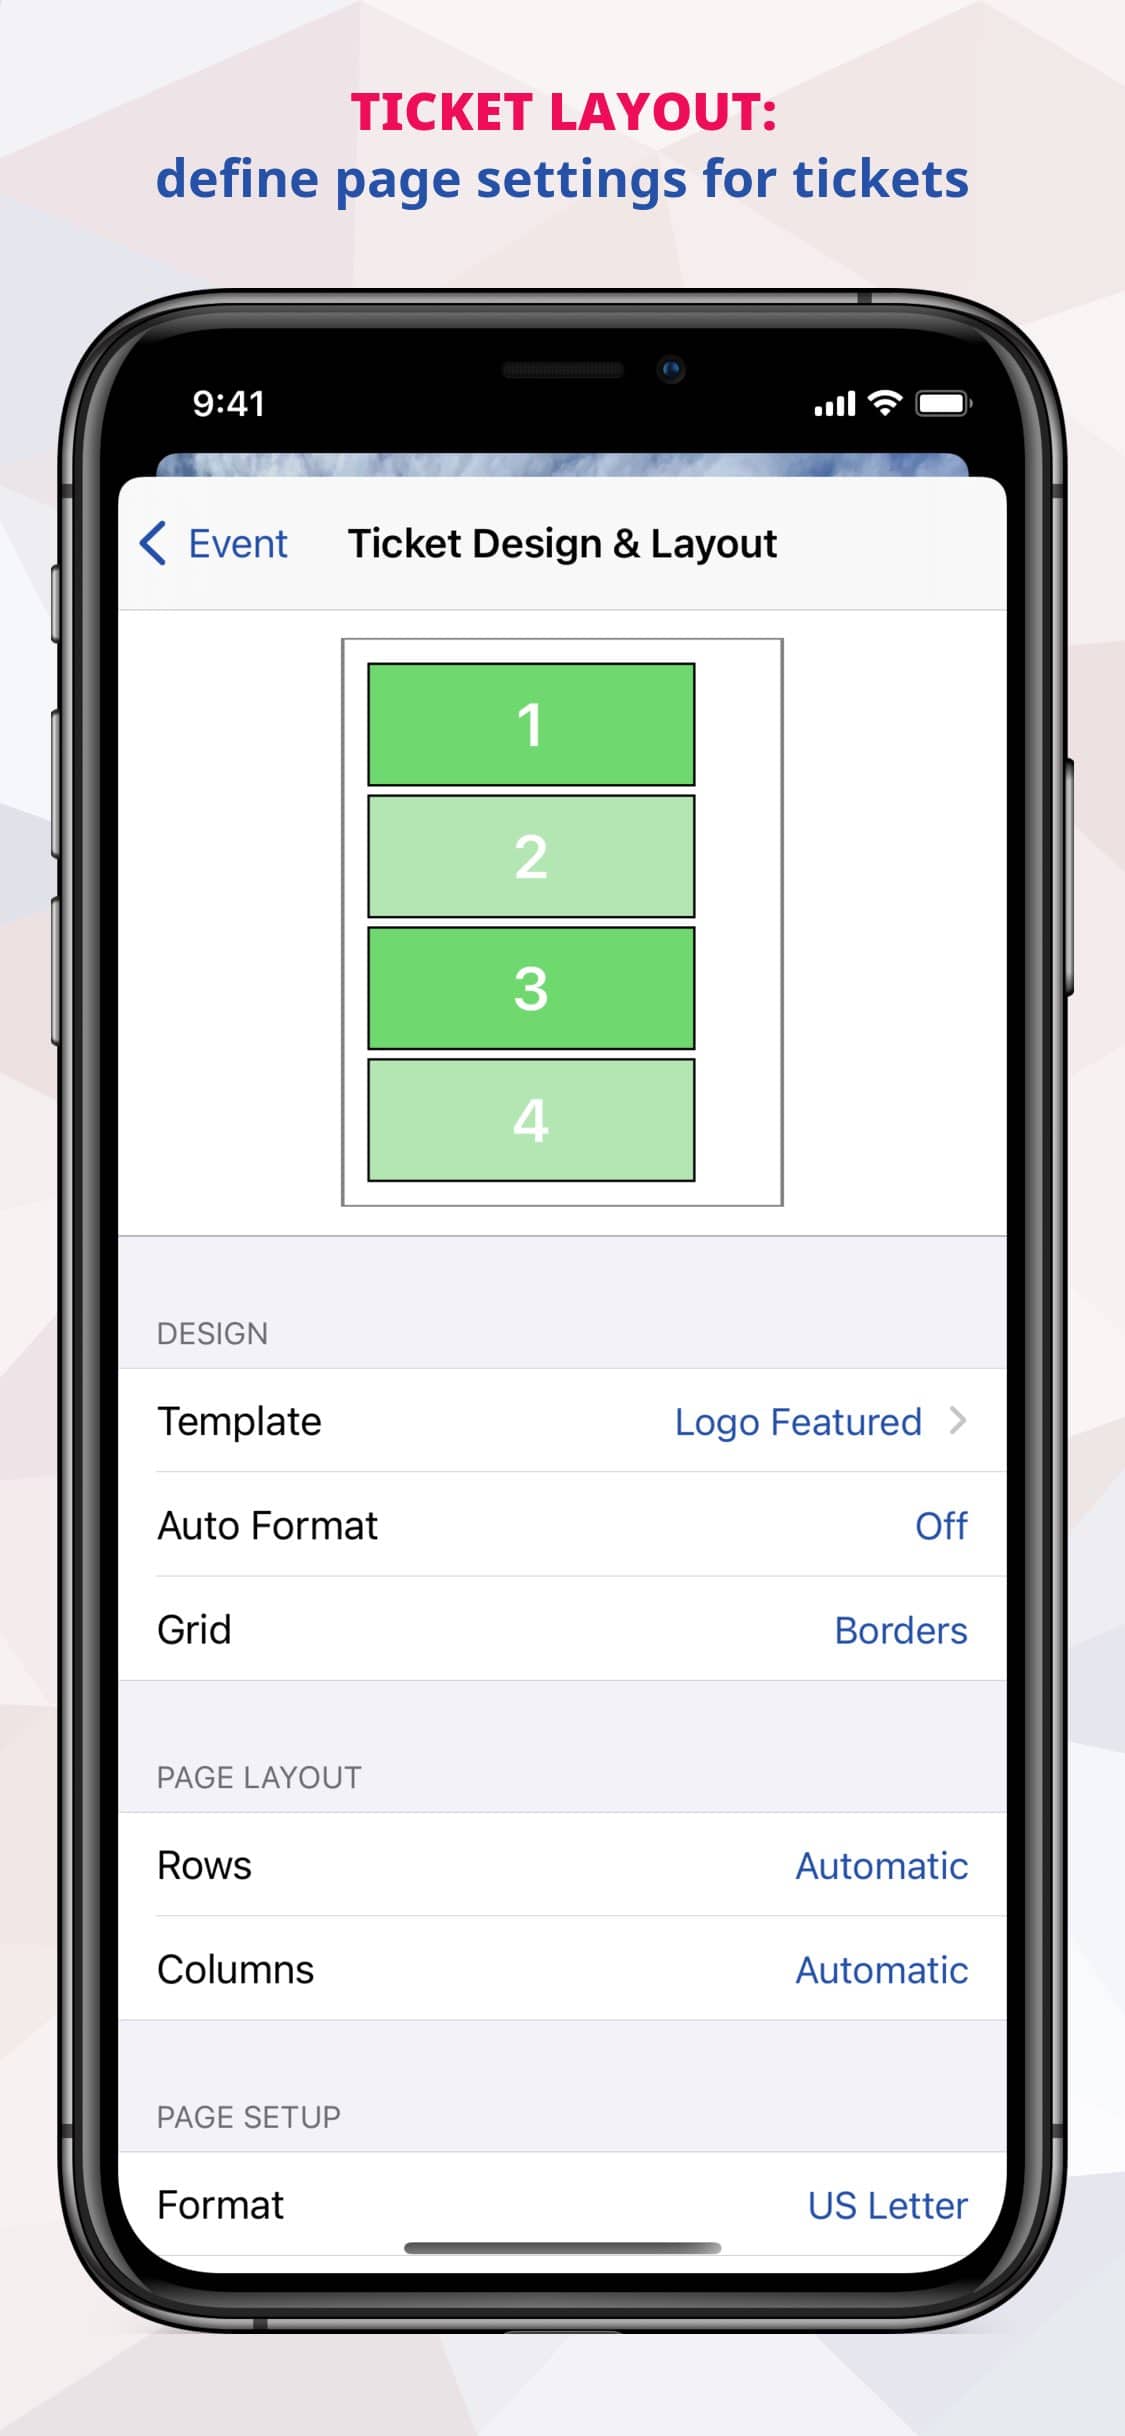
  • customizing ticket layouts, choosing from multiple templates, page sizes and design options with custom logos and a variety of barcode types
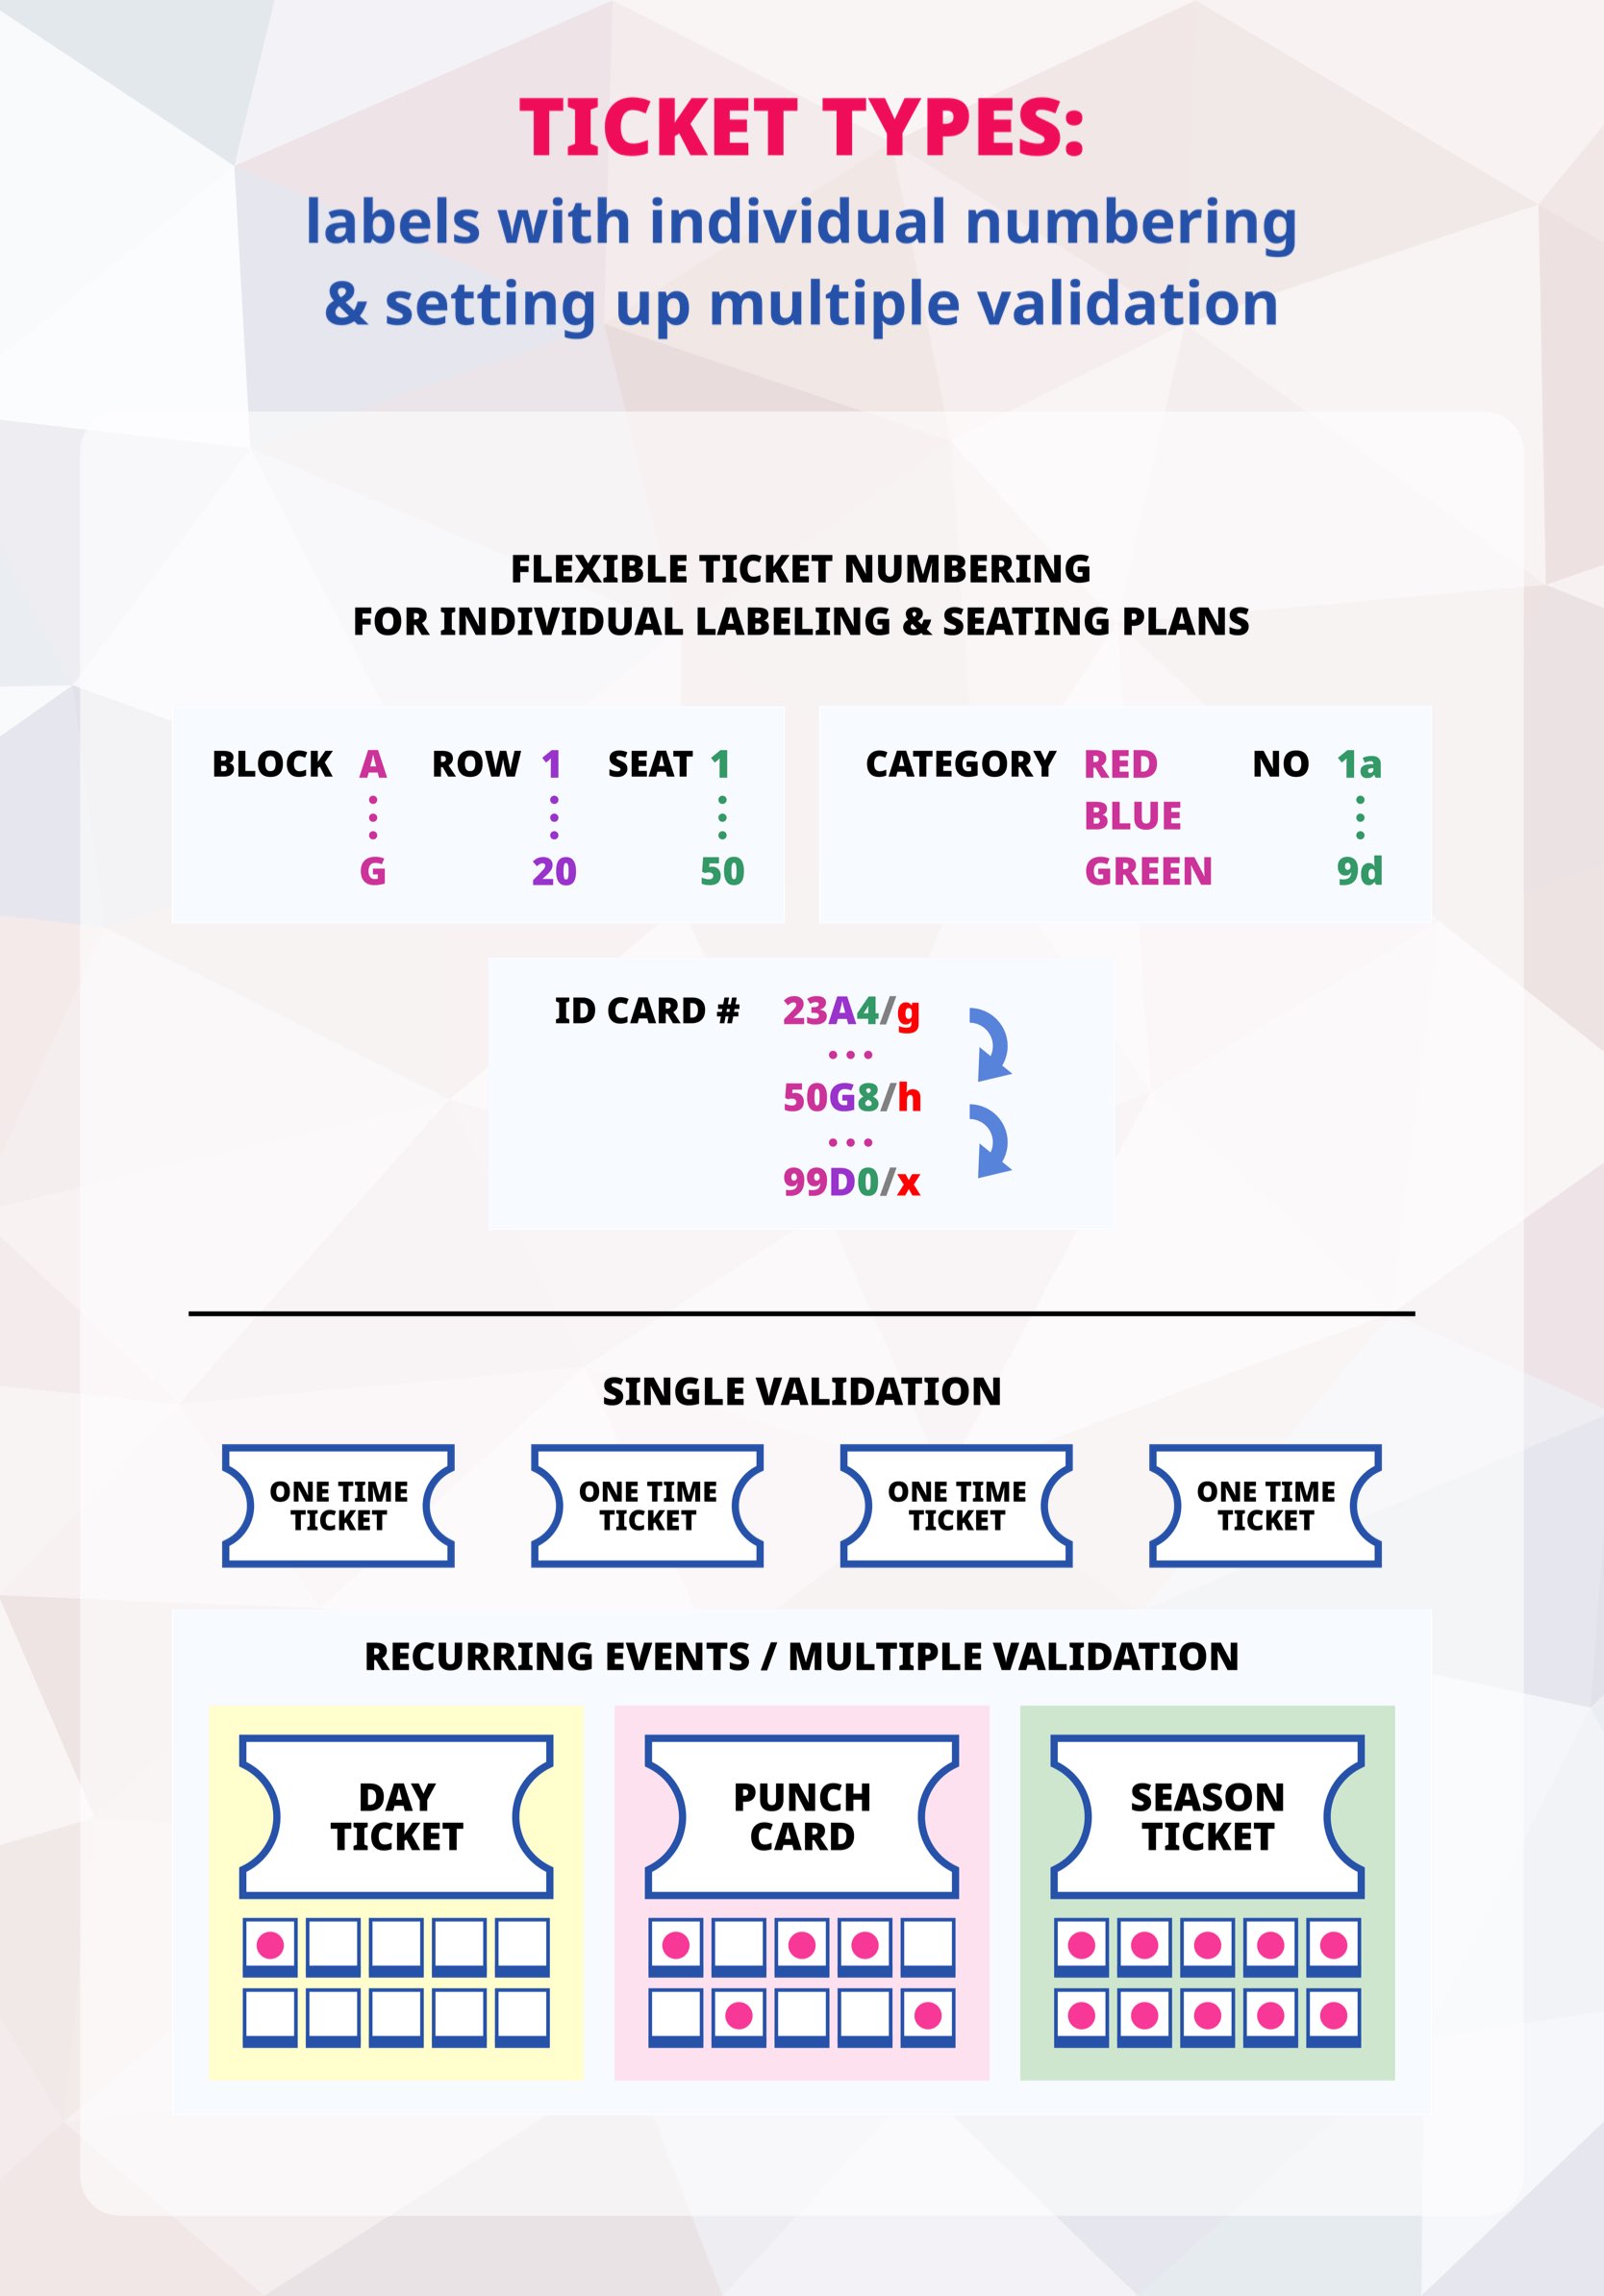
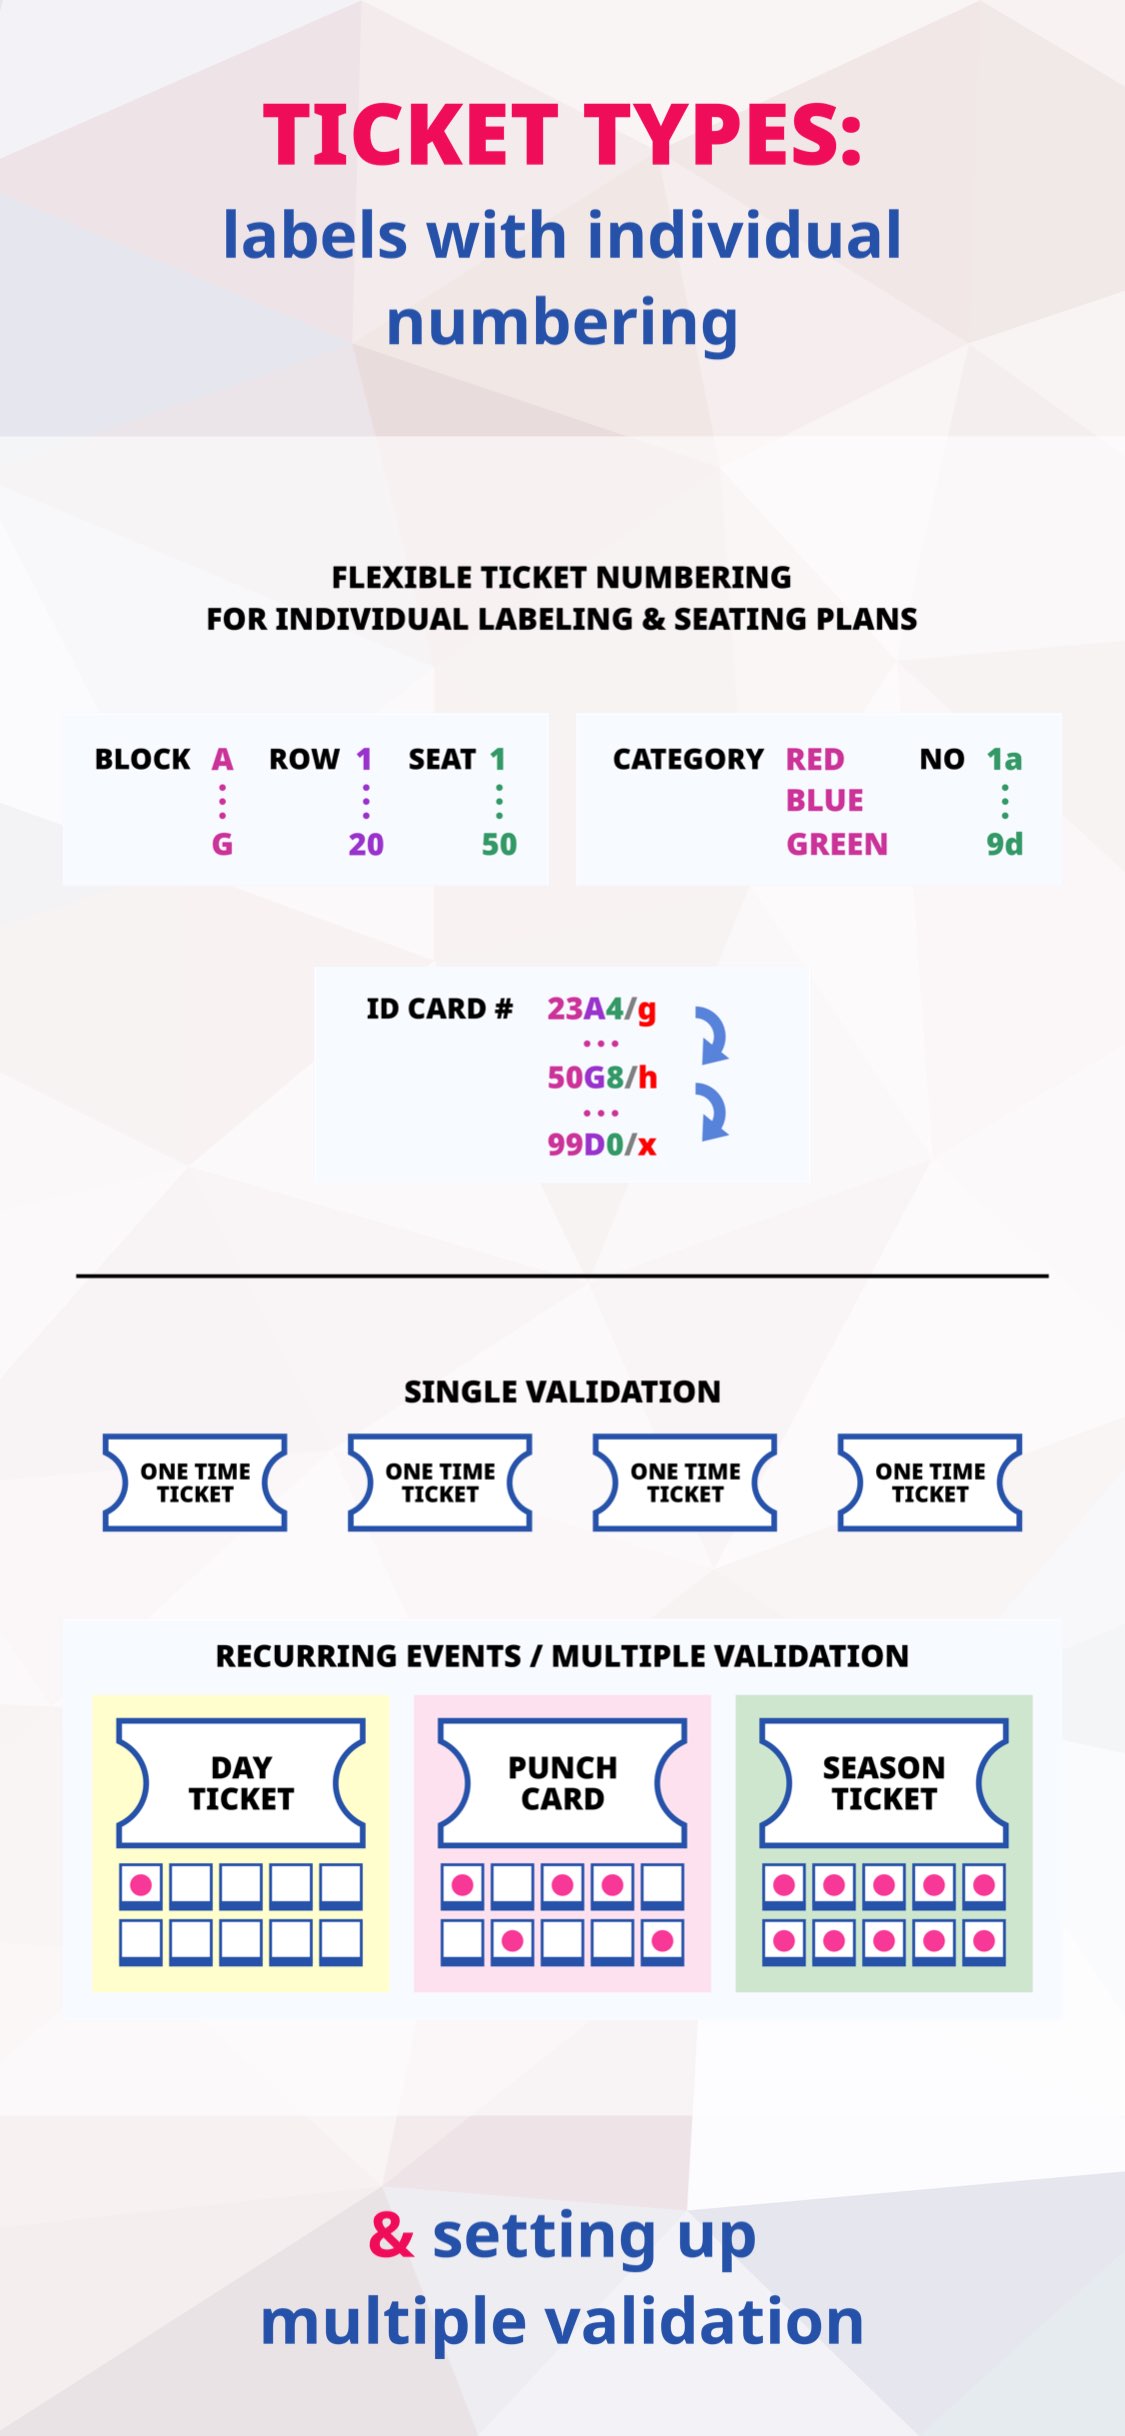
  • individual labeling, dating and extended ticket numbering for implementing seating plans (e.g. blocks, rows, categories)
  • creating, previewing and exporting printable tickets in PDF format with individual barcodes
  • exporting ticket lists in CSV, JSON and XML format for external processing
  • importing tickets lists from external data sources (formatted as CSV, JSON or XML)
  • exporting attendance lists in CSV, JSON and XML format
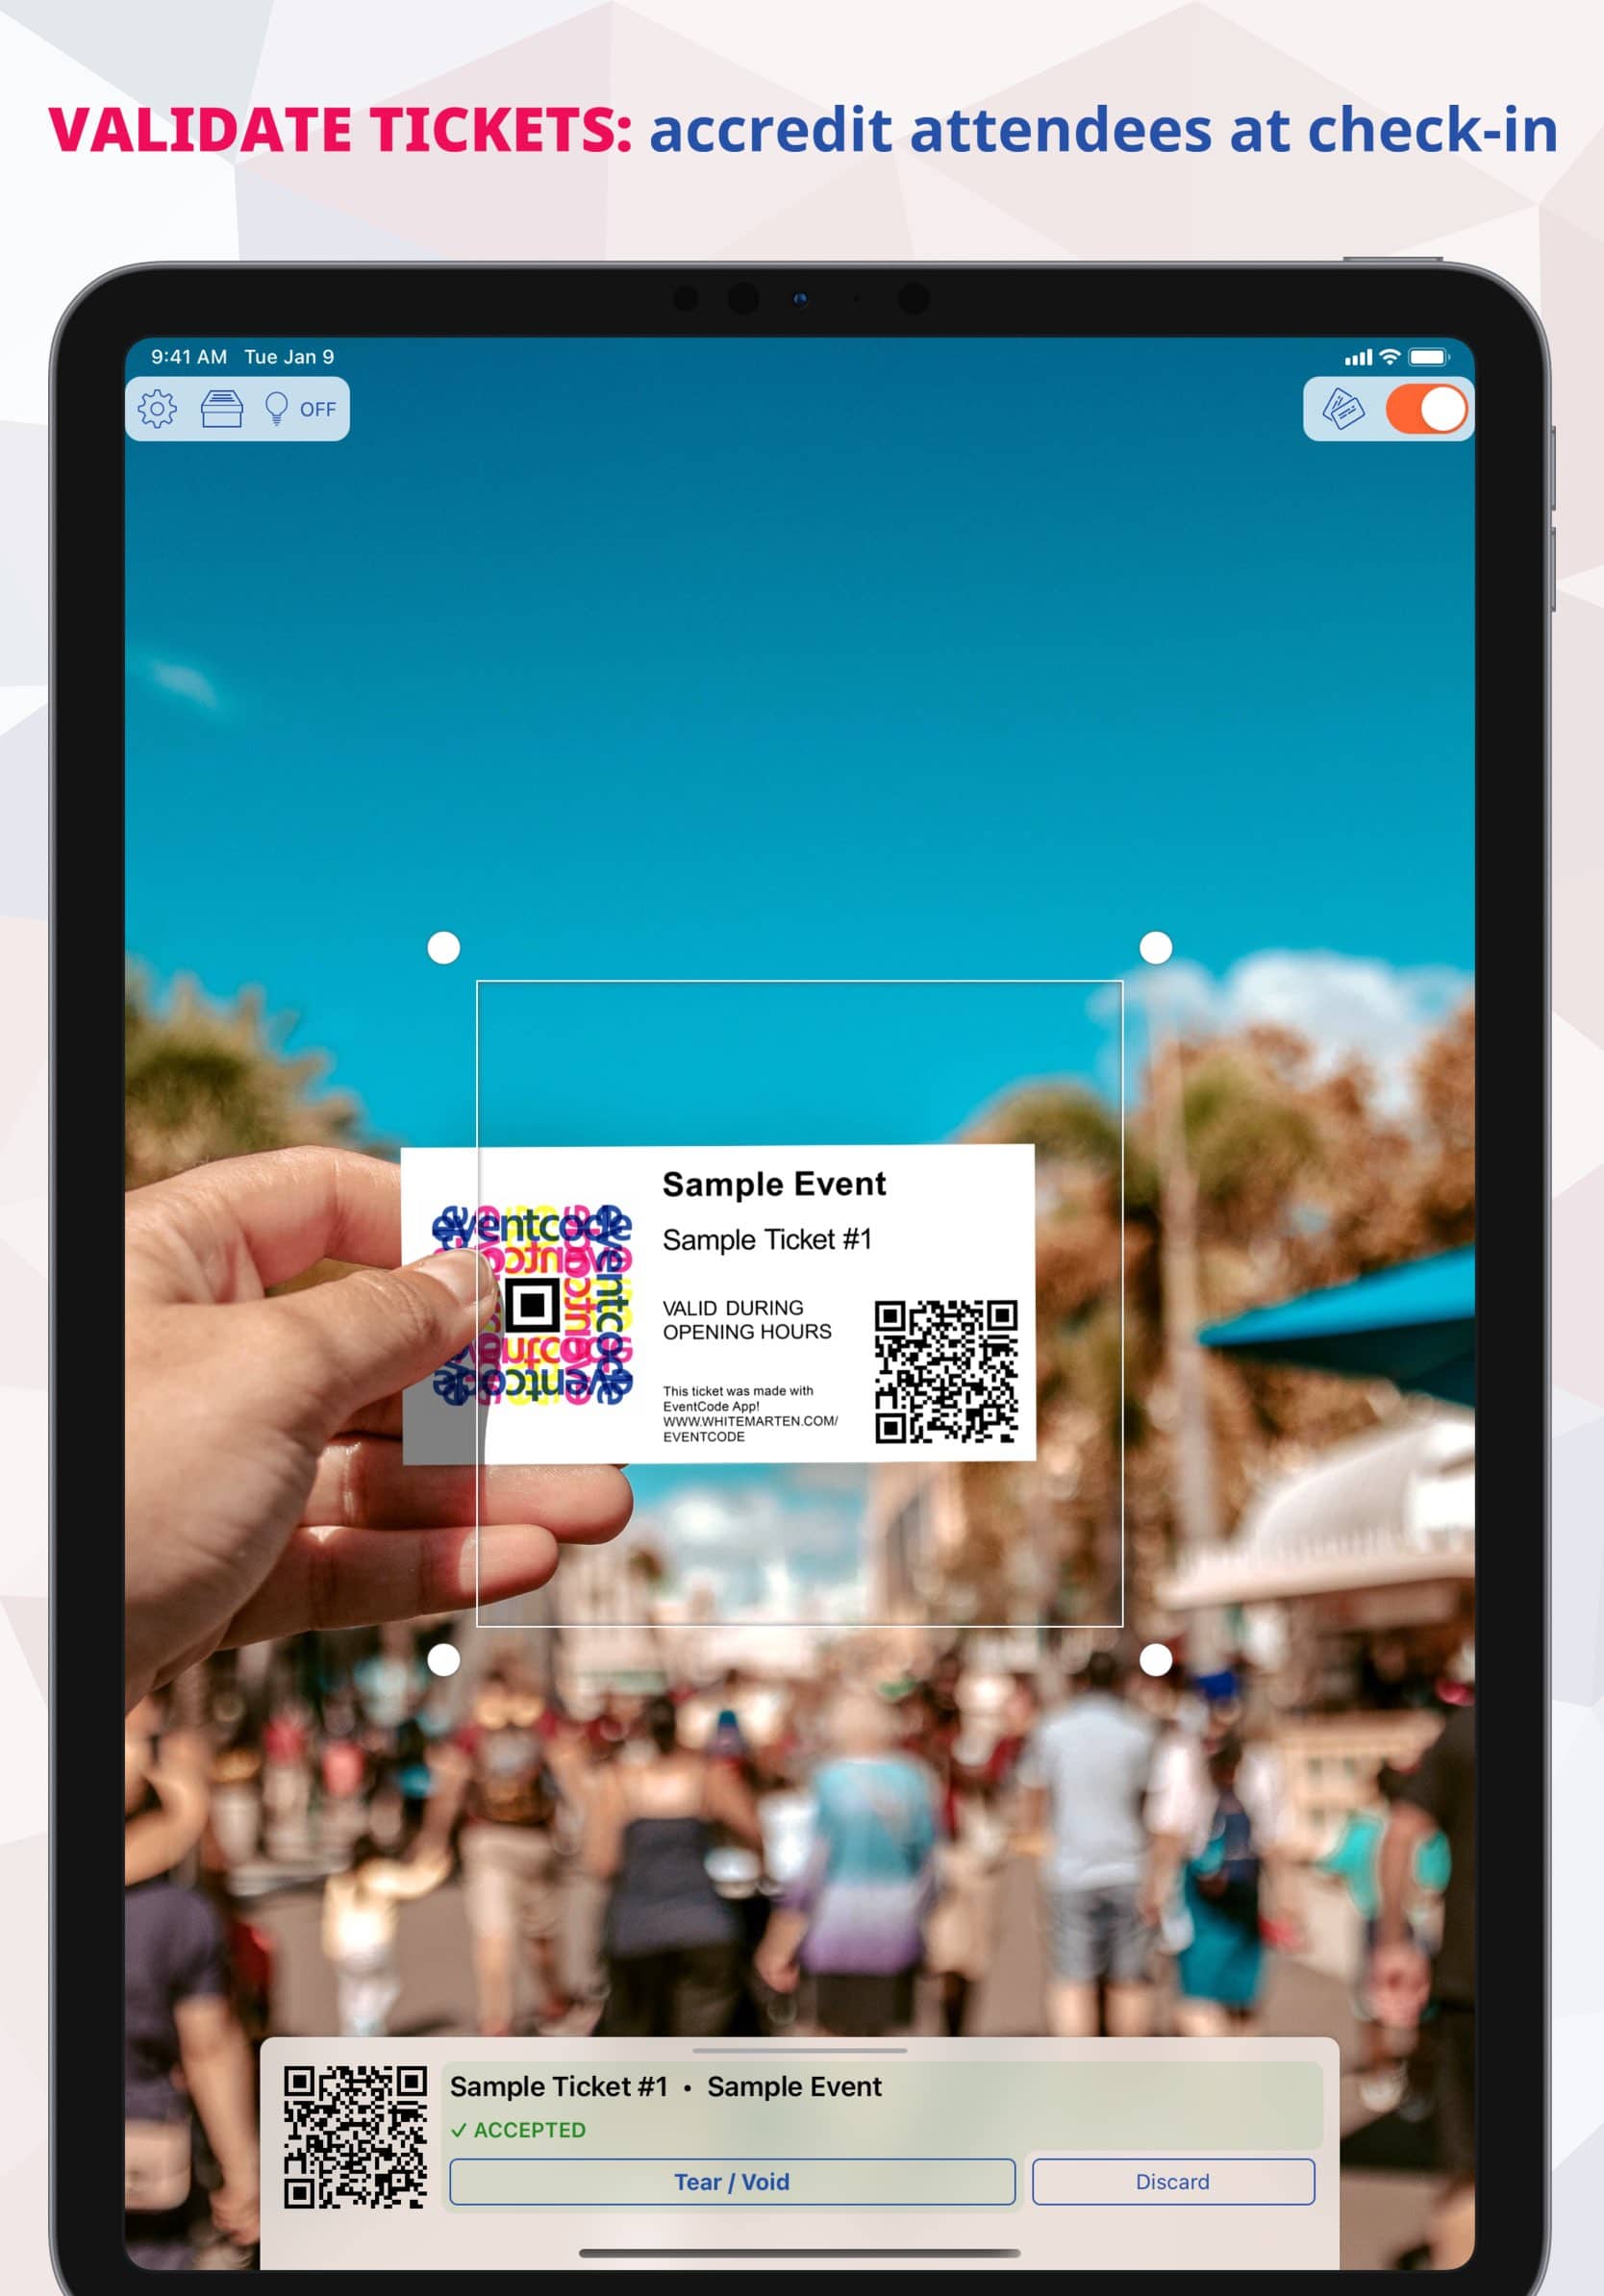
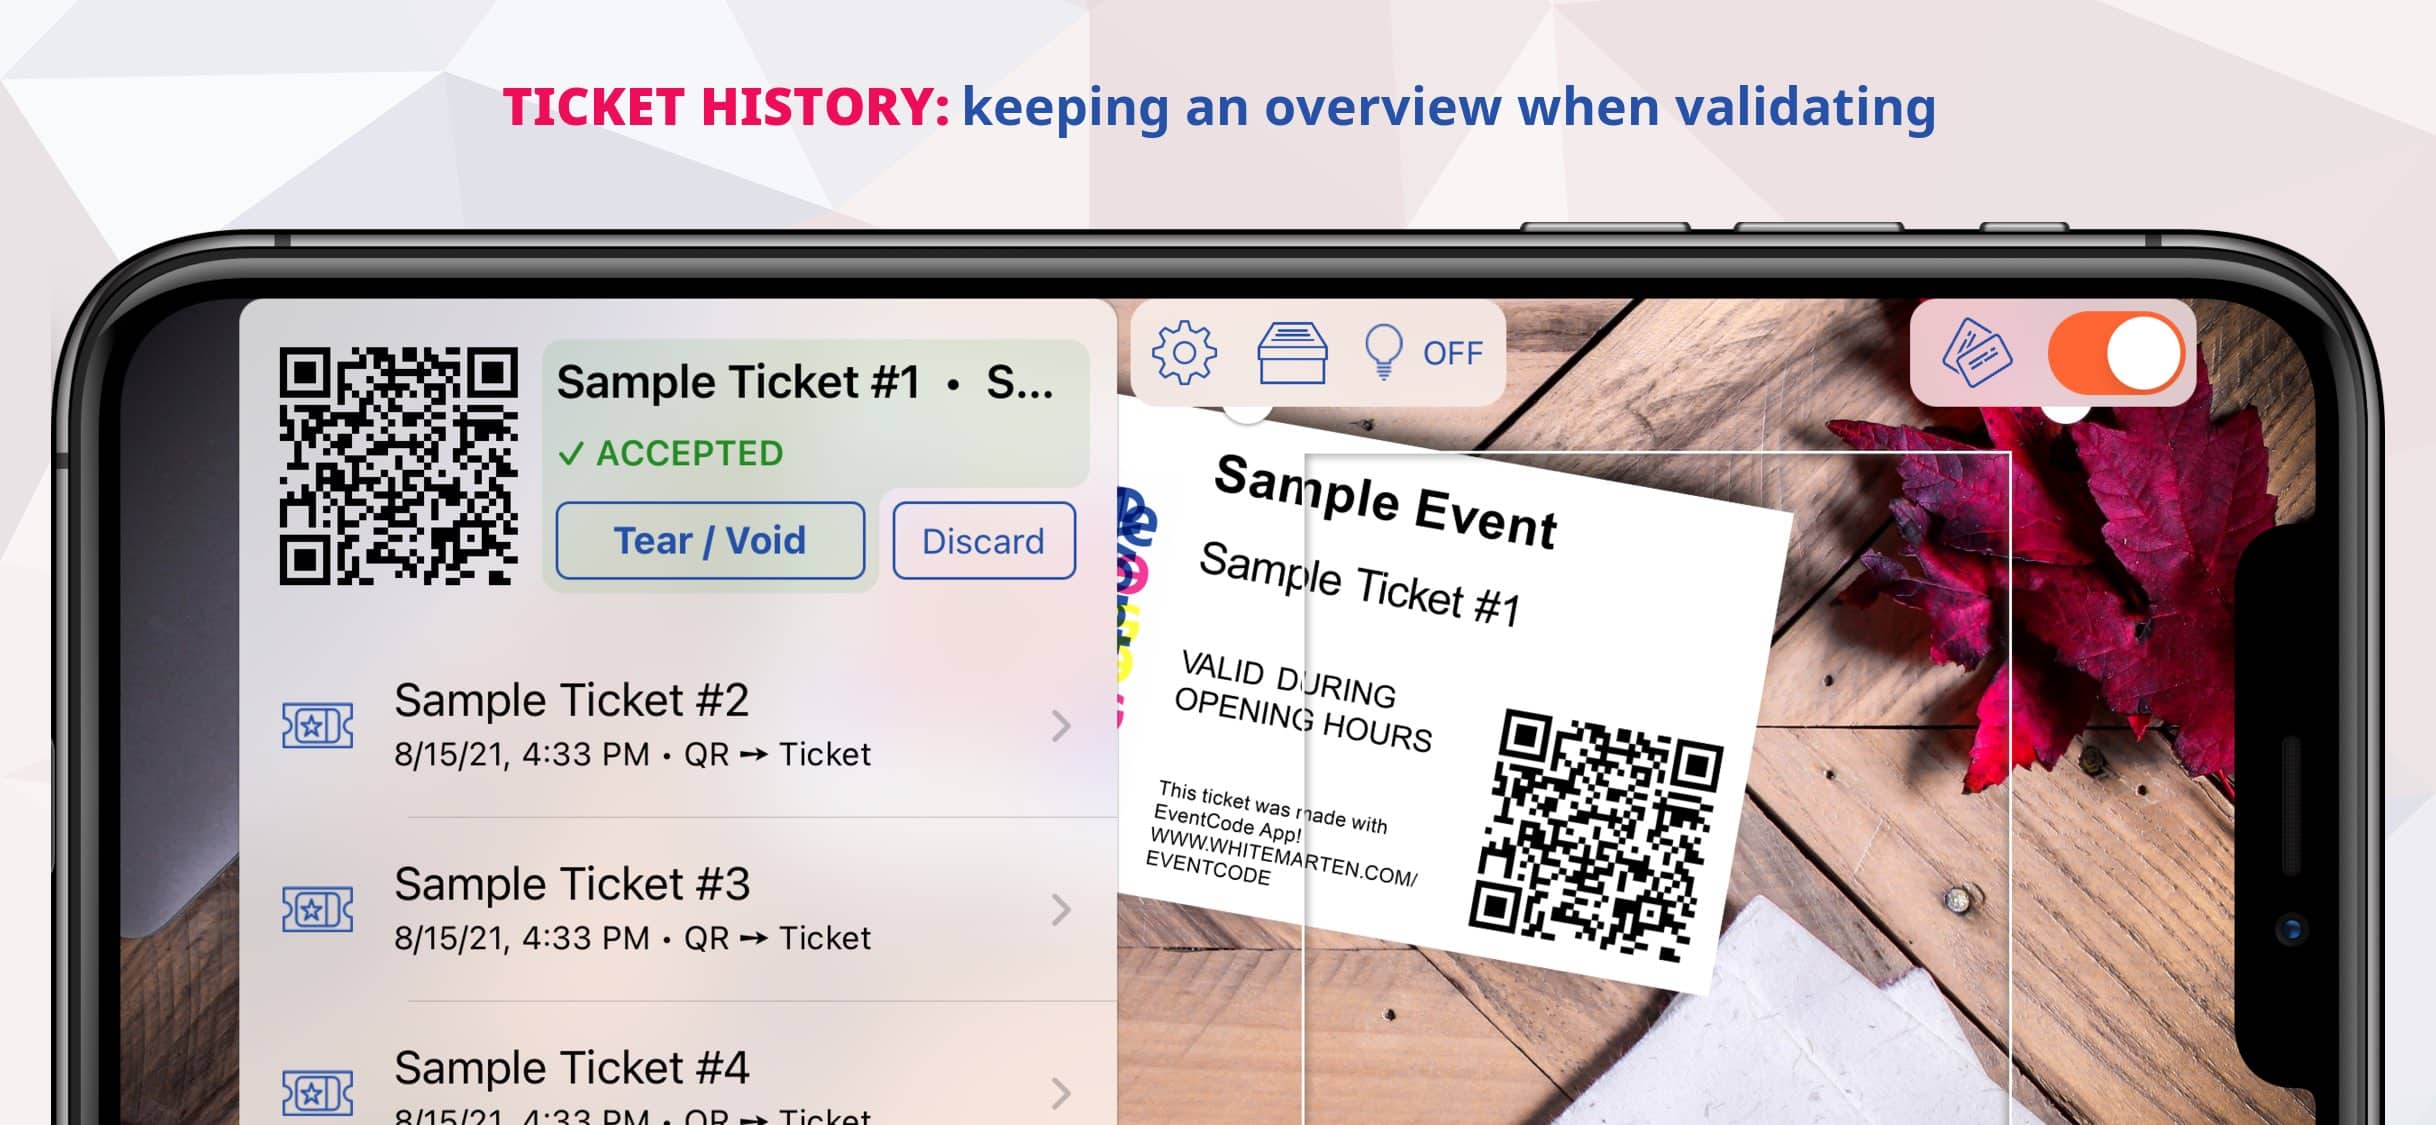

Ticket Validation

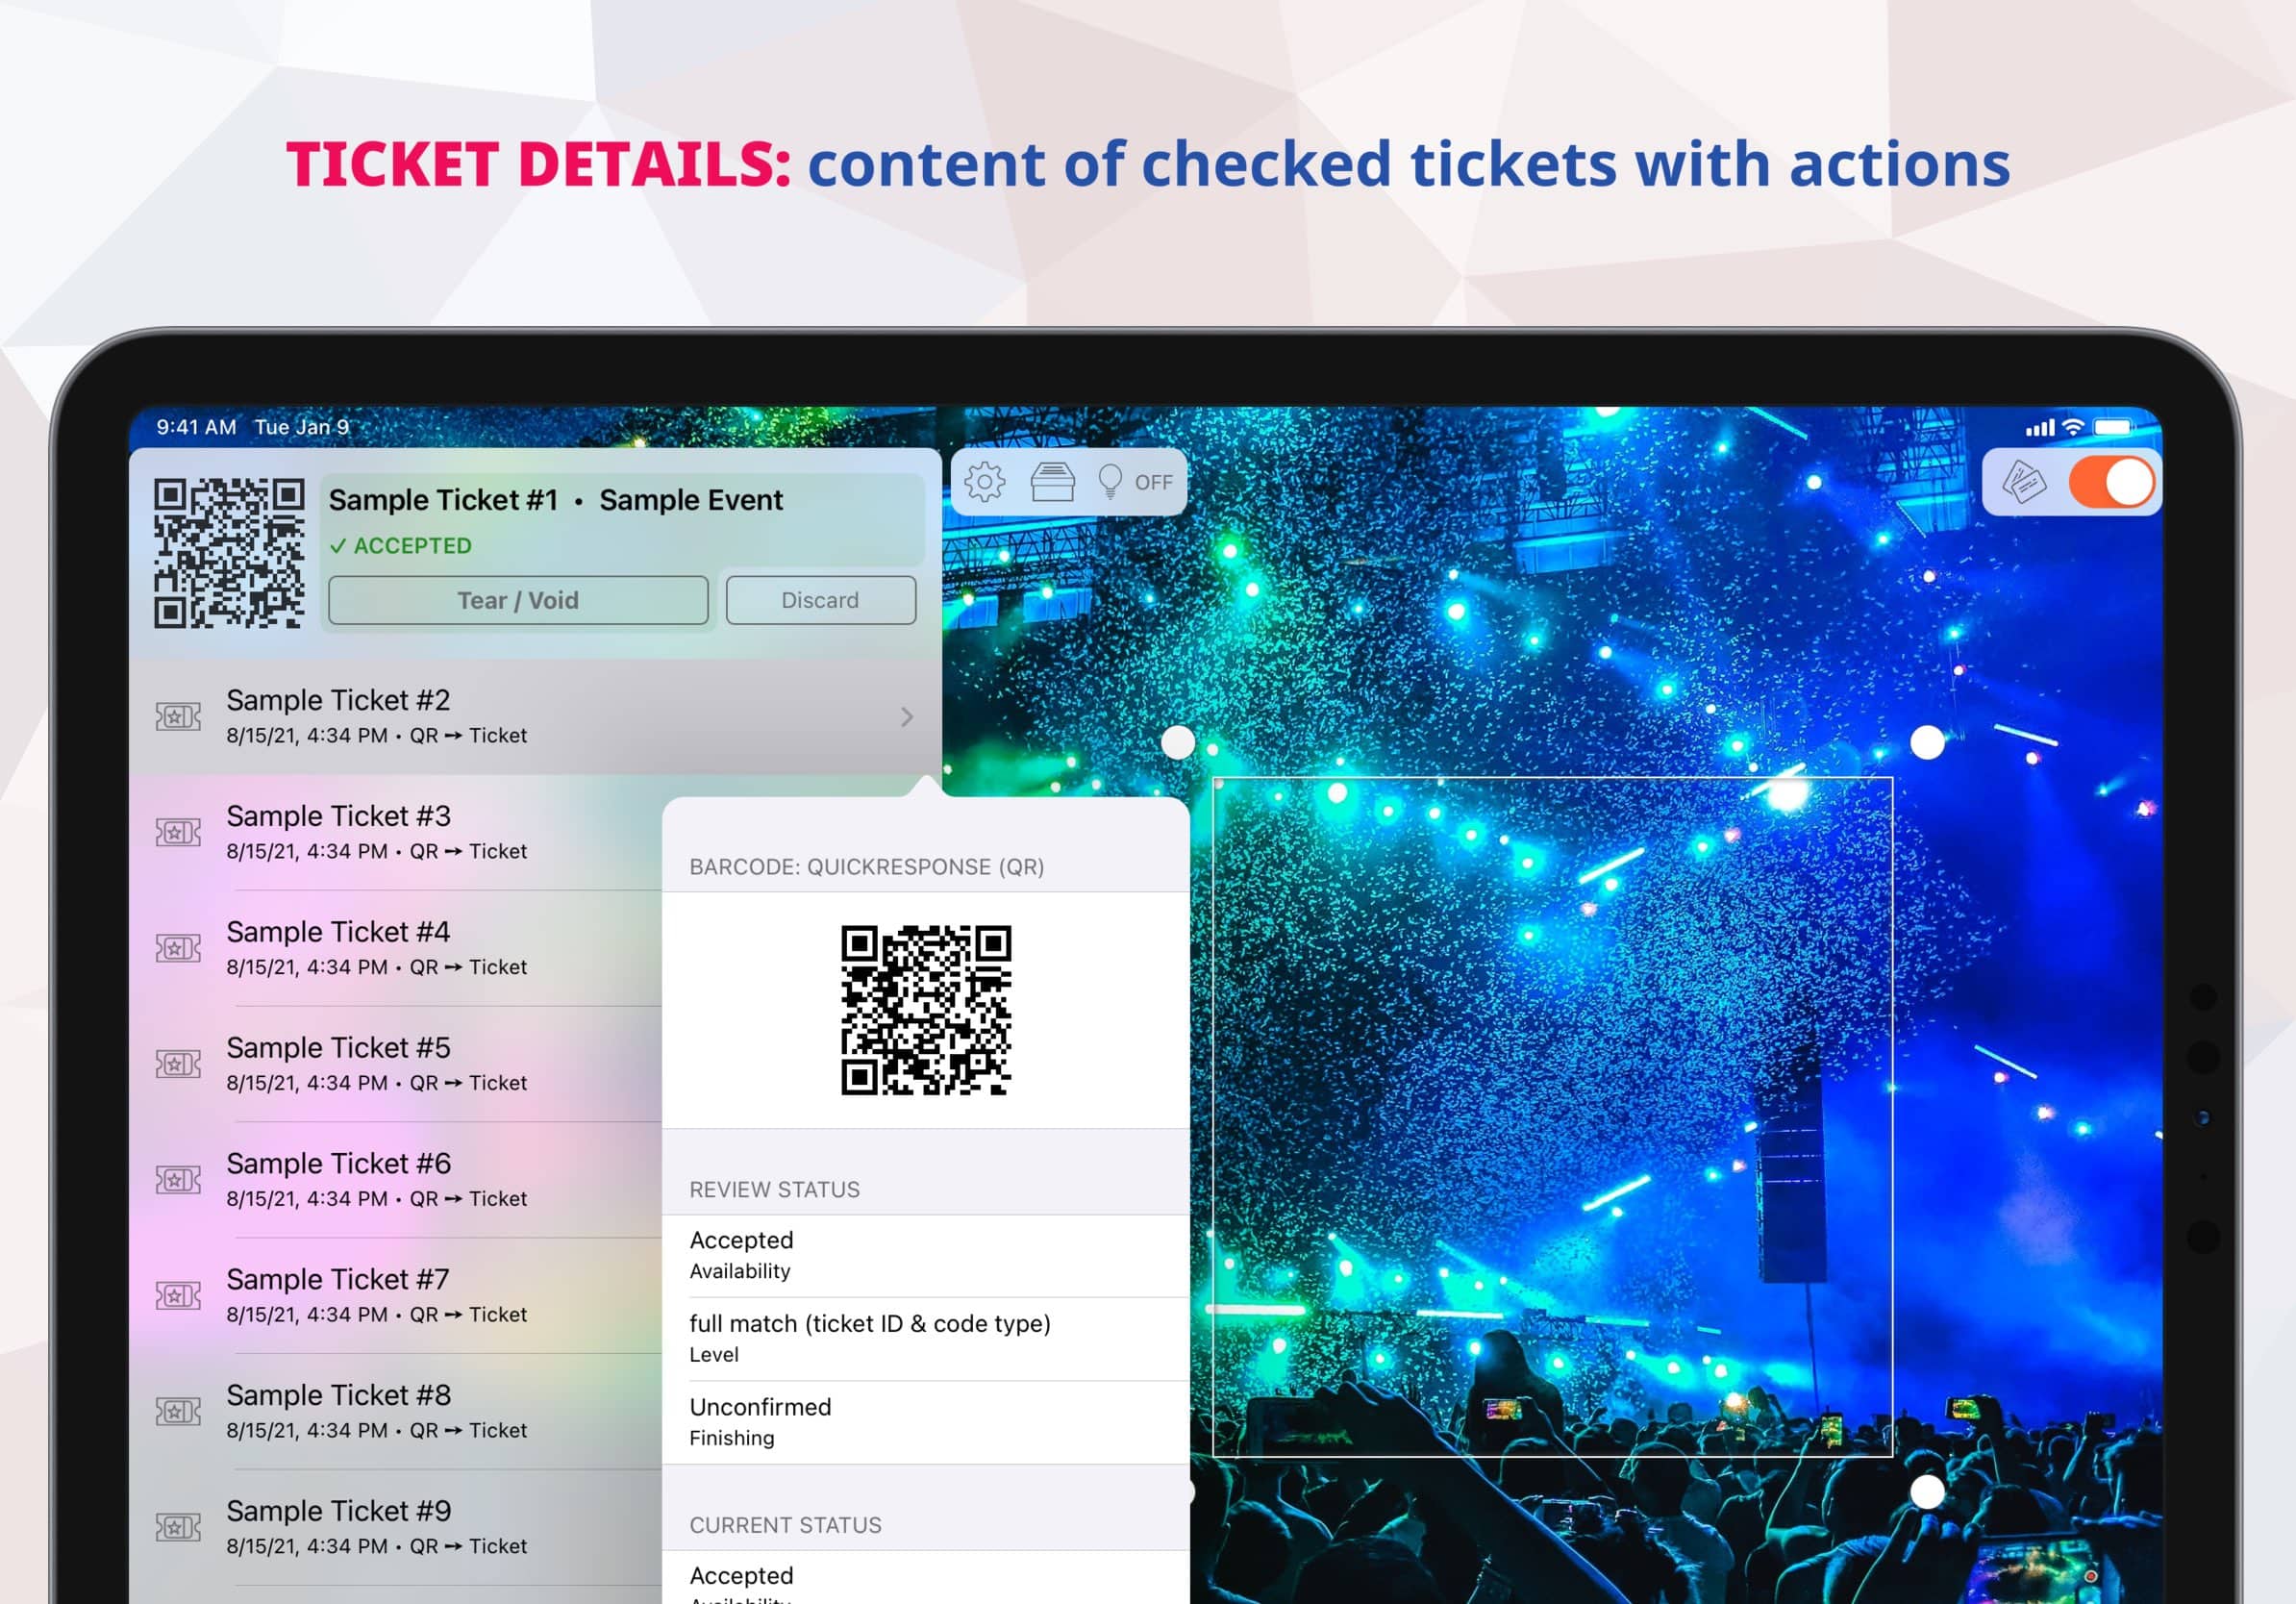
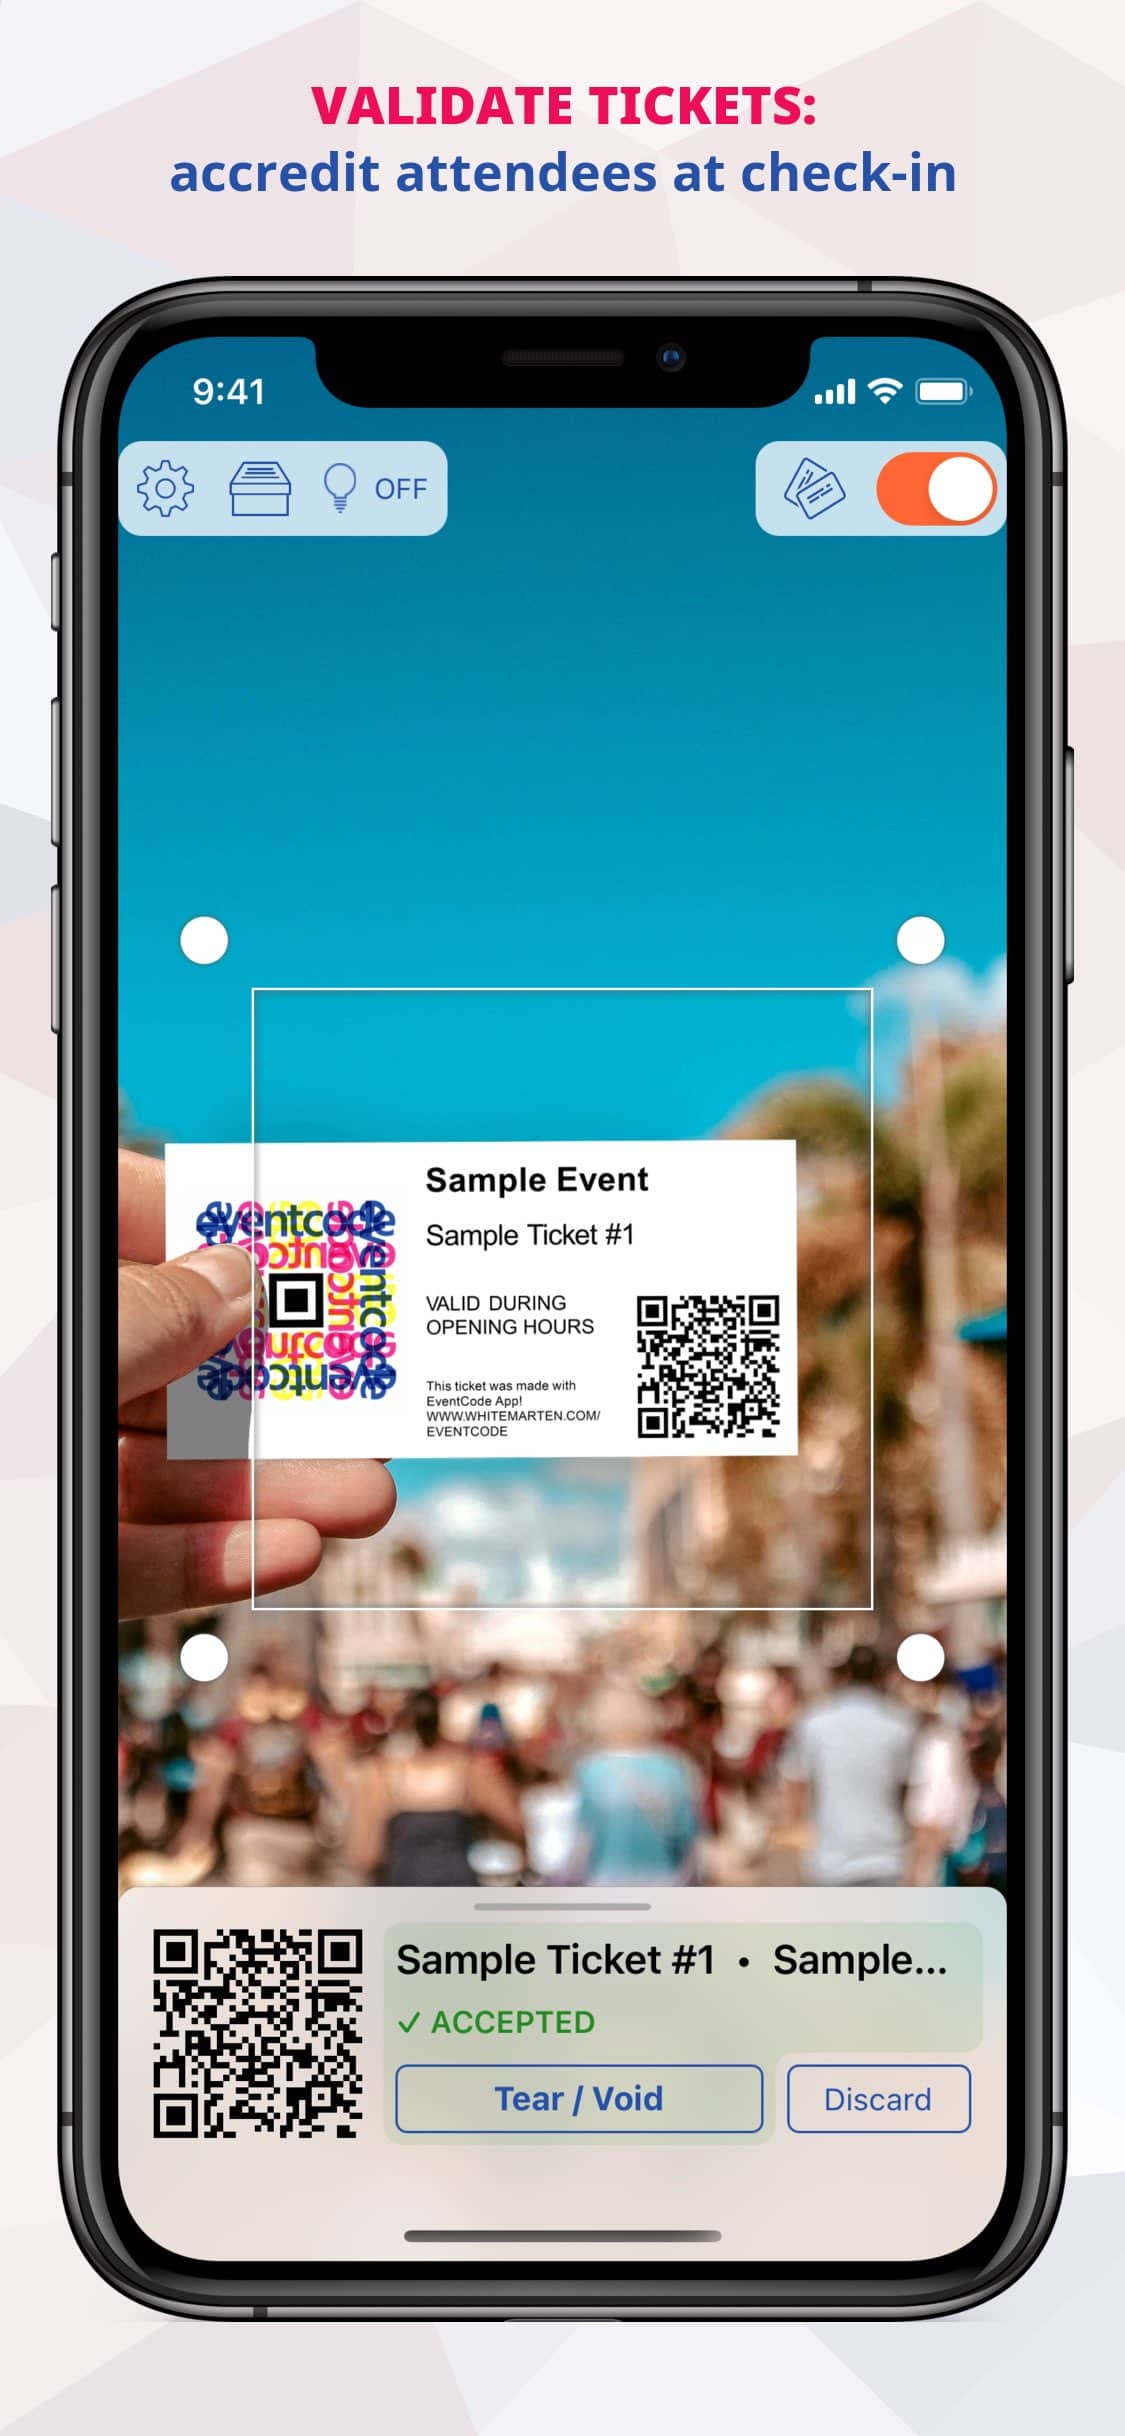
  • switching to validation mode for accreditation & entry check
  • conducting attendance checks and compiling attendance lists
  • scanning/verifying ticket barcodes with history logging and the ability to tear tickets digitally at check-in
  • validating tickets multiple times for season tickets, punch cards, day tickets and more
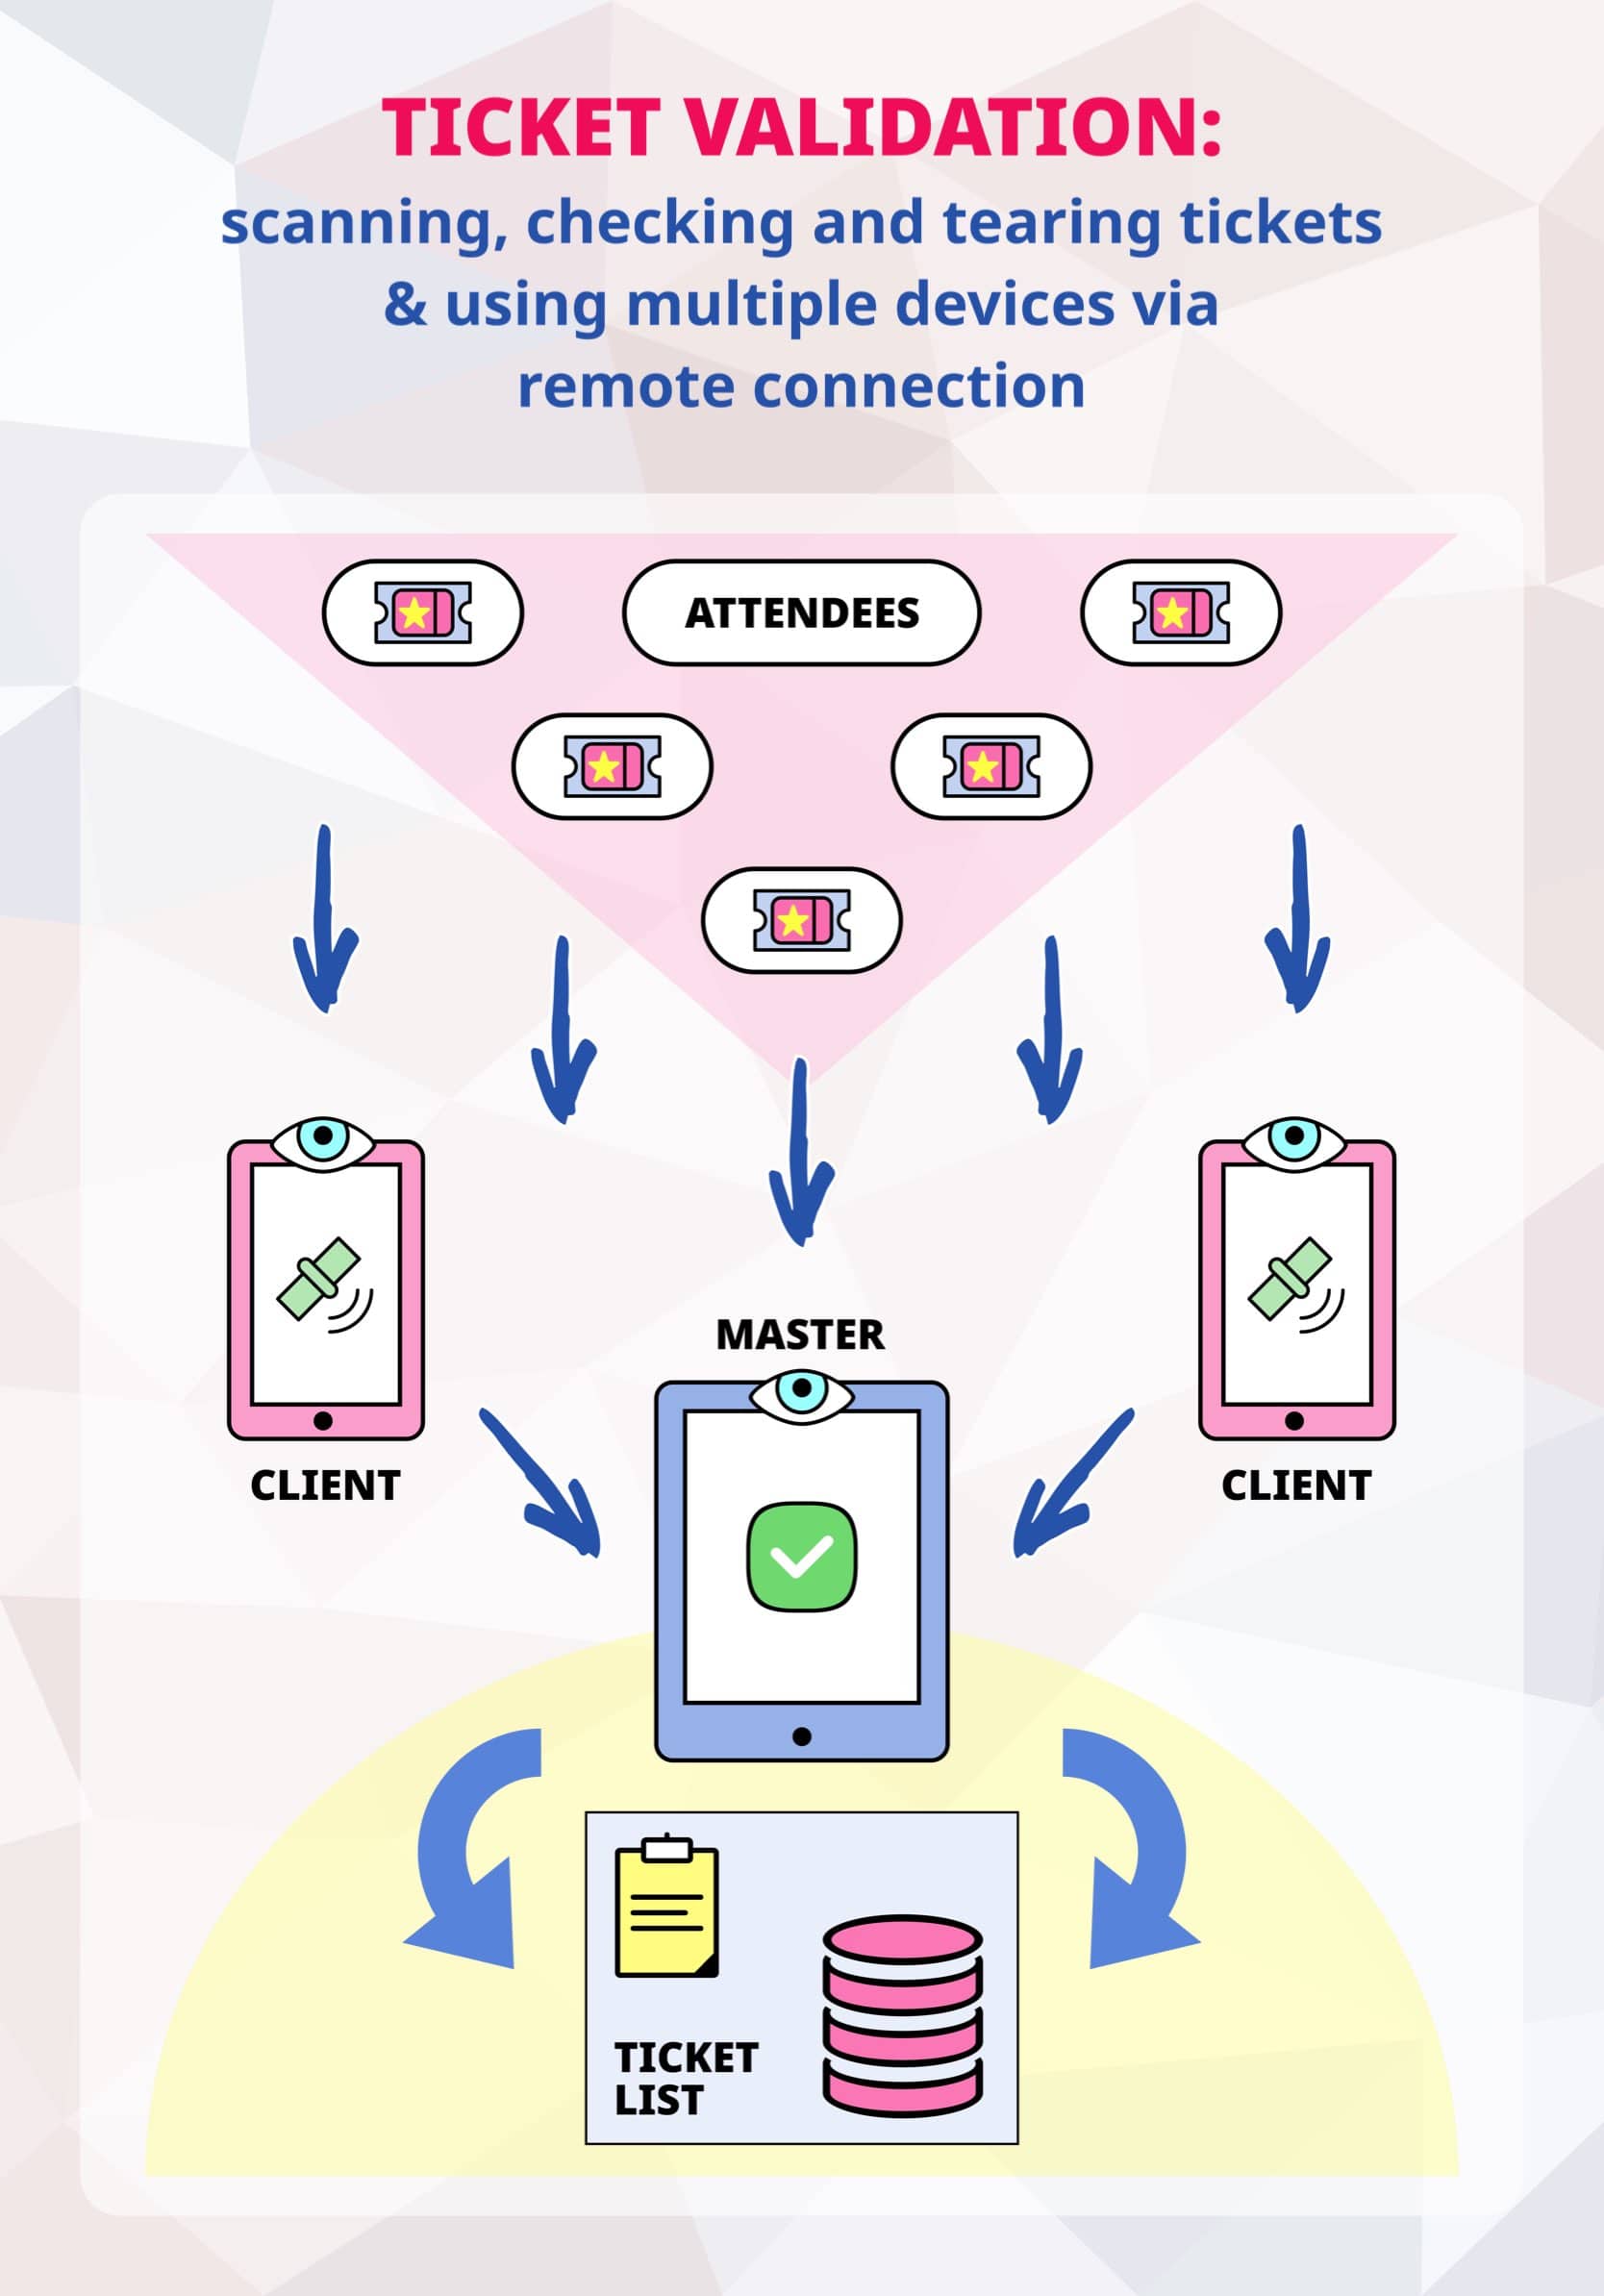
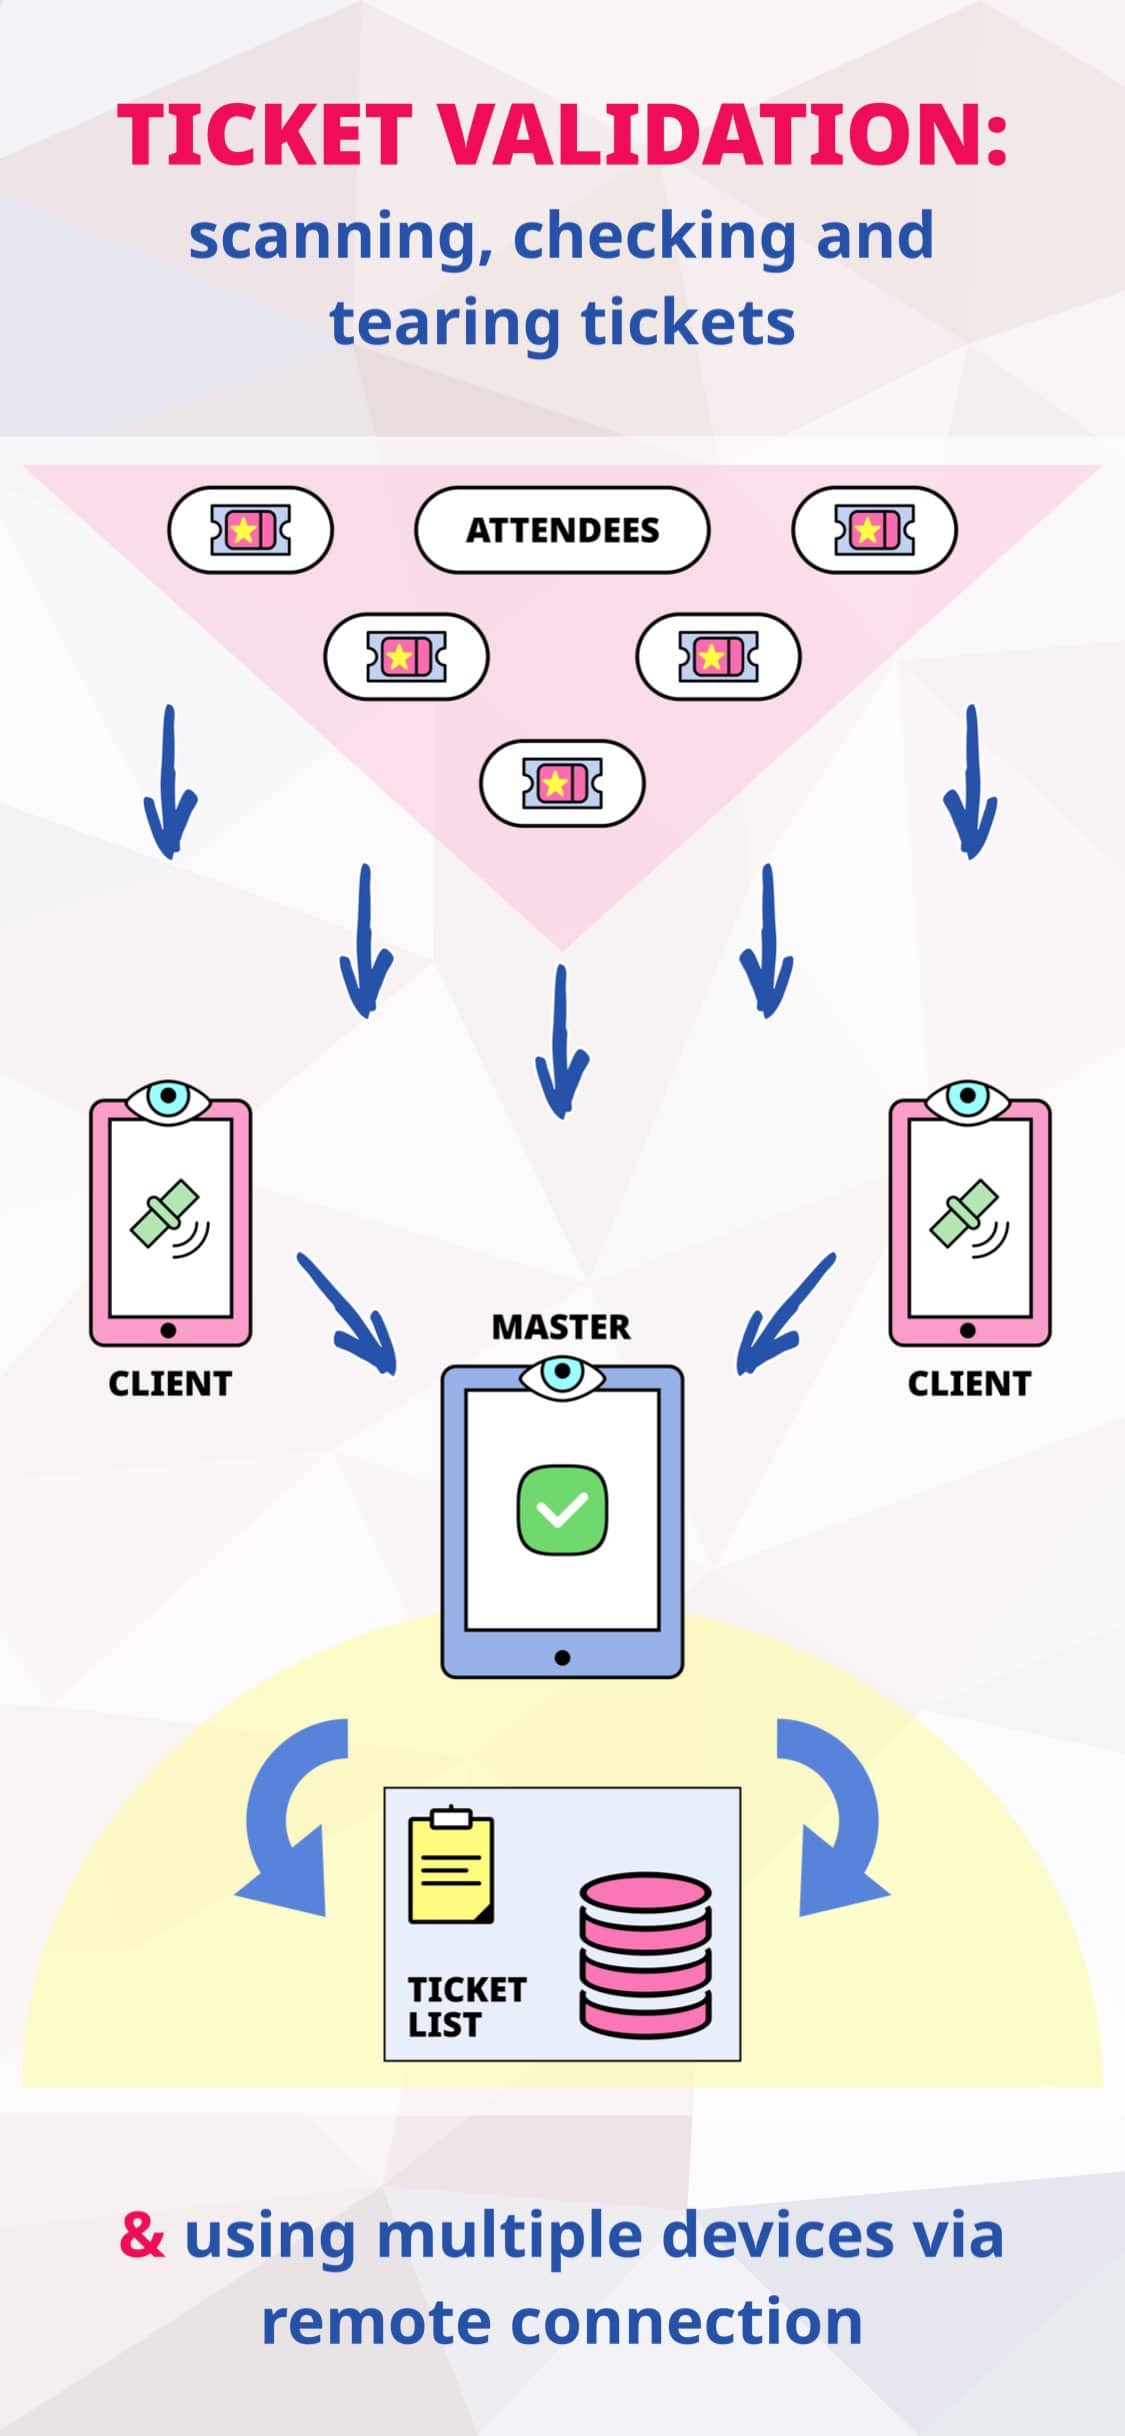
  • connecting multiple devices using Bluetooth/Wi-Fi for ticket scanning & validation in remote master/client mode

Barcode Detection / Barcode Generator

  • detecting linear (one-dimensional) barcodes and 2D barcodes
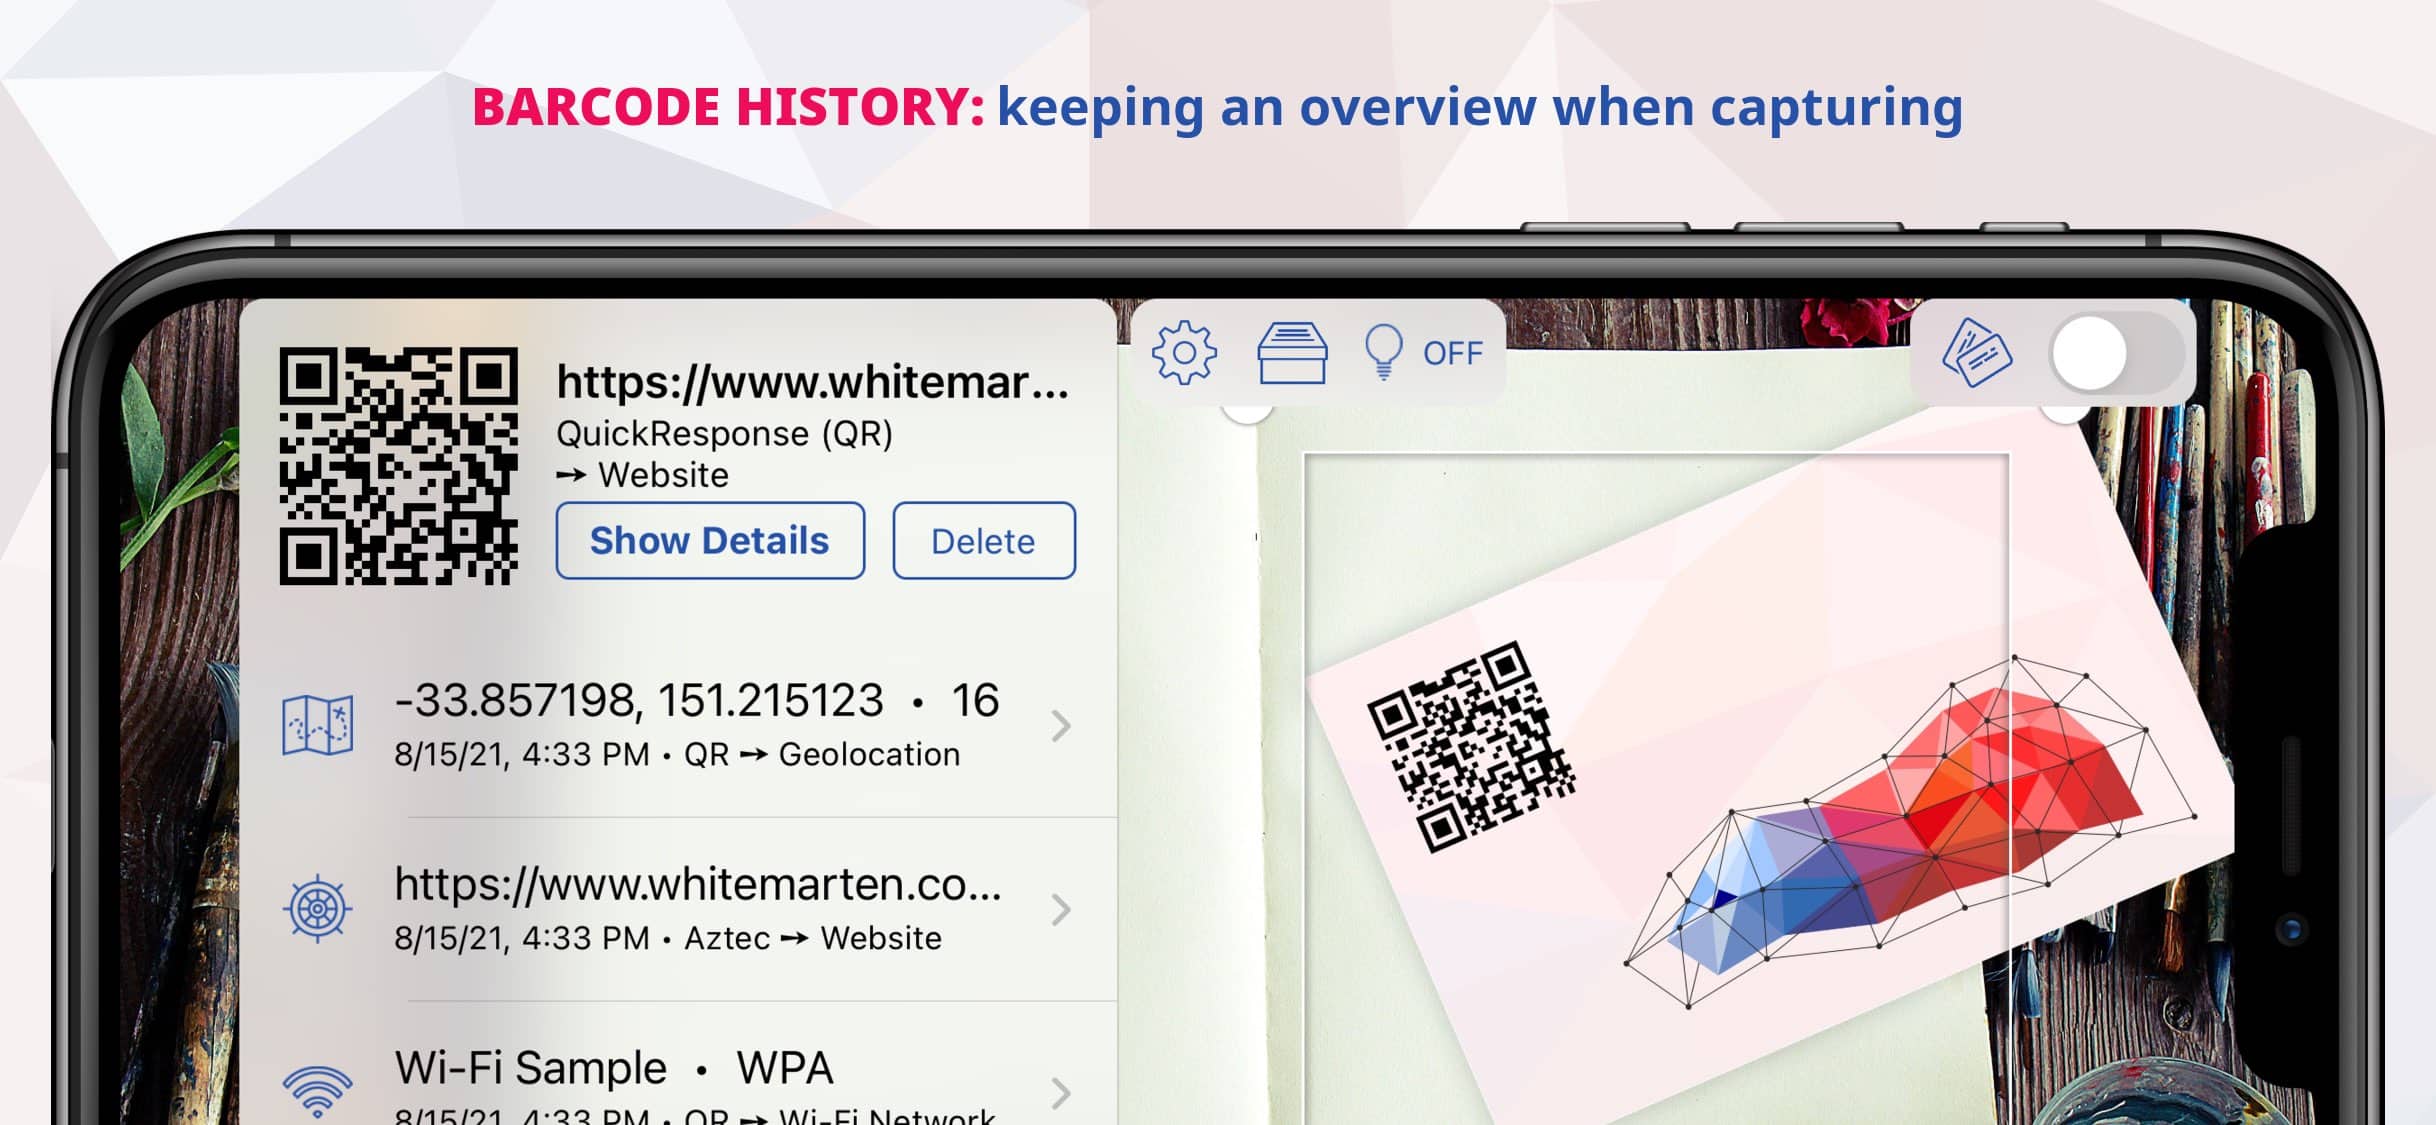
  • barcodes can be captured directly with the camera or imported from saved photos and images which are stored in the photo library
  • macOS only: barcodes can be scanned directly from the screen, captured with a camera or imported from photos and images stored as files on the hard drive
  • automatic scan processing for fast sequential capturing
  • alternatively: manual scan processing with preview and apply for pinpoint capturing
  • supported barcode formats (capturing): Code 39, Code 93, Code 128, Interleaved 2 of 5 (ITF), ITF-14, EAN-8, EAN-13, ISBN-10, ISBN-13, UPC-E, UPC-A, PDF417, QuickResponse (QR), DataMatrix, Aztec
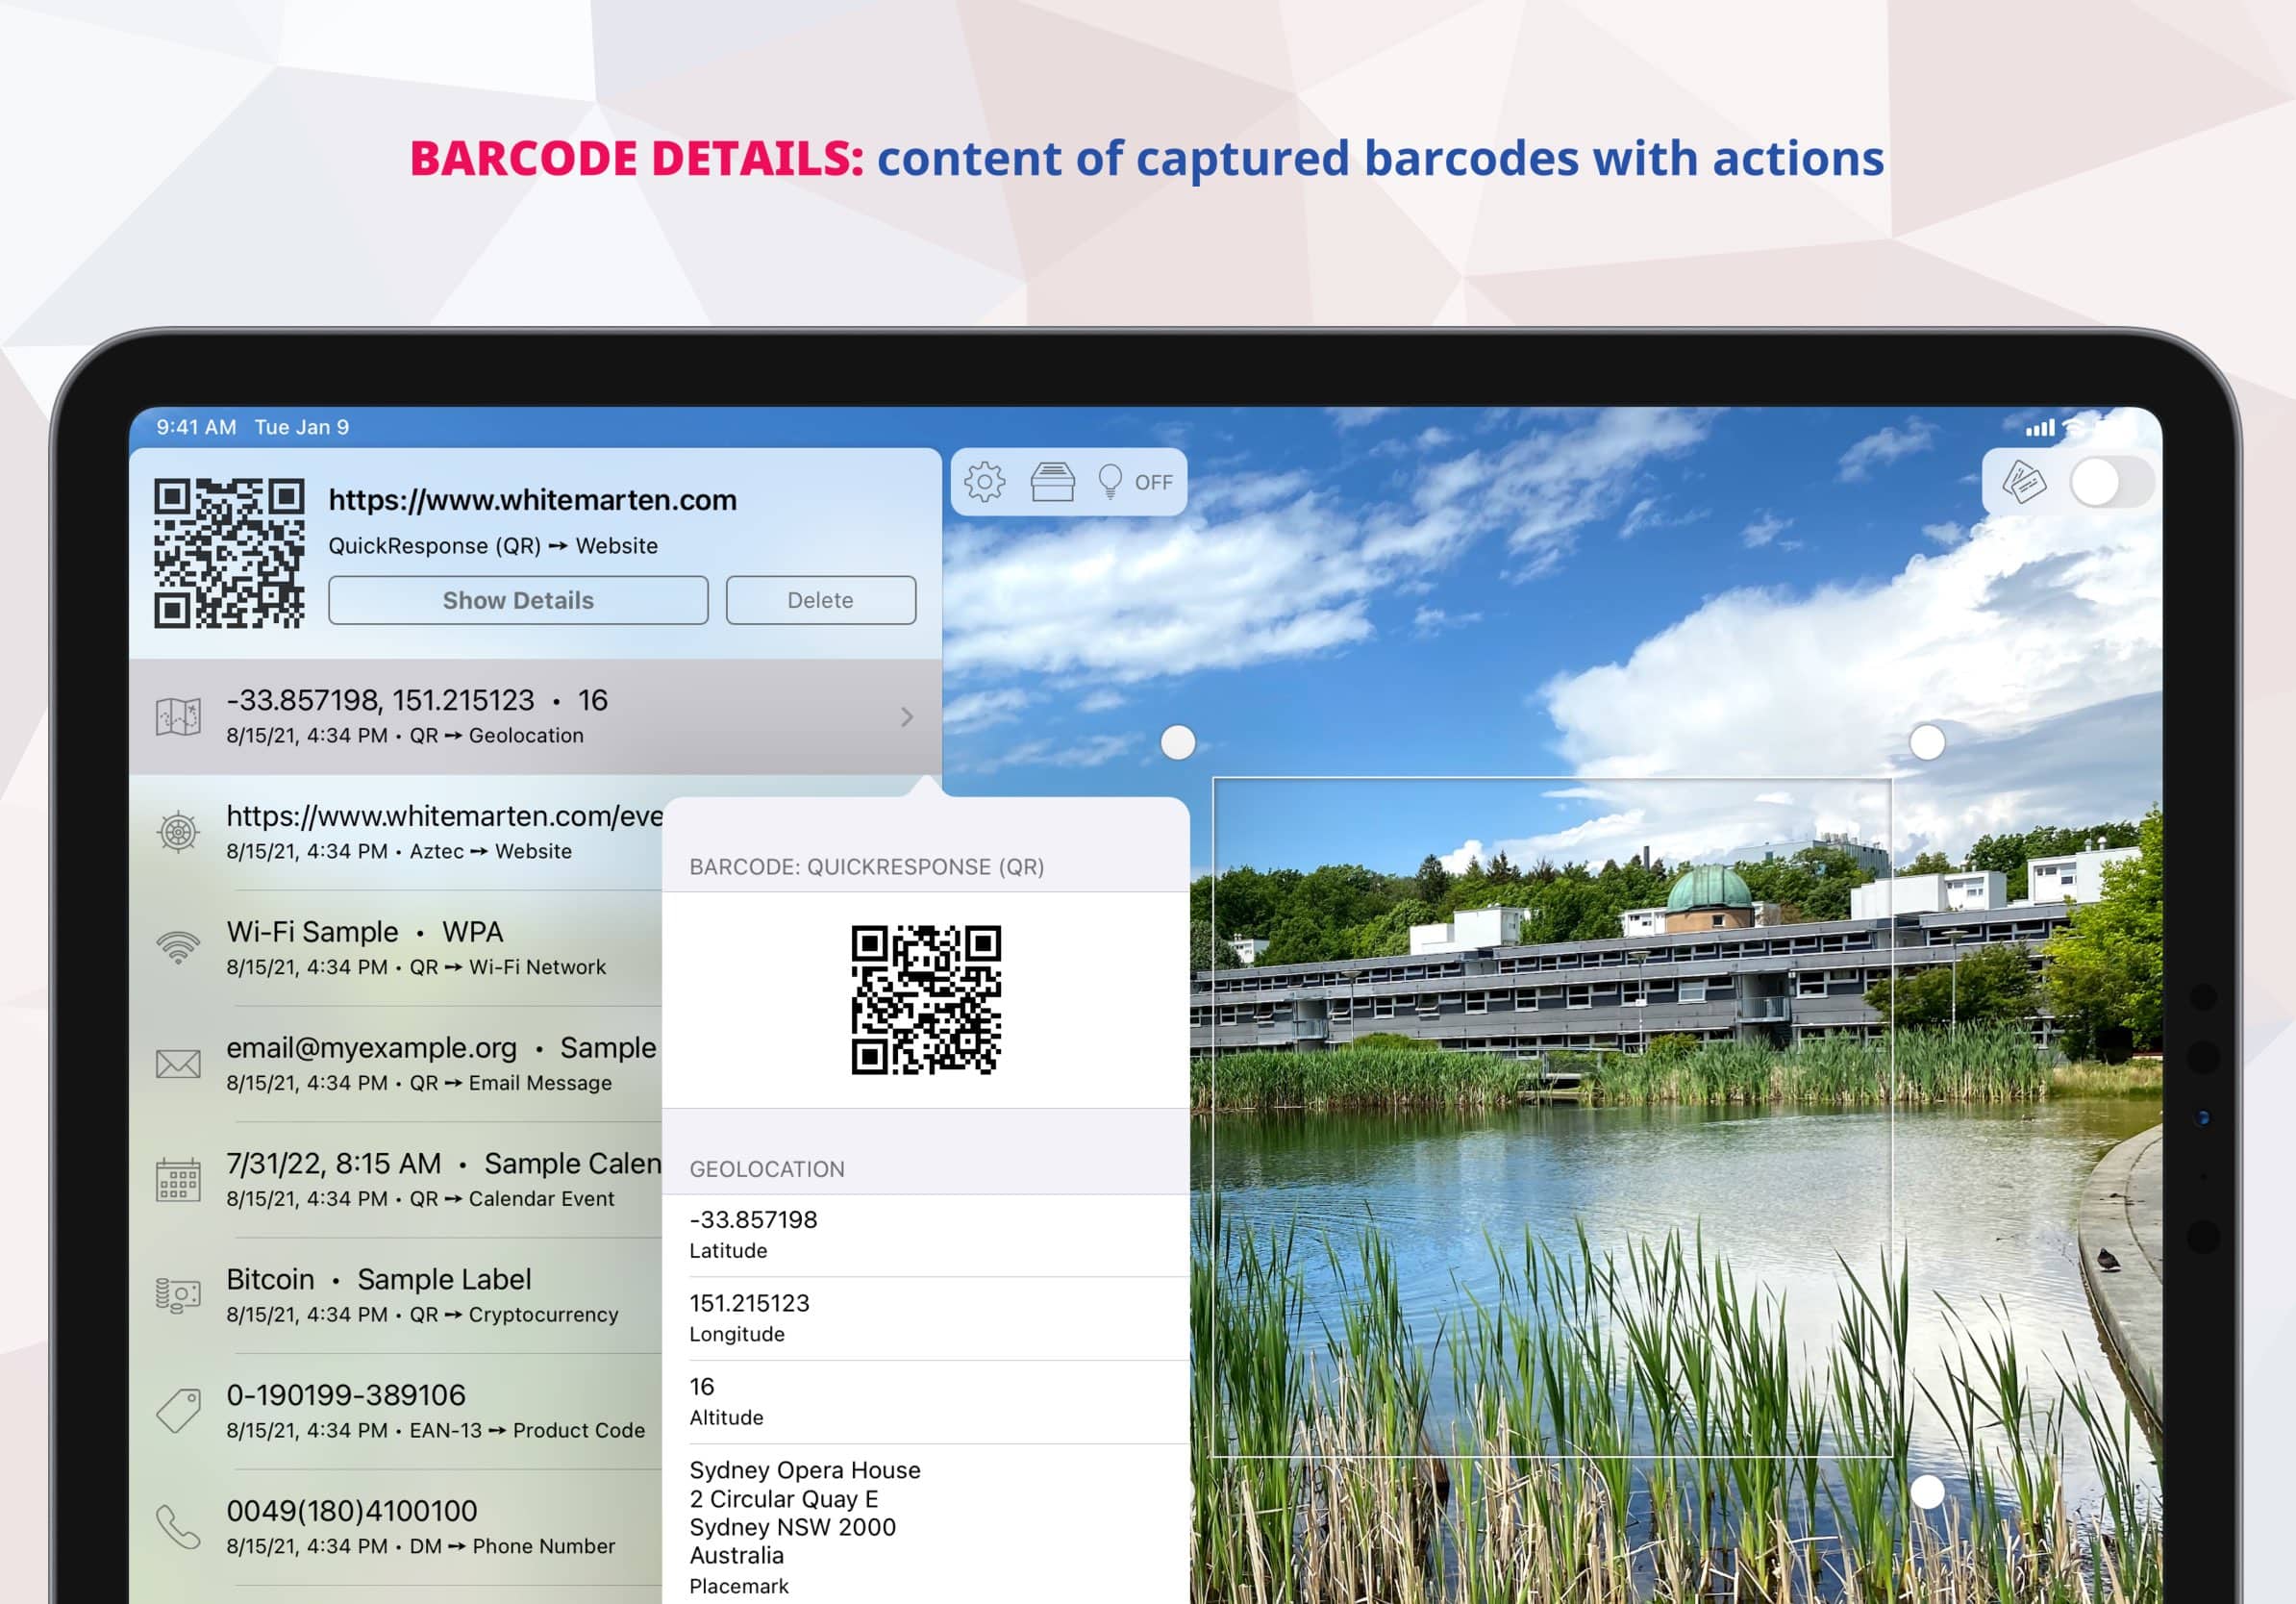
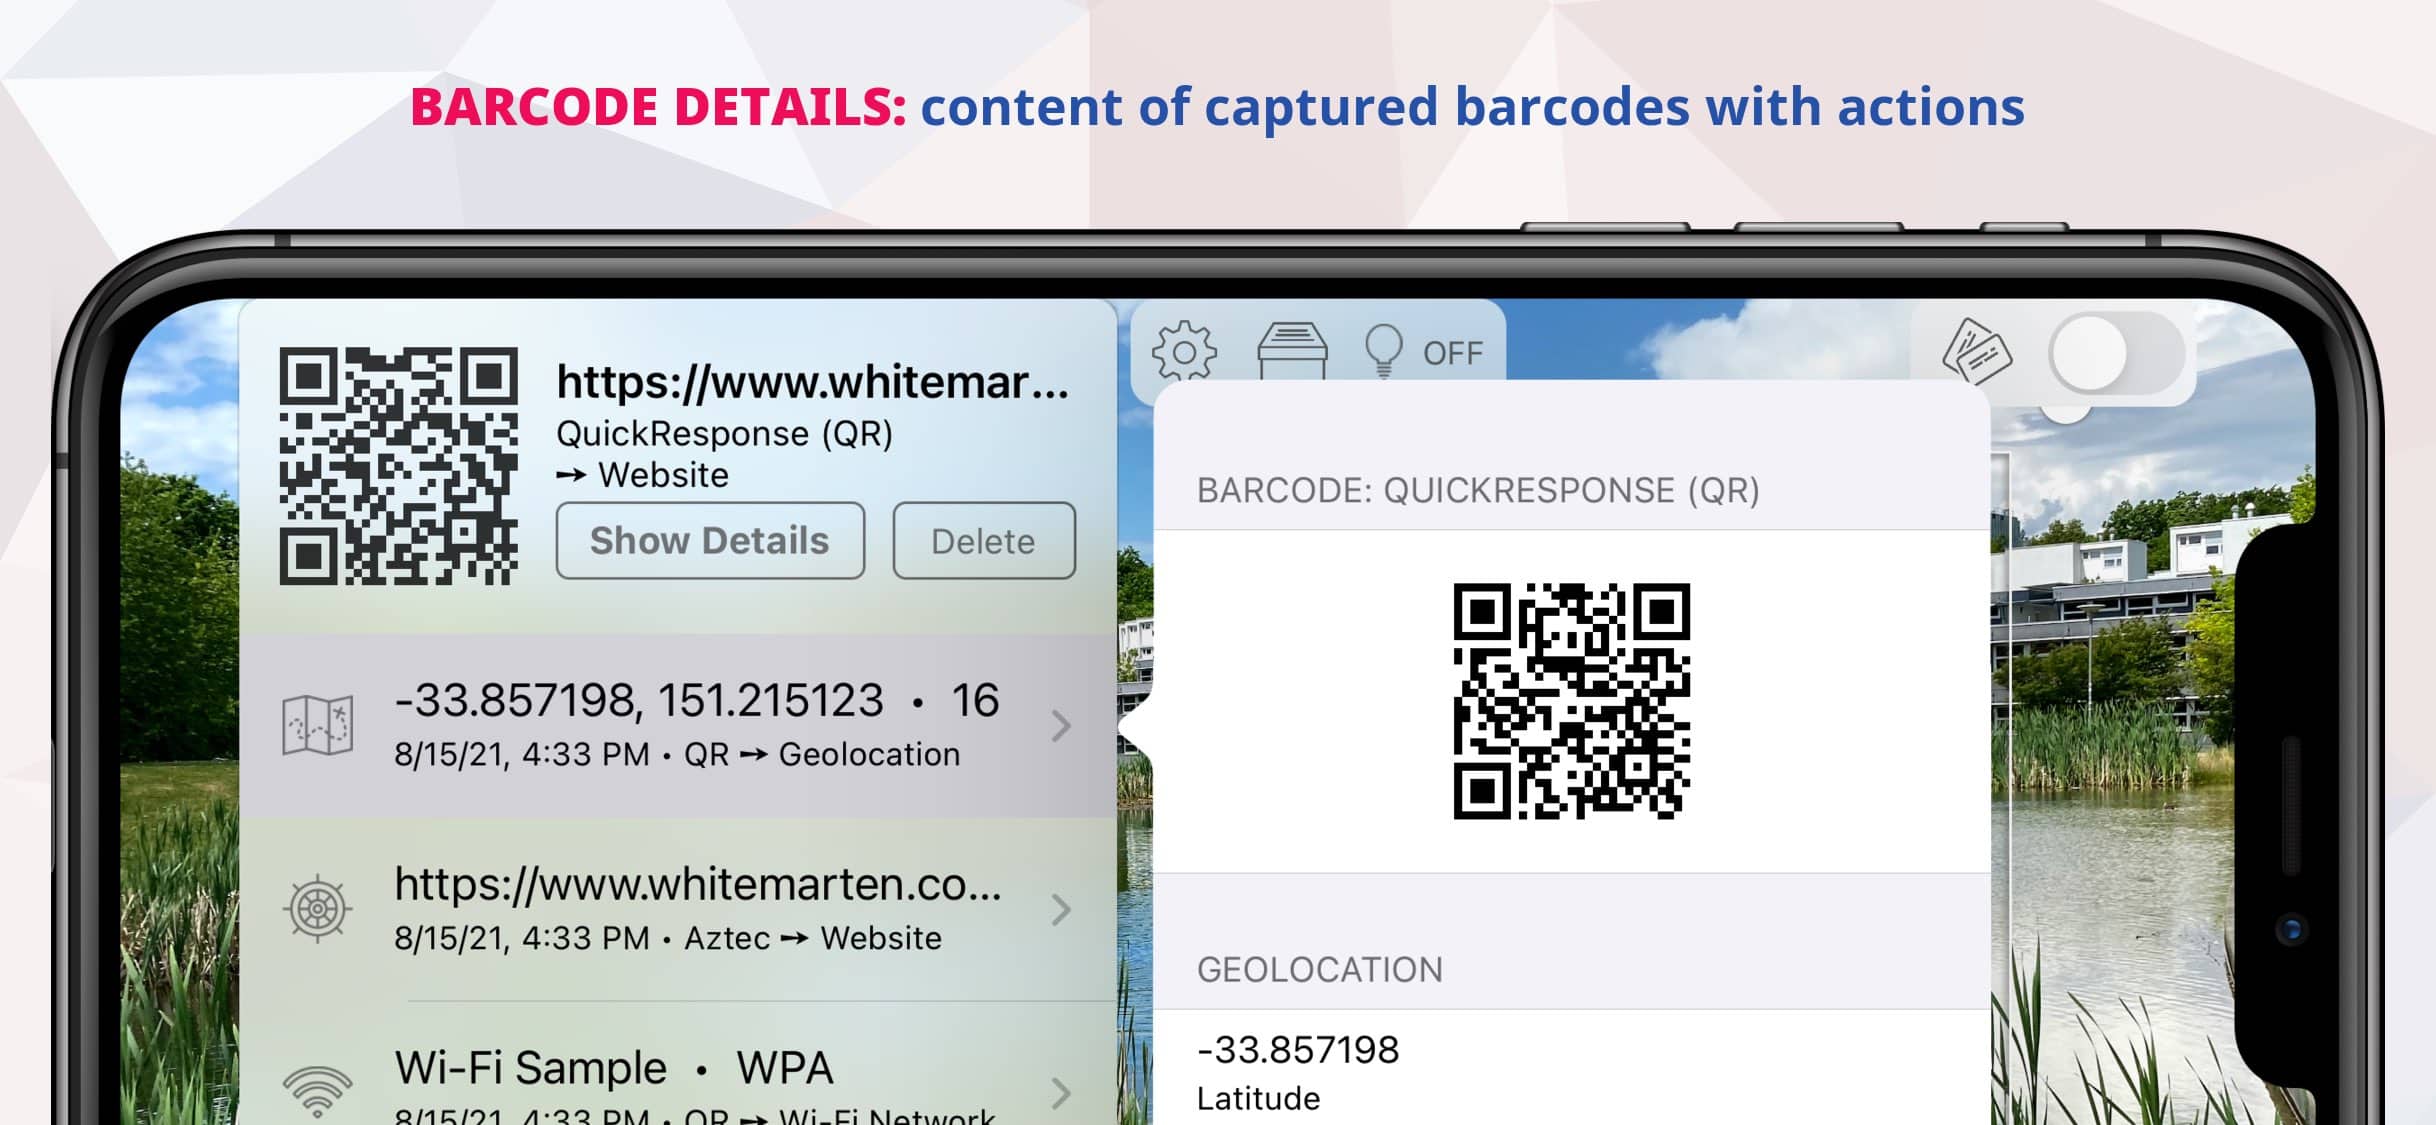
  • supported barcode content types: Wi-Fi Network, Bank Transfer, Crypto Currency (such as Bitcoin), Calendar Event, Contact, Geo Location, E-Mail, Phone Number, Text Message, Websites/URL, Ticket
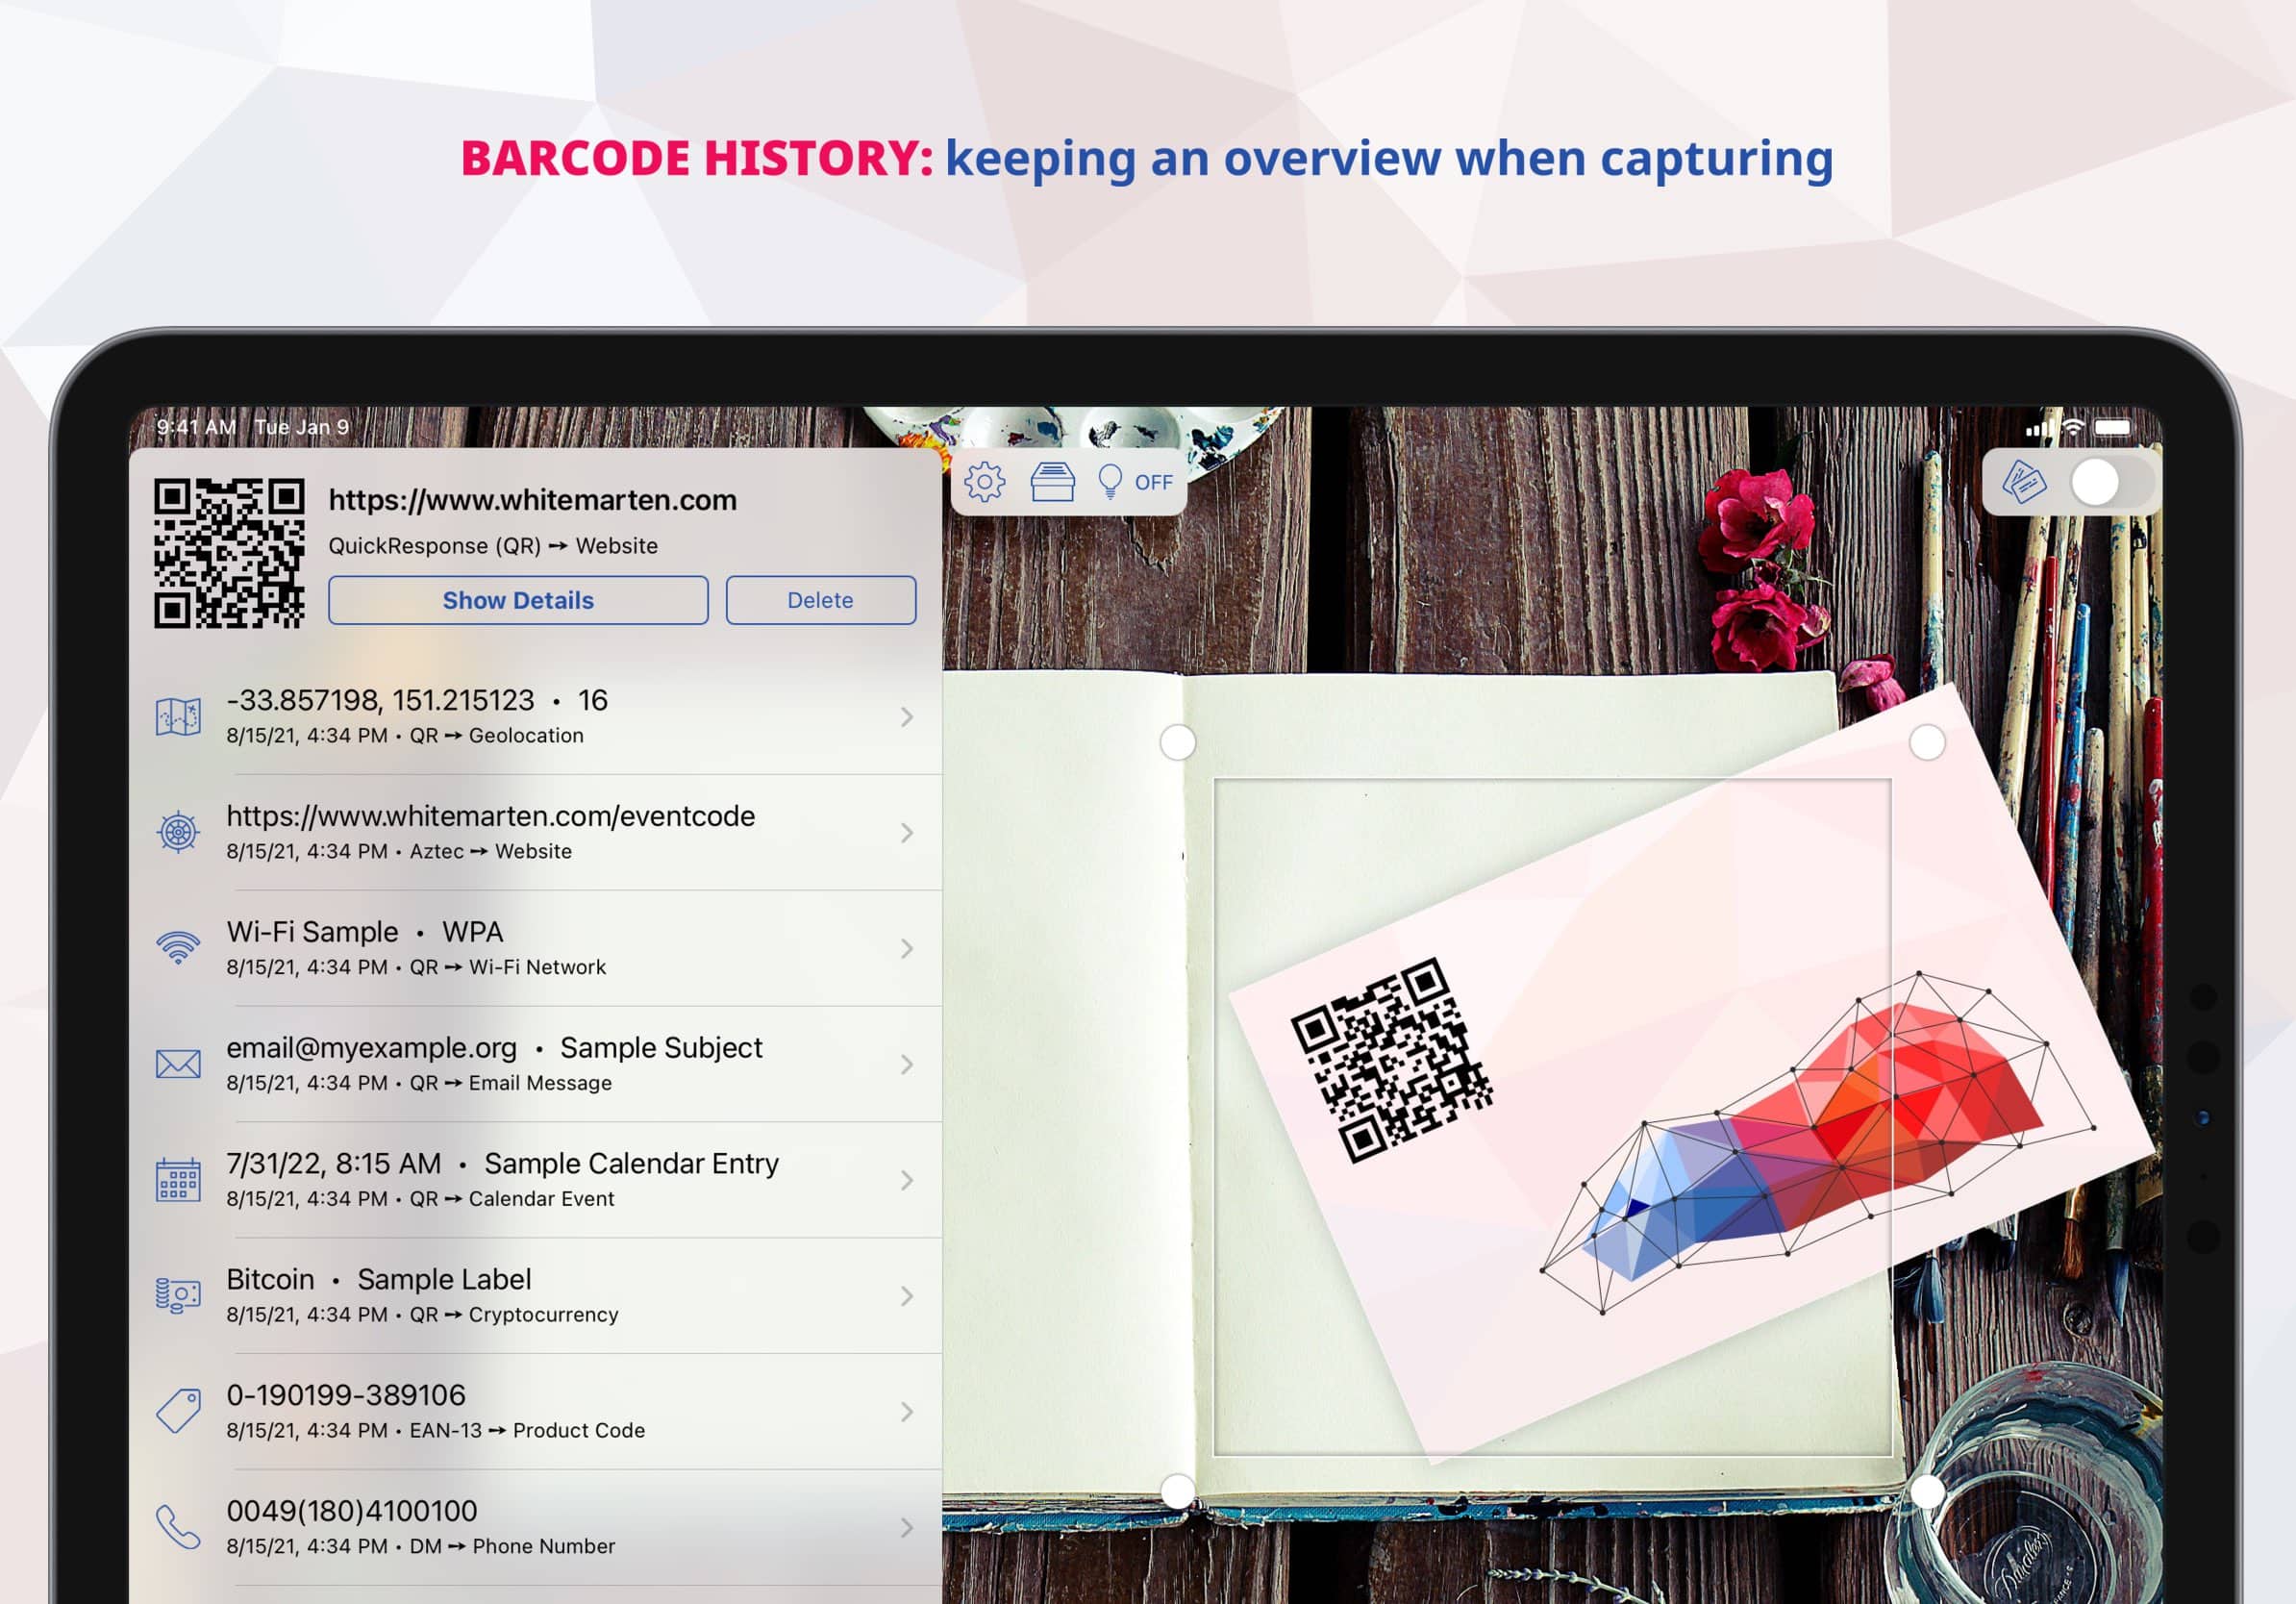
  • recording a history of detected barcodes
  • exporting history entries to CSV, JSON and XML files
  • performing content actions, such as opening URLs in a browser, adding contacts the Contacts App, adding events to the Calendar App, copying values to clipboard, dialing phone numbers, sending text messages, searching for results on the web (e.g. on Amazon or Google)
  • configuring custom online services for sending web queries with scanned values
  • customizing your individual barcode detection workflow with many useful options like playing sounds, ignoring duplicates and limiting the number of history entries
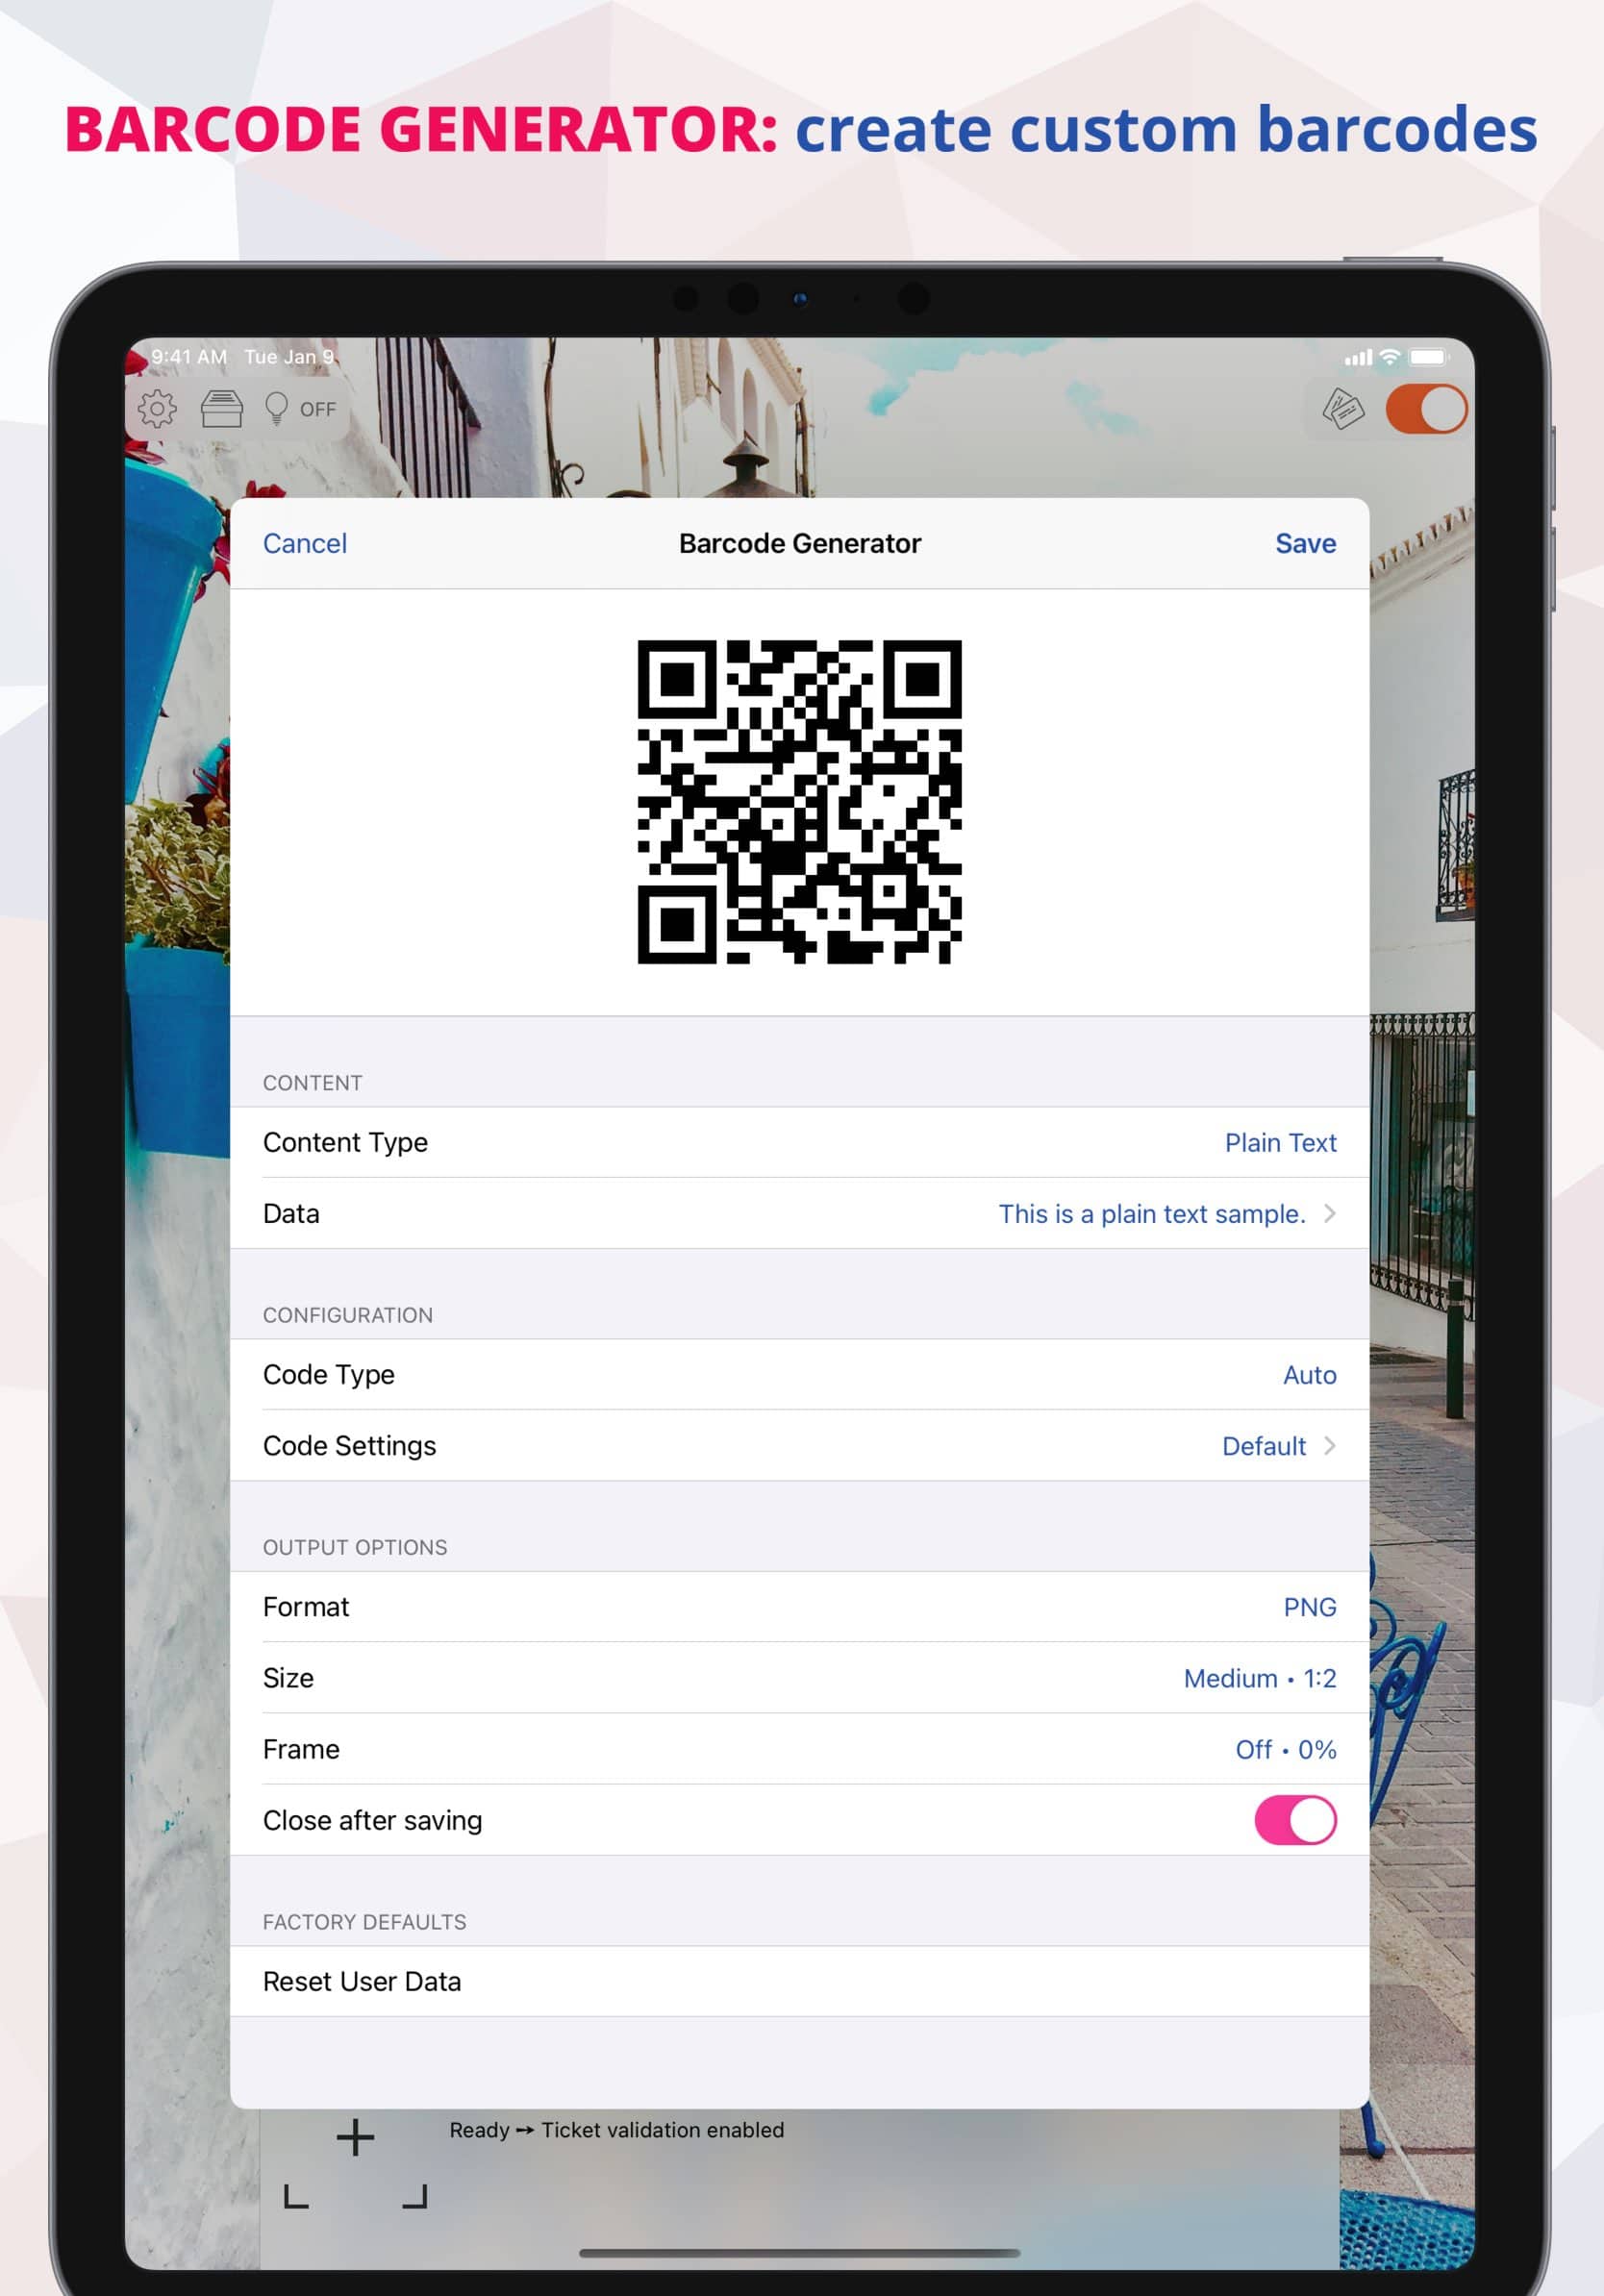
  • creating custom barcodes as PNG, JPEG or PDF with the integrated barcode generator in QR Code (QuickResponse), DataMatrix, PDF417, Code 128, Aztec format


iOS/iPadOS Features

  • Full Dark Mode Support
  • Universal App for iPhone & iPad
  • iOS File App Support
  • Support for Camera with LED Torch Light


macOS Features

  • Screen Capture: scan barcodes and tickets directly from the screen
  • Support for built-in camera or a USB camera


Further information can be found in the operating instructions.

Operating Instructions

Note: This manual will be updated on a regular basis. Corrections and changes are reserved. If necessary, make sure that the latest version of the app is installed on your device. Please contact support if you have any questions.

Revision: App version 1.8.0 or higher

Contents

  1. Introduction
  2. Capture Control
  3. Barcode Scanner
  4. Ticket Validation
  5. Event Manager
  6. Recurring Events / Multiple Validation
  7. Ticket Designer
  8. Remote Connection
  9. Photo Album Import / Image File Import
  10. Barcode Generator
  11. Settings

1. Introduction

Operating Modes

EventCode+ can be used in two operating modes.

  • In the first mode "Barcode Scanner", the camera can be used to capture common one-dimensional and two-dimensional barcodes. You may then view, process and archive the contents.
  • The second option is to use the "Ticket Validation" feature, which serves to verify and validate self-made tickets.

User Interface

  • The app will launch to the scanner view and display a live camera feed.
  • At the bottom of the screen is the history drawer. The details of the last scanned barcode will be displayed here.
    • By swiping the upper edge of the drawer, the history table can be expanded and a list of all history entries becomes visible.
    • When tapping an entry, a popover window appears displaying the entry's details.
    • This window also contains several buttons for performing individual content actions utilizing the barcode's payload (such as opening a URL in the browser or copying text to the clipboard).
    • The entries displayed in the history table depend on the operating mode which is currently enabled. There is a separate list for each mode ("Barcode Scanner" and "Ticket Validation").
  • In the center of the screen is the scanning area (a rectangle with four large dots). The app tries to detect all barcodes from the camera feed located inside of this scanning area.
    • As soon as a barcode is recognized, the scan area lights up briefly and a signal sounds.
    • The result of the recognition will be displayed immediately in the history drawer.
  • In the upper right corner is a slider button for switching between the two operating modes "Barcode Scanner" and "Ticket Validation". You'll also find a button with a ticket icon for opening the integrated event and ticket management.
    • The "Camera" and "Screen" buttons can be used to switch between camera and screen capture on macOS. For each of the two modes, a corresponding permission must be granted when used for the first time.
  • In the upper left corner is the torch light control (iOS/iPhoneOS only), the "Camera" and "Screen" buttons for selecting the input mode (macOS only) and a button with a gear icon to open the settings view.
    • The LED light (if present) on the back of your device can be used to illuminate the scanning area in several brightness levels. This ensures optimal barcode recognition even in a dark environment. Torch light control is only available on iOS/iPhoneOS and only if the device features an LED light.
    • The "Camera" and "Screen" buttons can be used to switch between camera and screen capture on macOS (see section "Capture Control"). For each of the two functions, an appropriate permission must be granted upon first use.
  • The scanner view may transition to a side-by-side layout.
    • This will display the history drawer on the left side, while moving the scan area the right side.
    • Switching occurs on iOS/iPadOS if the device is held in landscape orientation (provided that the rotation lock has not been enabled).
    • Switching occurs on macOS if the window is resized appropriately (and sidebar control is disabled).
    • The sidebar control options can be found in the "View" menu on the menu bar at the top of the screen (macOS only).
      • In "Auto" mode, the sidebar is automatically shown or hidden depending on the size of the main window.
      • If "Enabled" or "Disabled" is selected, the sidebar is forced to be permanently shown or hidden.

2. Capture Control

Input Mode Selection (macOS only)

  • On macOS, barcodes and tickets can be captured by using a built-in camera or through a camera connected via USB.
    • The camera capture mode is activated by clicking the button with the "Camera" icon in the upper left corner of the main window.
    • When accessing the camera for the first time, a dialog window will appear prompting the user to grant permission for accessing the camera. The permission may be adjusted later in the macOS settings.
  • Alternatively, barcodes and tickets can be scanned directly from the screen.
    • The screen capture mode is activated using the button with the "Screen" icon in the upper left corner of the main window.
    • The app requires a special permission for capturing screen contents. As long as the permission is missing, no other applications are visible to the app (only the desktop background without any application windows).
    • The permission must be granted in the macOS settings. If necessary, the app will show an informative dialog with a button that leads to the corresponding page in the system preferences.

Camera Capture

  • Barcodes are captured on iOS/iPhoneOS using a built-in camera.
  • On macOS, a built-in camera can be used if available. Alternatively, an external USB camera that has been properly detected and activated by the operating system may be employed.
    • Scanning speed and recognition performance strongly depend on the capabilities of the camera being used.
    • Make sure that a camera with sufficiently high resolution is used and that there is good lighting without any reflections at the point of capture.
  • If multiple cameras are available, the device that should be used can be specified in the app's settings (see section "Camera Configuration").

Screen Capture (macOS only)

  • Screen Capture records the macOS user interface, following the movement of the cursor. The output of the captured image is displayed within the main window of the app.
  • As soon as the cursor comes to rest for a short moment, the underlying image area is scanned for barcodes.
  • As long as the option key on the keyboard is pressed and held down, capturing will be frozen at the current location.
    • In this manner, the cursor can be moved to the desired location on the screen first and then evaluation may be started by releasing the key.
    • Alternatively, if the feature for applying barcodes automatically is disabled (see section "Apply Barcodes"), the recognition can be frozen after targeting a barcode at the desired screen location in order to perform manual confirmation in the app's main window.
  • Several zoom levels can be chosen for more precise detection (see section "Screen Capture (Settings)"). The active image area is enlarged accordingly and may appear pixelated.

3. Barcode Scanner

Overview

  • This mode is activated when the switch in the upper right corner has been shifted to the left (switch is grayed out).
  • All common barcodes such as QR codes from packagings, business cards or advertising materials can be captured in order to view and utilize their contents.
  • A current list of all supported code types can be found in the feature description of the app.

Functionality

  • Once a barcode is recognized by the camera, it will be stored in the history database.
  • Depending on the contents of the code, the app offers various actions in the history's detail view. The details view can be opened by tapping on the corresponding entry in the history drawer (see above).
  • Actions for special contents can be, for example:
    • connecting to a Wi-Fi network (for codes with Wi-Fi credentials)
    • adding an event to your calendar (for codes in iCalendar format)
    • adding contacts to the address book (for codes in VCard format)
    • showing a location on the map (for codes with coordinates)
    • placing a phone call or sending a text message (for codes with a phone number)
    • sending emails (for codes with an email address)
    • browsing a website (for codes with URLs)
    • performing a product search on the internet (for codes with UPC codes/product identifiers)
    • copying text to the clipboard
    • sending text and contents to a self-defined online service (see section "Online Services")

Configuration

  • The history can be deleted, exported or even turned off completely in the app's settings view. In this case detected barcodes will not be stored permanently anymore.

4. Ticket Validation

Overview

  • Ticket validation is enabled if the switch in the upper right corner has been shifted to the right (switch is displayed in color).
  • In this mode, self-made tickets can be verified and digitally validated.

Ticket Processing

  • Tickets are provided with a custom barcode containing a unique identification number (validation ID) in a special text format.
  • It's very easy to create tickets when using the integrated event manager. Alternatively, it is also possible to import pre-generated identification numbers from a file (e.g. XML). For more details, see the "Event Manager" section.

Functionality

  • Before the tickets can be processed, they must be entered into the database and assigned to an event. This event also has to be marked as "active" in the event manager.
  • When scanning a ticket, the outcome of its evaluation will be displayed in the history result view (at the top of the history drawer). The app verifies that the ticket is valid (i.e. whether the identification number is in the database) and checks if the ticket has expired or has already been validated before. It also displays additional information such as the name of the attendee.
  • Using the buttons in the result view, the ticket can be torn and thus marked as "validated".
  • If the ticket has already been validated or repeated validation is not permitted, a warning will be displayed instead when scanned.
  • Alternatively, the ticket can be discarded and the validation may be done at a later time (after scanning it again).

Further Options

  • The last step is not necessary if "Auto Tear" has been enabled in the settings (see section "Settings > Ticket Validation" for more details).
  • Verifying and validating tickets can also be carried out simultaneously with multiple devices (see section "Remote Connection").

5. Event Manager

Overview

  • The event manager can be opened from the scanner view by tapping the button with the ticket icon in the upper right corner.
  • The event manager can be used to create new events or edit existing events.
  • An event may hold a certain number of tickets, which can then be distributed to guests or attendees in order to perform accreditation or admission control at the venue.
  • If desired, an individual layout can be defined for the tickets using the integrated ticket designer (see section "Ticket Designer").

Managing Events

  • Existing events will be displayed in a list grouped by their status, which can be "active" or "inactive".
  • New events can be created by tapping the "plus" icon in the upper right corner.
  • By "swiping left" on a list entry, more options will be displayed ("delete", "activate" and "deactivate").
  • Tapping on an entry opens the event's details view. Here you can specify the event's title and a short info text to be printed on the tickets.
  • In addition, further optional properties such as the validity period can be set.
    • The validity period may be defined for the entire event or for each ticket individually (in the ticket details view).
    • If both values are set, either the overlapping of the time periods or primarily the restriction of the event applies (in case there is a conflict).
    • Selecting "Ignore Time" limits ticket labeling and validation to the date (e.g. for all-day events). If time and/or date are to be used exclusively for labeling, date verification can be turned off for Ticket Validation in the Settings.
    • The "Dating Mode" will determine the type of text output for the date label (see section "Tickets with Date Label").

Using Tickets

  • The ticket validation can be carried out either with tickets that were generated and designed entirely by the app or with tickets that were created externally.
    • For the latter, tickets must be provided with compatible barcodes. The identification numbers (validation IDs) contained therein must have been imported into an event in advance.
  • Events have to be marked as "active" in the event manager in order to have their tickets taken into account when performing ticket validation tasks.

Tickets with Date Label (Dating)

  • If events and/or tickets are provided with a start or end date, a date label ("dating") can be printed.
  • The type of dating can be defined individually for each event using the "Dating mode".
  • The modes "Expression" and "Listing" are available as presets.
    • Depending on the information available in each case (e.g. start and end time, number of days), a corresponding output is automatically compiled for every ticket using various text blocks.
    • If changes to the wording of certain text blocks are desired, these can be adjusted in the event's details in the "Dating" section under "Formats".
    • Certain formats contain a placeholder (represented by three consecutive dollar signs "$$$"). These placeholders must be kept, i.e. appear at least once within the text block. If a placeholder is missing, it is automatically added at the end.
  • Another alternative is to define a dynamic labeling pattern in the "Custom" dating mode.
    • A dating pattern is a markup string consisting of text sections that can be enhanced with variables for inserting individual ticket data. In addition, certain tag sections for control structures (e.g. conditions) are available.
    • The associated editor can be accessed from the event details in the "Dating" area under "Patterns". The latter is only visible if the dating mode "Custom" has been selected in the section "Presets" at the top.
    • After entering the editor, the archive button (top left in the navigation bar) can be used to load and save your own patterns. In addition, sample patterns may be opened or the pattern of another event can be copied.
    • In the lower area of the editor is a text field for entering the pattern. The upper area features a preview window, which displays the result of the pattern output.
    • If the event already contains tickets, this data will be used for the preview. If the event does not contain any tickets yet, sample data will be used. The ticket or example can be switched using the arrow buttons (top right in the navigation bar).
    • Markup tags may be inserted with the "Variable" and "Control" buttons. When tapped, a popup menu opens, which displays the available options for selection with a brief description of their particular functionality.
      • Each control tag is available in the variants "wrapping" and "non-wrapping". Their respective function is identical, but wrapping tags may offer better readability, e.g. for longer patterns, because each condition can be written on a new line and hence allows structuring.
      • In the final output, the contents of wrapping tags will be inserted directly into the preceding and following text without line breaks (if line breaks had been entered at these places in the pattern).

Data Export

  • If you wish to create a backup or if you would like to process the app-generated identification numbers externally, either ticket lists or complete events can be exported in CSV, JSON and XML format. It is also possible to reimport these files later.
    • Please add a demo event (see section "Samples & Demo Data") and export it if you would like to get a better understanding of the data structure.

6. Ticket Designer

Overview

  • The tickets of each event can be customized with an individual design by applying a self-defined layout.
  • You'll find these features in the event's details view when scrolling to the "Tickets & Design" section.
  • The layout options include adjustments for paper size, ticket dimensions or font sizes and the possibility of setting a custom logo.

Adding Tickets

  • The tickets of each event can be accessed from the event's details view by tapping the "Manage" button in the section "Tickets & Design" .
  • You may first create the tickets by using the "plus" icon and then edit them individually or as a block (using the "selection" button).
    • Alternatively, tickets (or even complete events) can be imported from a file in CSV, JSON or XML format.
    • Please add a demo event (see section "Samples & Demo Data") and export if you would like to get a better understanding of the data structure.

Customizing Tickets

  • Each ticket requires a unique identification number called "validation ID".
    • If the tickets are generated by the app, an appropriate ID will be assigned automatically. This ID is supposed to be unique (even across different devices).
    • If the database contains multiple tickets with an identical ID within all active events, an error will be issued when a ticket with this particular ID is scanned during ticket validation.
  • The identification number will appear in the form of a barcode on the ticket. The barcode's properties can be defined using the "Code Type" setting.
    • If "Auto" is selected as code type, any type of code is allowed during ticket validation (see also additional option "No Barcode Type Restriction" in the "Settings" section).
    • The default code type (usually QR code) will be used in "Auto" mode when outputting tickets.

Ticket Numbering / Implementing Seating Plans

  • When creating tickets, the ticket names can be enhanced with single or multi-level numbering.
  • This enables quickly creating tickets for seating plans with different areas, stagings or categories.
  • It is also possible to update the numbering of several or all tickets simultaneously by using the edit function after selecting the corresponding items in the ticket list.
Sequential Numbering
  • A basic sequential numbering will append a consecutive number to the default name.
    • This number reflects the ticket's index in the series of all tickets added to the event.
  • This numbering type requires to specify the amount of desired tickets.
Custom Numbering
  • The custom numbering is based on a pattern specification that can contain multiple variable fields for number and letter sequences or ranges.
  • As an example, the pattern "Row: [A-C] – Seat: [1-10]" generates a total of 30 tickets in rows A to C, each with seat numbers from 1 to 10.
    • The expressions in square brackets each represent an interval that is to be traversed when generating the tickets.
    • Any ascending series in the range of A-Z (uppercase letters), a-z (lowercase letters) and 0-10000 (numbers) are possible.
      • There is no explicit upper limit for number ranges. However, a system-dependent maximum number must not be exceeded. In this case, the app will issue a warning.
      • Numerical ranges can be prefixed with leading zeros, for example "[001-100]".
    • Alternatively, enumerations (separated by commas) consisting of ranges and any characters in any order are permitted, for example "[A,I,E,O,U,5,3,$,😀]" or mixed "[1-12,14-20,99,X]".
  • The use of multiple expressions within a pattern specification leads to nesting and multiplication of tickets.
    • Please note that this can quickly result in a very large number of tickets. In this case, the app will issue a warning.
  • If, in special cases, square brackets should actually appear in the name, the characters can be marked with a preceding backslash, for example "\[" or "\]".
    • This makes clear that the bracket does not belong to a range expression which is supposed to be traversed.

Layout & Page Setup

  • Multiple tickets can be printed together on one page. Alternatively, you can also output them as single tickets.
  • You may choose from standard paper formats or enter a custom page size.
  • For positioning the tickets on the page, the number of rows and columns can be specified. Furthermore, the page margins can be adjusted.
  • If the "Auto-Format" option "Single Ticket" has been selected, layout options and page sizes are automatically set to optimal values in order to create pages that fit exactly for a single ticket.
    • Manual changes to these settings are only possible if "Auto-Format" was set to "Off".

Design Template

  • A selection of predefined scheme types is available for customizing the template.
    • Alignment, width and height can be adjusted for each scheme type.
  • Every scheme has a field for logo, title, name, date and additional information.
    • Each field can be resized or hidden.
    • You may also insert a custom image or a logo.
  • In addition, every ticket will always contain a barcode. Position and content of the barcode are determined automatically.

Output

  • When generating an output, the template will be merged with the event's ticket data.
  • The fields on each ticket are filled with the corresponding record and a barcode of the selected type and with the specified content will be added.
  • The final tickets can either be printed directly (using AirPrint) or exported as a PDF if they shall be sent by email or are meant to be processed in some other way.
    • Tickets (or ticket sheets respectively) can be generated as multi-page documents or as separate PDF files.
    • You may also preview the ticket sheets directly in the app before generating the output.
  • Tickets can either be issued individually or in full for an entire event on multiple sheets.
    • If not all tickets should be contained (e.g. for reprints), these can be excluded from general output.
    • For this purpose, the "Included" flag in the "General Output" section may be removed (available in the ticket details and in the "Edit Tickets" dialog).
  • In the output dialog the image resolution can be selected at which logo graphics should appear in the PDF file.
    • Regardless of the selection, the result in the output cannot be higher than the resolution of the logo template.
    • The default resolution is 150 dpi.

7. Recurring Events / Multiple Validation

Overview

  • A repeat option can be set individually for each ticket. This means that the ticket will be accepted multiple times when validated.
  • The repeat options may also be adjusted later on.
  • It is also possible to update several or all tickets simultaneously by using the edit function after selecting the corresponding items in the ticket list.
  • Different use cases can be accomplished by combining the options "repeat type" and "repeat limit".

Repeat Types

  • Tickets with a repeat type of "any time" can be redeemed at any time within the validity period (if applicable).
  • If the repeat type is "once daily", the ticket may be redeemed no more than one time per day.
  • For the repeat type "same day", the ticket may only be redeemed again on the day of the first validation.

Repeat Limit

  • A ticket with the limit option "unlimited" may be redeemed as often as desired within the scope of the repeat type.
  • By setting a repeat limit, the maximum number of validations is restricted.
  • The repeat limit always refers to the number of redemptions after the first validation.
    • The total number of possible validations is always "Limit + 1", i.e. one more than the limit.

Repetition Logs

  • The repeated use of a ticket after the first validation will be recorded in the repetition log.
  • The repetition log of each ticket can be viewed in its ticket details.
  • Only repeated validations can be found in the logs.
    • The original tear date will be recorded separately and can also be viewed in the ticket details.
  • Individual entries may be deleted manually, for example in order to correct erroneous validations or to issue refunds.
    • It is also possible to delete/reset the repetition logs of several or all tickets simultaneously by using the edit function after selecting the corresponding items in the ticket list.

Season Tickets / Punch Cards / Day Tickets

  • A season ticket may be implemented with the repeat type "any time" and the limit option "unlimited".
  • A "ten time punch card" or pass for ten visits can be defined with a repeat limit of "9" and the desired repetition type.
  • A day ticket (giving the option to re-enter) is possible with the repeat type "same day".

Attendance Check / Attendance List

  • Keeping attendance lists becomes very easy by creating a ticket for each participant and setting the ticket to multiple validation.
  • The repeat type "once daily" can be useful to avoid multiple registrations when performing an attendance check.
  • A special export for creating attendance lists is available from the event details ("Export Attendance List").
    • The export can be done in CSV, XML or JSON format. In CSV format, each registration date is output as a separate column.
    • By selecting an accuracy of "same day" or "same hour" multiple registrations (if permitted) can be grouped into one entry.
    • It is also possible to have the number of registrations that occurred in the selected interval entered for each participant.
    • Participants who have not registered at all ("no-shows") may be excluded from the export.

8. Remote Connection

Technical Requirements

  • In order to allow ticket validation at different entry points, multiple devices can be connected using the multi-peer feature.
  • A single device acts as "master" by sharing its database with other devices which operate as "clients".
    • The connection will be established using Bluetooth and also WLAN if the devices are part of the same network.
    • The range and quality of the wireless connection depends on the environmental conditions and the individual configuration of the infrastructure being used.
    • A maximum of 7 clients can join one master.
    • Each client can only be attached to one master at a time.
    • The app must be installed an all participating devices and remain opened on both the master and the client to keep the connection active.

Configuration

  • The remote connection can be configured in the app's settings (see section "Settings").
  • The user chooses whether his device should operate as master or client.
  • The client uses the "Join" button to signal that it is ready to connect to a master.
    • The client can detach itself later if it does not wish to be reconnected automatically to this particular master anymore.
  • The master can add clients if they are visible and ready to join.
    • The client must confirm the procedure once when the master tries to establish a connection for the first time.
    • The master can remove joined clients if they should not be able to connect automatically anymore or if one of the available spots is supposed to be assigned to another client.

Functionality

  • When scanning a ticket on a client device, it will send the identification number (validation ID) to its master and request the ticket's status and details.
    • A client may also maintain a local database with its own events and tickets. However, these will not be considered as long as the remote connection remains enabled in the app's settings.
  • The master itself can also be used for ticket validation, but must stay in the reception area of its clients or the network.
    • If the connection is interrupted, an attempt will be made to automatically re-establish the connection as soon as the master or client comes back into range or becomes visible again.
  • While the connection to the master is active, the client will show the mode switch in the upper right corner in greenish color. If the connection has been lost, the switch is displayed in a reddish color.

9. Photo Album Import / Image File Import

Overview

  • The photo album import can be used to capture barcodes contained in previously taken photos or saved images (e.g. from emails or the browser).
  • This function is accessible via the button with the file box icon (between gear icon and lamp control) in the upper left corner.
  • When tapped, a pop-up window appears below it and inside you will find the menu item "Photo Album Import".
  • On macOS, this function is called "image file import". This allows image files to be loaded from the hard drive.
  • The import process will be explained in further detail below.

Open Image

  • After starting the photo album import, a welcome window is displayed. By tapping the large icon in the center of the screen labeled "Open Image From Album", the first image can be loaded.
  • Subsequently, loading another image is possible by tapping the "Open Image" button in the lower left corner.
  • If an image has already been loaded before, and you wish to run it again with other options, a pop-up also offers the selection "Previous Image (Original)" for cropping the original image again and "Current Image (Cropped)" if the image has already been cropped.

Import Options

Scan Precision
  • Barcode recognition is a computationally intensive process and can take a while under certain circumstances (especially on older devices). Therefore, to minimize the waiting, an optimized method is used. This allows for very fast recognition of most barcodes.
  • If an image contains very small barcodes or many barcodes at once, this method may not be sufficient to find all elements at the first attempt. By increasing the scanning precision, the image will be searched more thoroughly, but this may also take more time.
Cropping Dialog
  • If an image contains several barcodes, but there is only interest in certain elements, the search can be restricted to this area by cropping the image beforehand. At the same time, recognition may be accelerated (especially with higher scanning precision) when cropping areas of the image which do not contain relevant content.

Selecting Elements

  • After completing the recognition process, the selected image will be displayed in the import window. All recognized Barcodes are highlighted in green and marked with a white checkmark.
  • Tapping one of the green areas selects or deselects the underlying barcode for later import. When deselecting an item, the color of the area changes to red and the checkmark disappears.
  • Each recognized barcode also has a button with an "eye" icon. When tapped, further details regarding the barcode's content will be displayed.
  • In addition, the "Show List" button may be used to display all recognized barcodes more conveniently as a list.
  • In list view, the content of every barcode is displayed in a separate line. By tapping a list entry, further details will be presented. The import selection can be altered by tapping the "Edit" button (top right corner).

Execute Import

  • The process can be completed by selecting the "Import" button at the top right of the image view.
  • All selected elements will then be inserted at the top of the scan history and can then be used in the same way as barcodes that have been captured by the camera.
  • If the image contains multiple identical barcodes or barcodes with the same content and all of them are selected, these will also appear multiple times in the history.
  • The subsequent confirmation dialog offers a "Finish" button to close the photo album import directly. If you wish to process more images, you may select the "Continue" option.

Notes

  • Certain barcode types (linear barcodes) have only one dimension (height or width). Therefore, they may be recognized multiple times if they are stretched or interrupted. In this case, you can manually deselect duplicates before importing.
  • Most barcode types have an error correction mechanism so that partial or truncated barcodes can be recognized as corrupted and be ignored. Sometimes in extreme cases, this may not work, especially with linear barcodes that may still contain readable information even if partially recognized. In this situation, you can manually deselect false detections (e.g. in the border area).

10. Barcode Generator

Overview

  • The barcode generator converts a given text into a machine-readable, one-dimensional (1D) or two-dimensional (2D) barcode.
  • With regard to the text content, various well-established formats are available (e.g. for transferring phone numbers, email addresses or calendar events) with certain data fields structured according to the respective standard.
  • The barcode generator can be accessed via the button with the file box icon (between the gear icon and the lamp control) in the upper left corner.
  • When tapped, a pop-up window appears below it and inside you will find the menu item "Barcode Generator".

Providing Content

  • The content type determines the data structure of the encoded text for which there are different formats (e.g. calendar, appointment, business card, WI-FI network). If no specific format is desired, a plain text can also be entered. A full list of available content types can be found in the feature description of the app.
  • This selection is only available for 2D barcodes. Please also note that for technical reasons, only certain characters are allowed when entering text in any format (see next section).
  • Depending on the selected content type, different data fields are available. These can be edited when tapping the "Data" button.
  • Some data fields allow entering a user-defined text, others only numbers or picking a selection from a list of predefined values. Certain data fields are optional, others are mandatory (marked in bold) in order to yield a useful result.
  • When selecting a different content type, all fields will be populated with suitable examples. The "Clear" button can be used to empty all fields or reset them to default values.

Selecting Barcode Types

  • The barcode type determines the look of the generated barcode. One-dimensional barcodes (e.g. classic barcodes found on product packaging) are read along one axis only and usually do not offer much storage space. For these, only the input of a simple text is possible, i.e. there is no meaningful use for structured content types.
  • For situations in which a higher data volume is desired, two-dimensional barcodes (e.g. QR codes or DataMatrix) are used. These consist of multiple lines and usually have a rectangular block shape.
  • Only a limited range of characters can be encoded in each barcode type. The "ASCII encoding" (for 1D types) allows for numbers, letters (without mutations), punctuation marks and a few special characters. With the "ISO 8859-1" encoding (also called "Latin-1", for 2D types), mutated letters and other special characters are possible.
  • If a data field contains an invalid character, the barcode cannot be generated and a corresponding message will be displayed. These characters must be deleted or replaced before the procedure can be completed.
  • Each barcode type can be customized with individual code settings (e.g. error correction or geometric shape). These settings usually change the appearance of the final barcode. In some cases, the barcode also grows bigger as the effective data volume increases, e.g. because of a higher error correction level inserting more redundant data. Error correction helps to recognize a barcode even if it is partially illegible (e.g. due to dirt).

Output Options

  • The final barcodes can be issued as PNG, JPEG or PDF files.
  • The output can occur in different sizes or be supplied with an empty frame. When choosing the size "Original (1:1)", each code point takes exactly one pixel. This is useful, for example, if the image is supposed to be scaled afterwards without interpolation.
  • If the option "Close after saving" is deactivated, the window remains open after saving so that further barcodes can be generated subsequently.

Saving The Result

  • The result can be stored by tapping the "Save" button (top right corner).
  • Different targets are available for output depending on the capabilities of your device (e.g. photo album, sending email or cloud services).
  • Some targets will only be displayed if the system is meeting the requirements (i.e. an email account or cloud service has been set up in the device settings, etc.).

11. Settings

Overview

  • The settings can be accessed by tapping the button with the gear icon in the upper left corner.
  • On macOS, the camera configuration and screen capture options are accessible from the button with the gear icon in the main window. All other settings can be found in the menu bar at the top of the screen.
  • Below you will find a short summary of the most important features.

General

  • App Permissions
    • The app uses several device features which require the user's permission.
    • The app cannot be used without the permission to access the camera.
    • All other permissions (calendar, contacts, etc.) are optional but may limit some of the app's functionalities.
  • Samples & Demo Data
    • The app is shipped with sample data for demonstration purposes, so that its features can be tested immediately.
    • The sample data can be removed completely or added again later if desired.
  • Feedback / Report a Problem
    • If you have questions or need assistance, you can contact the support team here.
    • The respective support conditions and data protection regulations apply. The relevant information will be displayed to you automatically before using this function. Further details can also be found on our website.

Camera Configuration

  • Input device
    • If the system is equipped with multiple cameras (e.g. front/rear), the preferred device can be specified here.
    • With the "Auto" option, the system's default camera will be determined automatically.
    • Some iPhone and iPad models also have multiple back cameras, usually with different lenses. If a camera with a wide-angle lens is selected, barcode recognition may not be possible due to distortion in case the camera is too close to the object.
    • On macOS, built-in cameras and cameras connected via USB are listed. USB cameras must have been properly recognized by the operating system and, if necessary, the required drivers must be installed so that the device shows up in the app.
  • Mirroring
    • Some cameras (usually webcams or front-facing cameras on mobile devices) automatically mirror the output to facilitate user interaction. If this is undesirable for the intended use, this feature can be disabled.
      • In "Auto" mode, the respective camera's default is used.
      • When selecting "Enabled" or "Disabled", the preferred mirroring is forced and applied accordingly (if supported by the current camera).

Screen Capture (macOS only)

  • Zoom
    • The active image section for screen capture can be enlarged in several zoom levels.

Remote Connection

  • Enabled / Mode
    • Multiple devices can be connected as master/client for distributed ticket validation (see section "Remote Connection").
    • If this feature is enabled, clients will use the master's database when evaluating tickets during validation. A master in turn allows clients to access its database.
  • Setup
    • According to the selected mode, the required steps for pairing your devices can be performed here.
    • The name of a master or client will be determined automatically by using the device name. If desired, the name can later be changed manually.

History

  • Recording
    • If deactivated, the contents of scanned barcodes will not be stored permanently (history is turned off).
  • Entries Limit
    • When the maximum number of entries in the history is reached, older entries are automatically deleted.
  • Allow Duplicates
    • If deactivated, barcodes with identical content will not be saved in the history (except when scanned for the first time). Capturing the same barcode repeatedly (with matching code type and content) will not create an additional entry.
    • Only available if barcodes are applied automatically (see section "Apply Barcodes").
  • Access Original Text
    • Each barcode contains a raw text. If it is a known format, the content will be parsed and displayed in a structured fashion.
    • After activating this option, the raw text can also be viewed (but it may be difficult to read).
  • Export
    • The history entries can be exported in structured form if you wish to archive them or process the data externally.
    • The data can be exported in CSV, JSON and XML format.
    • Please add the sample entries to the history (see section "Samples & Demo Data") and export it if you would like to get a better understanding of the data structure.
    • You can view further details for all export options directly inside the app when tapping the respective label in the export dialog.
  • Clear All Entries
    • The entire history can be deleted here.
    • Individual entries can also be removed directly in the history drawer by "swiping" an entry to the left.

Content Actions

  • Use Internal Browser
    • URLs can be displayed in an internal browser window without leaving the app. If this option is disabled, URLs will open in an external browser app on your device (such as Safari) instead.
  • External Services
    • The app offers direct access to third-party services (e.g. Amazon search and Google search) when performing certain content actions.
    • In this case, the data will be sent to the respective third-party provider. By activating this function, you confirm that sharing this data happens with your consent.

Custom Online Services

  • Captured content can also be used with online services you have set up yourself.
  • In this case the request is transmitted to a server as part of a predefined URL. The exact position of the request within the URL can be configured by setting a prefix and suffix.

Scanning

  • Apply Barcodes
    • Auto: Detected barcodes will be added to the history immediately.
    • Manual: A preview will be displayed in the scan area for each detected barcode. Only an additional tap on the scan area will apply the result to the history.
  • Fast Detection
    • Multiple barcodes can be captured in quick succession without a short recognition pause.
    • In certain situations, undesired false recognitions may occur, for example, if codes are located very close to each other and there was not enough time to position the camera properly.
  • Optimized for Close Range
    • If enabled, barcodes are expected to be scanned on surfaces that are relatively close to the camera (distance approx. 10-20 cm / 4-8 inches).

Ticket Validation

  • No Barcode Type Restriction
    • During ticket validation, an identification number is associated with a specific ticket even if the expected code type does not match (for example, the ticket was set up as a QR code, but the scanned code was in Datamatrix format).
  • Time-Independent Admission
    • The timestamp entered for the event or ticket can be ignored for ticket validation, e.g. if admission should start earlier or this specification only serves as a guideline or ticket label.
    • When using remote connections (see section "Remote Connection"), this setting may be configured separately for each client.
  • Auto Tear
    • Valid tickets will be torn automatically and immediately invalidated in the database when scanned.

Questions about our products? Need support?


Please don't hesitate to contact us if there is anything we can help you with!